
How to add, change, or clear autofill data
The autofill feature available in Internet browsers is very useful as it can autopopulate form fields with data, such as addresses or credit card information. Sometimes, saved autofill data is misspelled, outdated, or missing. The following sections show you how to add, change, or clear autofill data. To proceed, select your Internet browser from the list below and follow the steps.

Google Chrome
To modify your autofill data in Google Chrome, follow the directions in these sections. The first section shows you how to access the autofill options, and the others show you how to edit them.
Access autofill options
- Open the Google Chrome browser.
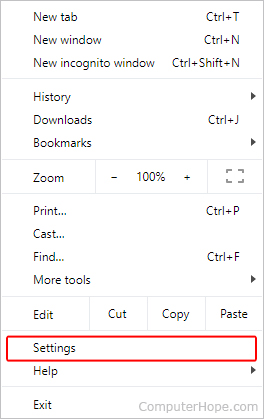
- Click the
 icon in the upper-right corner of the browser window.
 - In the drop-down menu, select Settings.
- On the left side of the screen, click the Autofill selector.
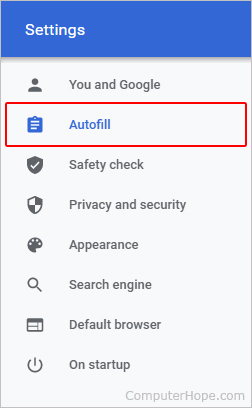
- In the middle of the screen, under the Autofill section, you are presented with three choices: Passwords, Payment methods, and Addresses and more.
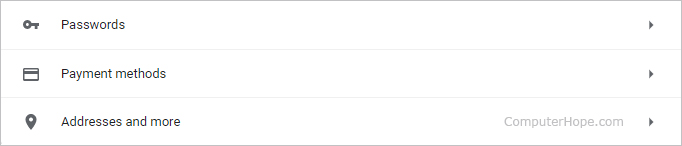
- Once you know which autofill item you'd like to edit, find it in the sections below and follow the instructions.
Passwords
The following link shows you how to manage your browser passwords in Chrome.
Payment methods
The following section contains details on the payment method autofill options in Chrome.
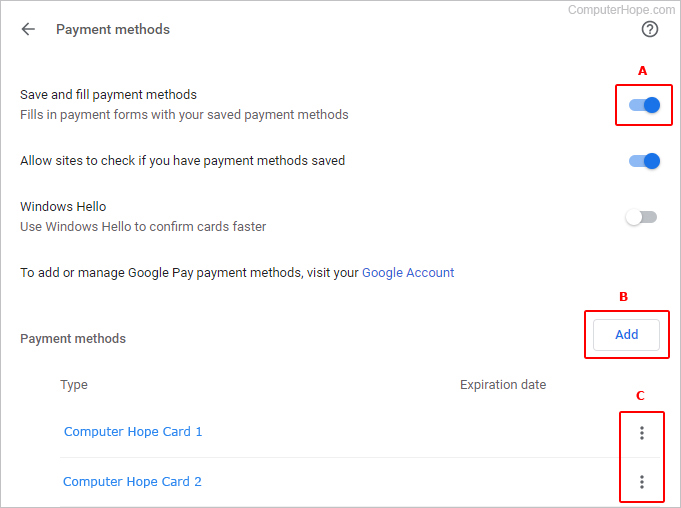
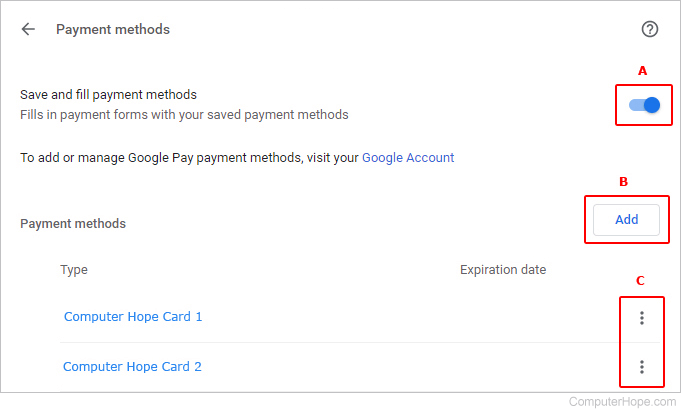
Save and fill payment methods
Use the toggle switch next to Save and fill payment methods to choose whether or not Chrome should save and autopopulate your payment information going forward (A).
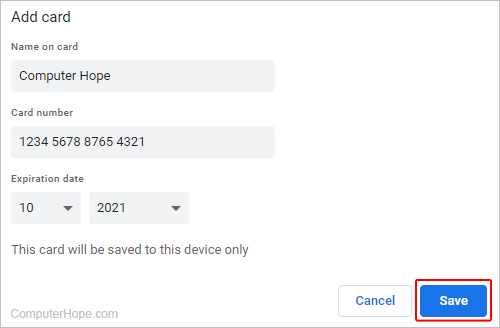
Add payment method
To input new payment information, click the Add button (B) and type in the appropriate information. When you've finished, click the Save button.
Edit payment methods
To edit or remove payment info, click the ![]() icon next to one of the entries (B), and select Edit or Remove from the drop-down menu.
icon next to one of the entries (B), and select Edit or Remove from the drop-down menu.

Addresses and more
The following section contains details on the address autofill options in Chrome.
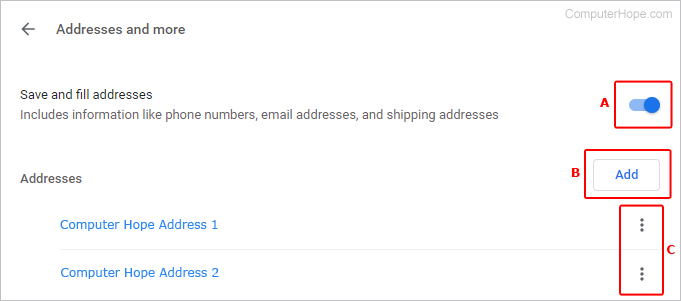
Save and fill addresses
Use the toggle switch next to Save and fill addresses to choose whether or not Chrome should save and autopopulate your address information going forward (A).
Adding addresses
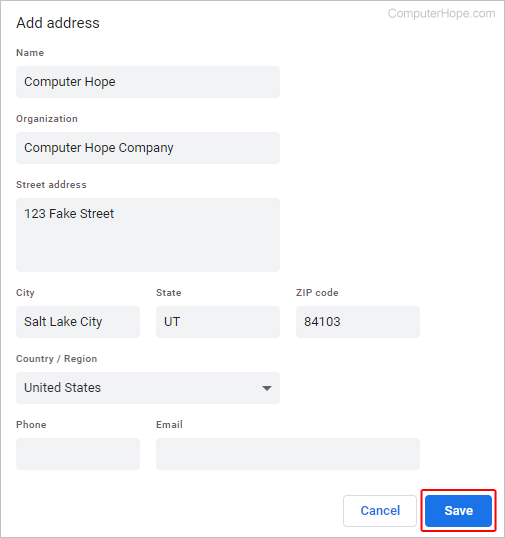
To input new address information, click the Add button (B) and type in the appropriate information. In this area you'll also find an autofill for the phone number and e-mail address. When you've finished, click the Save button.
Remove or edit an address
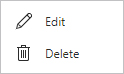
To edit or remove address info, click the ![]() icon next to one of the entries (C), and select Edit or Remove from the drop-down menu.
icon next to one of the entries (C), and select Edit or Remove from the drop-down menu.

Mozilla Firefox
Firefox's autofill capabilities for forms are limited to addresses only. To learn how to access, add, modify, and delete your autofill data in Firefox, follow these steps.
Access autofill options
- Open the Firefox browser.
- Click the
 button in the upper-right corner of the browser window.
 - Select Settings (called Preferences in macOS and Linux).
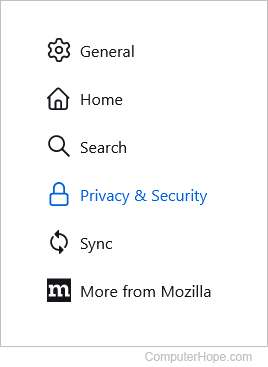
- In the next window, select the Privacy & Security tab.
- Scroll down to the Forms and Autofill section. Make sure the box next to Autofill addresses is checked and click the
 button.

- You should now see a Saved Addresses prompt.
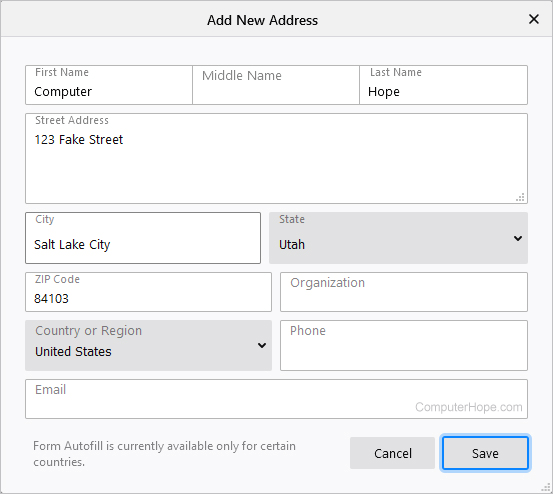
Add autofill data
- In the Saved Addresses prompt, click the
 button.
 - Fill out the information, then click the
 button.
Change autofill data
- In the Saved Addresses prompt, select an address and click the
 button.
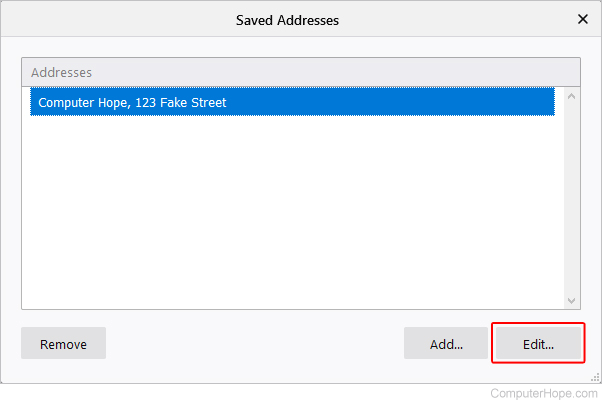
- Make your edits, then click the button.
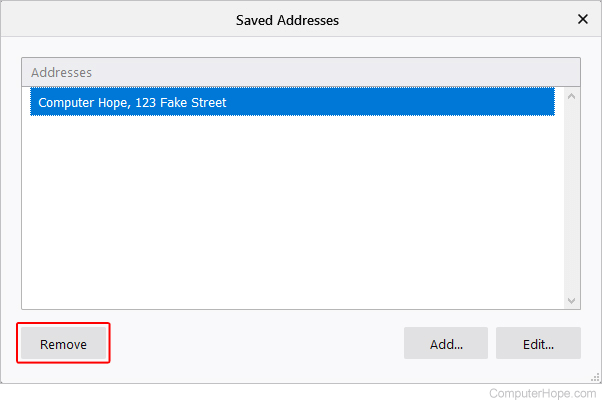
Delete autofill data
Select the entry you'd like to delete, then click the ![]() button.
button.

Microsoft Edge
To modify your autofill data in Microsoft Edge, follow the directions in these sections. The first section shows you how to access the autofill options, and the others show you how to edit them.
Access autofill options
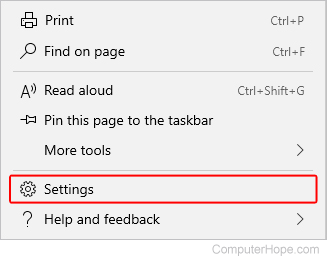
- Open the Microsoft Edge browser.
- Click the Settings and more icon
 in the upper-right corner of the browser window.
 - In the drop-down menu, near the bottom, select Settings.
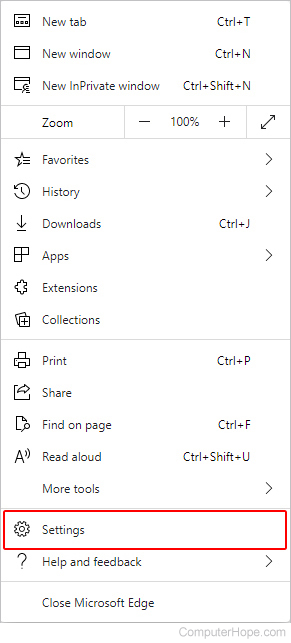
- Under the Settings section on the left, click Profiles.

- Under the Your profile section in the middle of the screen, there are three categories to choose from: Passwords, Payments, and Addresses and more.
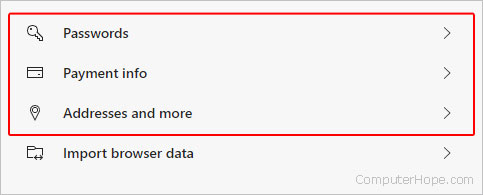
- Once you know which autofill item you'd like to edit, find it in the sections below and follow the instructions.
Passwords
The following link shows you how to manage your browser passwords in Edge.
Payment info
The following section contains details on the payment info autofill options in Edge.
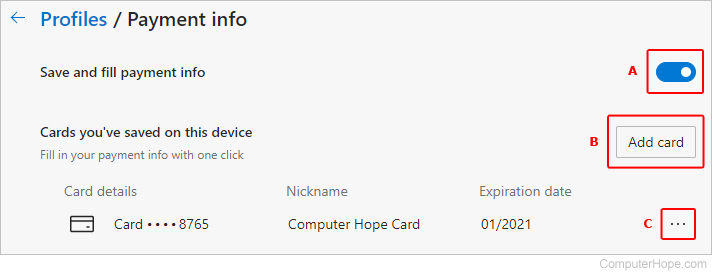
Toggle payment autofill
Use the toggle switch next to Save and fill payment methods to choose whether or not Edge should save and autopopulate your payment information (A).
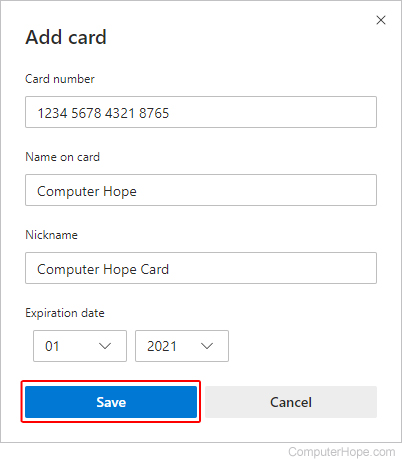
Adding a card
To add a credit card to Edge, click the Add card button (B). Fill out the payment information, then click the Save button at the bottom.
Edit or delete payment information
To edit or delete payment info, click the ![]() icon next to one of the entries (C), and select Edit or Delete from the drop-down menu.
icon next to one of the entries (C), and select Edit or Delete from the drop-down menu.
Addresses and more
The following section contains details on the address autofill options in Edge.
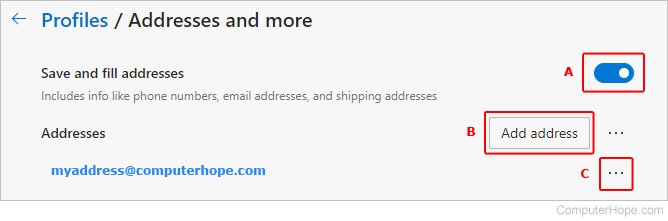
Save and fill addresses
To choose whether or not Edge should save and autopopulate your address information, enable or disable Save and fill addresses (A).
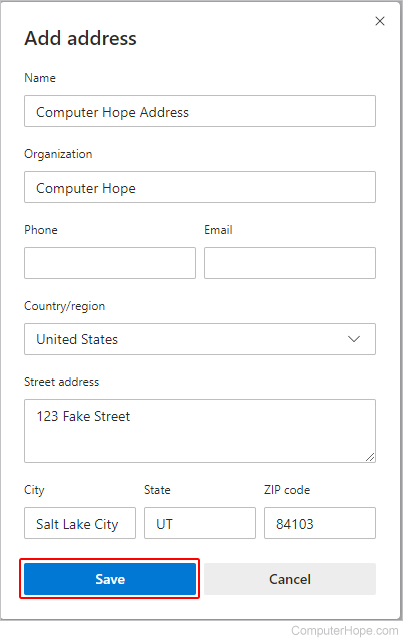
Add addresses
To input a new address, click the Add address button (B). Fill in the appropriate information, then click the Save button.
Edit or delete an address
To edit or delete address info, click the ![]() icon next to one of the entries (C), and select Edit or Delete from the drop-down menu.
icon next to one of the entries (C), and select Edit or Delete from the drop-down menu.

Microsoft Edge Legacy
To modify your autofill data in Microsoft Edge Legacy, follow these steps.
- Open the Microsoft Edge Legacy browser.
- Click in the upper-right corner of the screen.
- Select Settings.
- Scroll to the bottom and click the
 button.
 - Click the
 option in the middle of the Autofill entries list.
To create a form entry - Click ![]() , fill out the appropriate information, then click the
, fill out the appropriate information, then click the ![]() button.
button.
To edit the form entry - Click an existing form entry, make your changes, then click the ![]() button.
button.
To delete a form entry - Hover your mouse over the entry, then click the ![]() icon in the upper-right corner of the screen.
icon in the upper-right corner of the screen.

Microsoft Internet Explorer
Internet Explorer only allows users to enable and disable autofill, or clear its history, but not change specific entries.
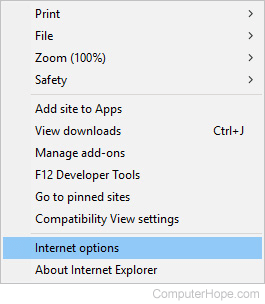
- Open the Internet Explorer browser.
- In the upper-right corner of the screen, click the
 icon.
icon. - Select Internet options.
- In the window that opens, click the Content tab (A), then select Settings (B) in the AutoComplete section.

- On the next menu, you have two options: toggle autofill on or off and delete AutoComplete history.
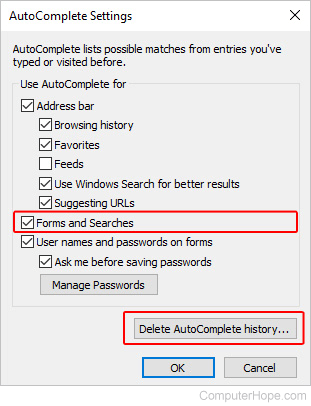
Toggle autofill on or off
- Check or uncheck the box next to Forms and Searches.
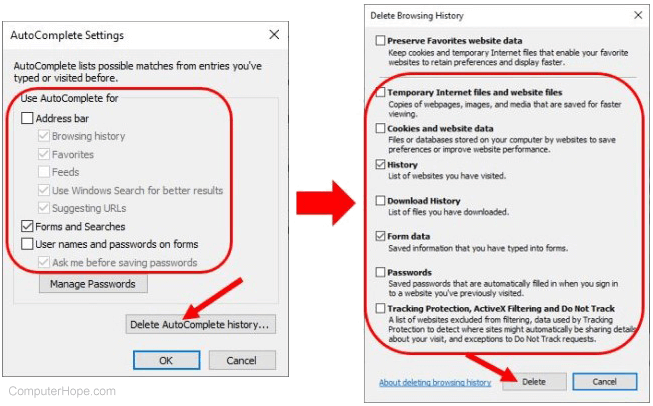
Delete AutoComplete history
- Near the bottom of the window, click the Delete AutoComplete history button.
- Check the box next to Form data, then click Delete.
- Click OK twice to exit the two windows.

Opera
To modify your autofill data in Opera, follow the directions in these sections. The first section shows you how to access the autofill options, and the others show you how to edit them.
Access autofill options
- Open the Opera browser.
- Click the
 button in the upper-left corner of the screen.
 - In the drop-down menu, near the bottom, select Settings.

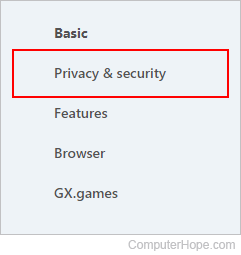
- On the left side of the tab that appears, click Privacy & security.
- In the Privacy and security section, scroll down to the Autofill section where you see three options: Passwords, Payment methods, and Addresses and more.
- Once you know which autofill item you'd like to edit, find it in the sections below and follow the instructions.
Passwords
The following link shows you how to manage your browser passwords in Opera.
Payment methods
The following section contains details on the payment method autofill options in Opera.
Save and fill payment methods
Use the toggle switch next to Save and fill payment methods to choose whether or not Opera should save and autopopulate your payment information (A).
Add payment method
To input new payment information, click the Add button (B) and type in the appropriate information. When you've finished, click the Save button.
Edit payment methods
To edit or remove payment info, click the ![]() icon next to one of the entries (B), and select Edit or Remove from the drop-down menu.
icon next to one of the entries (B), and select Edit or Remove from the drop-down menu.
Addresses and more
The following section contains details on the address autofill options in Opera.
Save and fill addresses
Use the toggle switch next to Save and fill addresses to choose whether or not Opera should save and autopopulate your address information (A).
Adding addresses
To input new address information, click the Add button (B) and type in the appropriate information. When you've finished, click the Save button.
Remove or edit an address
To edit or remove address info, click the ![]() icon next to one of the entries (C), and select Edit or Remove from the drop-down menu.
icon next to one of the entries (C), and select Edit or Remove from the drop-down menu.

Safari
To modify the Autofill settings in Safari, follow the steps below.
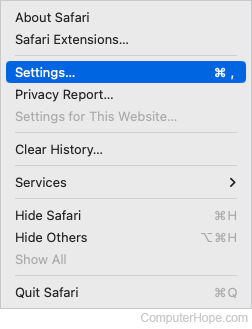
- Open the Safari browser.
- In the Apple menu bar, click
 , and select Settings... from the drop-down menu.
- In the Preferences window, click the AutoFill tab (A).
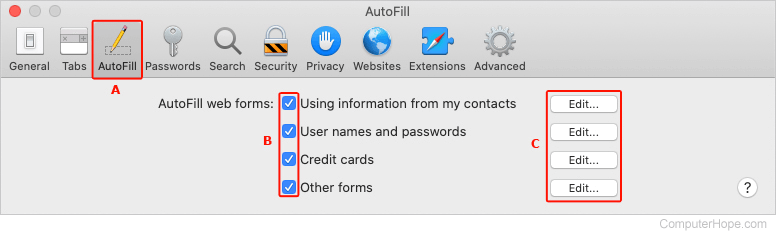
- Under AutoFill web forms, uncheck one or more boxes to completely disable any of the four categories (B), or access the editing menus for each and customize your preferences (C).