
How to enable and disable Windows Desktop Cleanup Wizard

Microsoft Windows XP included the Desktop Cleanup Wizard which was intended to remove any icons from the desktop that aren't used for at least 60 days. Unfortunately, this feature isn't great for users who commonly utilize their desktop space for icons, files, and folders.
Microsoft did not include the Desktop Cleanup Wizard with Windows Vista. In Windows 7 and later versions of Windows, the Desktop Cleanup Wizard functionality is integrated with the System Maintenance tool.
How to run the System Maintenance tool
To run the System Maintenance tool in Windows 7, Windows 8, Windows 10, or Windows 11, follow the steps below.
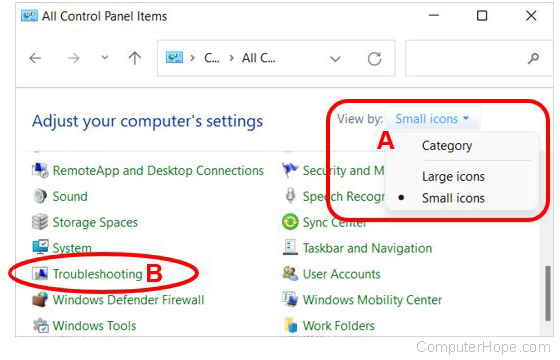
- Open the Control Panel.
- Near the top-right corner of the Control Panel window, select Small icons or Large icons in the View by drop-down menu (A).
- Click the Troubleshooting option (B).
- In the Troubleshooting window, under System and Security, click the Run maintenance tasks link.

- In the System Maintenance window, click the Next button to run the maintenance tasks that find and clean up unused files.
If the System Maintenance tool is not run with administrator rights, you are prompted to run it as an administrator to possibly find more issues to fix. Click the Try troubleshooting as an administrator option in the System Maintenance window to run again with admin permissions.
How to enable or disable Desktop Cleanup Wizard
To enable or disable the Desktop Cleanup Wizard in Windows XP, follow the steps below.
- Right-click an empty area on the desktop and select Properties in the pop-up menu.
- In the Display properties window, click the Desktop tab.
- Click the Customize Desktop button.
- In the Desktop Items window, check the Run Desktop Cleanup Wizard ever 60 days box to enable the feature, or uncheck the box to disable it.