
How to remotely shutdown another Windows computer
Users of Microsoft Windows version 2000 and later can remotely shut down another computer in their network with the shutdown command.
To start the GUI (graphical user interface) version of this command, follow these steps:
Windows 8 and 10 users
- Press the Windows key+X on the keyboard to open the Power User menu.
- Select the Search option in the menu.
- In the Search text box, type shutdown -i and press Enter.
Windows Vista and 7 users
- Click the Start button.
- In the Search text box at the bottom of the Start menu, type shutdown -i and press Enter.
Windows 2000 and XP users
- Click the Start button, then select the Run option.
- In the Run window, type shutdown -i and press Enter.
After running this command, you see a dialog window shown in the following example.
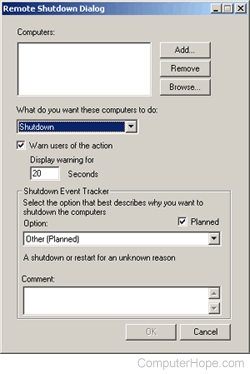
As seen in the example above, you have different options to choose from in the Remote Shutdown dialog.
You need administrative privileges to access and shut down the computer remotely to complete the following steps.
- Specify the name or IP address of the computer you want to shut down by clicking the Add button.
- Select Shutdown from the list of values under "What do you want these computers to do."
- To warn the user of the shutdown before it occurs, keep the check box labeled Warn users of the action checked.
- In the Shutdown Event Tracker section, choose the option that you want the Event Log to show when the computer shuts down and enter a comment.
- Click OK to initiate the shutdown of the remote computer.
For Windows Home edition computers
The Windows Resource Kit is no longer available for download from Microsoft. The following instructions work only for a legacy Windows computer that already has the Resource Kit installed.
If the remote computer you're attempting to shut down is running a Home edition of Microsoft Windows, you must enable guest remote shutdown privileges before the steps above work. To do this, follow these steps.
- From the Microsoft Windows Resource Kit (required), copy the NtRights.exe file from the "Program Files\Windows Resource Kits\Tools" directory into the "Windows\System32" directory.
- After the file is copied, open a command prompt window by clicking Start, Run, and typing cmd and pressing Enter. At the prompt, type the following commands exactly as you see them here (unless your Windows directory is in a different path).
cd\windows\system32
NtRights -u Guest +r SeRemoteShutdownPrivilege
NtRights -u Guest +r SeShutdownPrivilege
- If successful, after typing each of the NtRights commands above, a success message appears. Once this task is completed, exit the command prompt window and restart your computer.
Once the steps above are completed, remotely shutdown that computer from another Windows computer.
Unable to get remote shutdown to work
Inoperable remote shutdown could be caused by any of following reasons.
- The domain administrator has group policies in place to prevent remote shutdown.
- Remote administration or the $ADMIN share is disabled.
- You're logged in to an account that does not have administrative privileges.
Alternative solutions
If you're still unable to remotely shutdown a computer or are using an earlier version of Windows, try PsShutdown, which is part of the free SysInternals Suite.