
How to disable Windows thumbs.db files from being created
Updated: 03/10/2024 by Computer Hope
Although it is safe to delete any thumbs.db file, Windows automatically recreates it unless the option to create thumbs.db files is disabled. The following sections detail how to stop thumb.db files from being generated in different versions of Windows. Select your version from the list below and follow the steps.
Windows 11
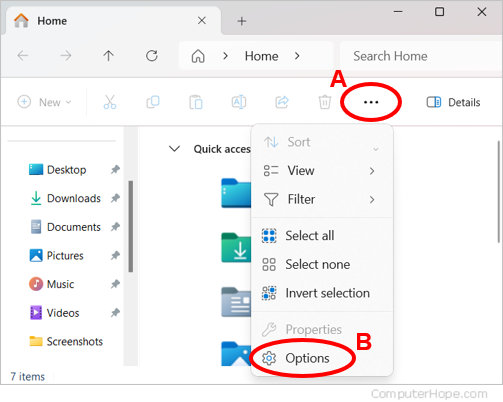
- Press Windows key+E to open File Explorer.
- In the File Explorer window, click the ellipsis icon (A) in the menu bar at the top and select Options (B).
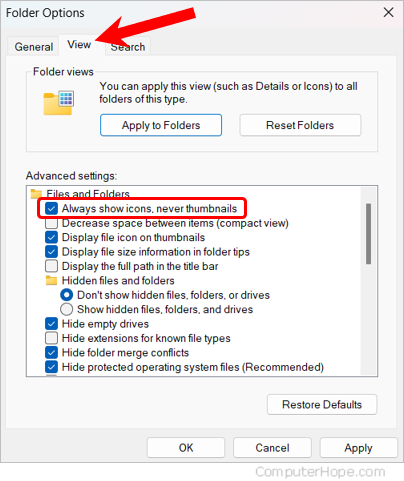
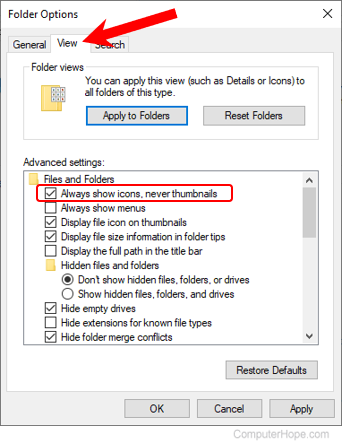
- In the Folder Options window, click the View tab.
- In the Advanced settings section of the window, under Files and Folders, check the box next to Always show icons, never thumbnails.
- Click Apply and then OK.
- (Optional) Run a Disk Cleanup to clear any pre-existing thumbs.db files.
Note
If you run the Disk Cleanup utility, make sure the box next to Thumbnails is checked.
Windows 8 and 10
- Press Windows key+E to open File Explorer.
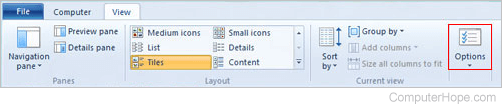
- In the File Explorer window, select the View tab in the top-left corner.
- Locate and click Options on the right side.
- In the Folder Options window, click the View tab.
- In the Advanced settings section of the window, under Files and Folders, check the box next to Always show icons, never thumbnails.
- Click Apply and then OK.
- (Optional) Run a Disk Cleanup to clear any pre-existing thumbs.db files.
Note
If you run the Disk Cleanup utility, make sure the box next to Thumbnails is checked.
Windows 7 and Vista
- Press Windows key+E to open File Explorer.
- In the File Explorer window, click Tools in the menu bar at the top. If you don't see the menu bar, press Alt to display it.
- In the drop-down menu, select Folder options.
- In the Folder Options window, select the View tab.
- In the Advanced settings section of the window, under Files and Folders, check the box next to Always show icons, never thumbnails.
- Click Apply and then OK.
- (Optional) Run a Disk Cleanup to clear any pre-existing thumbs.db files.
Note
If you run the Disk Cleanup utility, make sure the box next to Thumbnails is checked.
Windows XP
- Open My Computer.
- Click Tools and then Folder Options.
- In the Folder Options window, click the View tab.
- In the View tab, under Advanced Settings, check the box for Do not cache thumbnails.
- Click OK.