
How to remove a computer CPU fan
Removing a computer processor fan from the computer is a relatively simple process and may be necessary to clean the fan or replace a bad or noisy fan. Below, are the steps required for removing most computer processor heat sinks or fans.
While inside the computer, make sure it's off and you're familiar with ESD (electrostatic discharge) and its potential dangers.
Removing any covering
Before removing the heat sink from the processor, make sure the processor is visible. If any duct or ventilation system is above the CPU (central processing unit), it must be removed first. In the picture below, is an example of a processor duct system in an OEM (original equipment manufacturer) Dell XPS computer. The heat sink for this computer's processor is not visible until this duct is removed from the computer.
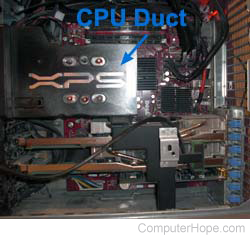
For this computer, the duct system can be removed by pressing in on the clips and pulling the duct away from the processor. After the duct is removed, the computer processor and the heat sink should be visible.
Disconnect the fan
Before disconnecting the heat sink fan from the computer, disconnect the fan power wire. A two, three, or four pin power cable should be connecting the fan to the computer motherboard. Locate where this cable connects to the motherboard and disconnect it by grabbing the connector end and pulling up on the connector.
If the connector is accessible, do not pull the wire by the cable. Instead, disconnect the cable by pulling on the connector end. Pulling on the wires may loosen them from the connector.
Unclip the heat sink from the processor
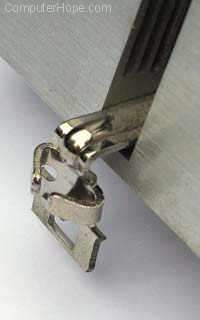
After the fan wire is disconnected from the computer, locate the clip holding the fan to the processor. The picture shows an example of how this clip may look. In this example, inserting a screwdriver into the small hole and gently pressing down and away from the processor will unlatch the heat sink.
With some computers, the fan may also be screwed into the heat sink. If you see screws on the heat sink and you only want to remove the fan, unscrew any screws and disconnect the fan instead of unlatching the heat sink.
After the clip holding the heat sink in place is unlatched, the heat sink can be pulled away from the processor.
Do not pull hard; the heat sink should be able to be removed with a little upward force. In some situations, the thermal compound or thermal pad that facilitates transference of processor heat to the sink may make it difficult to remove the heat sink. You can often overcome this by gently twisting the heat sink while pulling up.