How to enable and disable Wi-Fi

Laptops today all have Wi-Fi (wireless Internet) built-in, allowing people to connect to the Internet from almost anywhere. For security, compatibility, or other reasons, you may want to enable and disable the Wi-Fi on your laptop. To do so, select from the list below and follow the steps.
After enabling Wi-Fi on your computer, you must connect to a Wi-Fi network to access the Internet. See: How to connect to a Wi-Fi network.
If your Wi-Fi is not working or the suggested buttons do not work, for troubleshooting steps, see: Why is my Wi-Fi not working?
How to enable Wi-Fi on a laptop
Wi-Fi can be enabled by performing any of the steps below.
Enable with laptop Wi-Fi button
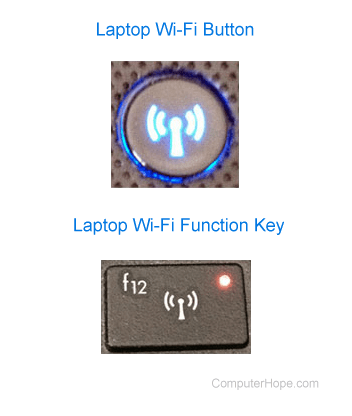
Some laptops have an On/Off button or switch for the Wi-Fi connection, as shown in the picture. It is usually found on the laptop's front edge or above the keyboard. Find the button or switch, and make sure it's enabled. When enabled, the button should be illuminated as blue, or the switch should be in the On position.
Enable with laptop Fn and function key
Some laptops enable and disable Wi-Fi using the Fn key and one of the function keys (F1-F12). As seen in the picture, some laptops use the Fn and F12 keys to enable and disable Wi-Fi. The F12 key also has an orange LED (light-emitting diode) when disabled and blue when enabled, shown in the picture.
Enable Wi-Fi in Windows
Look in the Windows notification area to find the Wi-Fi or wireless Internet icon. Right-click with your mouse on the icon and select the option for enabling (or turning off) the Wi-Fi device in the pop-up menu. If no Enable option is available in the pop-up menu, there may be an option called Open Network and Sharing Center. If so, select this option and then Change adapter settings. Once the wireless network card icon is seen, right-click it and select Enable.
In Windows 8, when you right-click the Wi-Fi icon, check if Airplane Mode is turned on. Turn it off to enable the wireless network card if it's turned on.
The Wi-Fi adapter can also be enabled in the Control Panel. Click the Network and Sharing Center option, then click the Change adapter settings link in the left navigation pane. Right-click the Wi-Fi adapter and select Enable.
Enable Wi-Fi in Windows Device Manager
Access the Device Manager by right-clicking with your mouse on the My Computer icon on your desktop or in the Windows Start menu. Select Properties from the pop-up menu, click the Hardware tab in the window that opens up and click the Device Manager button.
In Windows Vista, and later, there is no Hardware tab. Click the Device Manager link in the System window.
Find the Wi-Fi adapter in the list of hardware devices. Right-click the adapter name and select Enable from the pop-up menu. If no Wi-Fi adapter is found in Device Manager, the Wi-Fi adapter drivers are not installed.
Enable Wi-Fi in BIOS setup
Finally, there is also the option of enabling the Wi-Fi device in the computer's BIOS setup. However, it is very unlikely the Wi-Fi device would be disabled in BIOS.
How to disable Wi-Fi on a laptop
Wi-Fi can be disabled by performing any of the steps below.
Disable with laptop Wi-Fi button
Some laptops have an On/Off button or switch for the Wi-Fi device, like the button shown in the picture. It is usually found on the front of the laptop or above the keyboard. Find the button or switch and make sure it is disabled. When disabled, the button should not be illuminated or illuminated as orange or red, or the switch should be in the Off position.
Disable with laptop Fn and function key
Some laptops enable and disable Wi-Fi using the Fn key and one of the function keys (F1-F12). Some laptops use Fn and F12 keys to enable and disable Wi-Fi and show an orange LED when disabled and blue when enabled.
Disable in Windows
Right-click the Wi-Fi icon in the Windows notification area and select Disable (or Turn off) from the pop-up menu. If no Disable option is available in the pop-up menu, there may be an option called Open Network and Sharing Center. If so, select this option and then Change adapter settings. Once the wireless network card icon is seen, right-click it and select Disable.
In Windows 8, when you right-click the Wi-Fi icon, you can turn off Wi-Fi by turning on Airplane Mode.
The Wi-Fi adapter may also be disabled from the Control Panel. Click the Network and Sharing Center option, then click Change adapter settings in the left navigation pane. Right-click the Wi-Fi adapter and select Disable.
Disable in Windows Device Manager
Access the Device Manager by right-clicking with your mouse on the My Computer icon on your desktop or in the Windows Start menu. Select Properties from the pop-up menu, click the Hardware tab in the window that opens up and click the Device Manager button.
In Windows Vista, and later, there is no Hardware tab. Click the Device Manager link in the System window.
Find the Wi-Fi adapter in the list of hardware devices. Right-click the adapter name and select Disable from the pop-up menu. If no Wi-Fi adapter is found in Device Manager, the Wi-Fi adapter drivers are not installed.
Disable in BIOS setup
As is the case with enabling the Wi-Fi device, it can also be disabled in the computer's BIOS setup.
Wi-Fi on desktop computers
Wi-Fi adapters are also available for desktop computers. The Wi-Fi button mentioned above is not available with most desktop computers. However, there is the possibility that the Wi-Fi adapter itself (e.g., an external version, like a USB (universal serial bus) Wi-Fi adapter) has an On/Off button or switch. If there is no button or switch, disconnecting the adapter from the computer disables the device.
If the Wi-Fi adapter is not an external device, it is either an internal PCI (peripheral component interconnect) expansion card or built onto the motherboard. When you install the software for the Wi-Fi adapter, an icon shows in the Windows notification area, giving you access to enable and disable the device. Alternatively, you can enable and disable the Wi-Fi adapter through the Device Manager or the BIOS.
Wi-Fi on Android smartphones and tablets
There are many variants of Android-based smartphones and tablets. These steps are for a device with the stock Android operating system. You may have to adjust the instructions based on the brand of phone or tablet you have.
- On the home screen, place your finger near the top of the screen and swipe downward.
- Once a menu similar to the one below is seen, look for the Wi-Fi symbol.
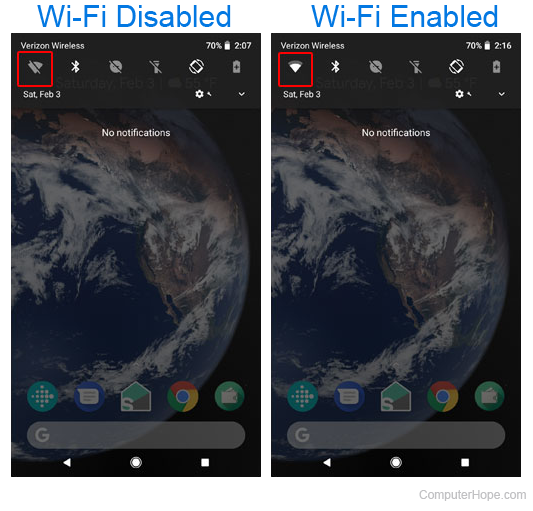
- Tap the Wi-Fi symbol to toggle wireless access on and off.
Wi-Fi on Apple iPhone and iPad
Follow the steps below to enable or disable Wi-Fi on an iPhone or iPad.
- Open the Settings utility
 on the iPhone or iPad.
 - On the Settings screen, tap the Wi-Fi option.
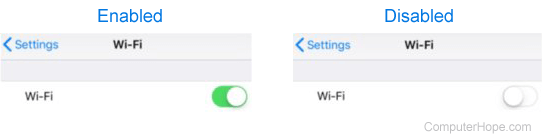
- On the Wi-Fi screen, for the Wi-Fi entry, tap the toggle switch. Wi-Fi is enabled when the toggle switch is green and disabled when the toggle switch is white, as shown below.