
How to make Windows not automatically restart after update

When Windows updates are installed, the system needs to restart for them to take effect. Consequently, Windows Update normally initiates an automatic restart once the installation is complete. The sections below contain steps to disable this feature. Realize that updates cannot be applied until the computer is restarted. To proceed, select your version of Windows from the list and follow the instructions.
Windows 10 and Windows 11 users
- Click Start or press the Windows key, type gpedit.msc in the search field, and press Enter.
If you have the Home edition of Windows 10 or Windows 11, the Group Policy Editor (gpedit.msc) is not included. To add the Group Policy Editor to Windows 10 or 11, see our steps for adding gpedit.msc to Windows 10 and 11 at the bottom of this page.
If you need help determining the version of Windows 10 or Windows 11 on your computer, see: What version of Windows do I have?
After adding the Group Policy Editor, return to this section and continue with step 2 below.
- In the Local Group Policy Editor window, navigate to the following location:
Computer Configuration > Administrative Templates >
Windows Components > Windows Update >
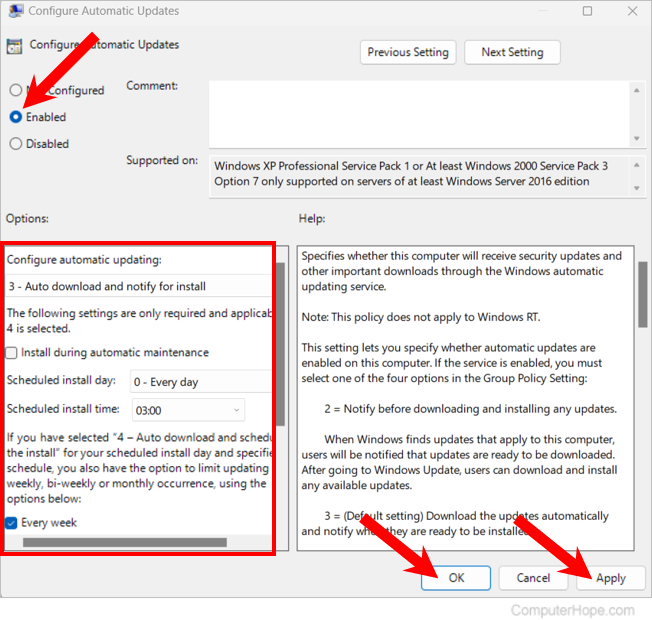
Manage end user experience. - On the right side of the window, double-click the Configure Automatic Updates policy object.
- In the window that opens, click the radio button next to Enabled near the upper-left corner of the screen.
In the Options section, default settings for automatic updates are configured. To modify how and when automatic updates are downloaded and installed, change the applicable settings.
When you're finished, click Apply, and then OK.
- In the navigation list on the left side of the window, under the Windows Update folder, click the Legacy Policies folder.
- On the right side of the window, double-click the No auto-restart with logged on users for scheduled automatic updates installations policy object.
- In the window that opens, click the radio button next to Enabled near the upper-left corner of the screen. Click Apply, and then OK.
To turn the automatic restart back on, follow the same steps, but select the Disabled option in Step 7.
Windows Vista, Windows 7, and Windows 8 users
- Click Start or press the Windows key, type gpedit.msc in the search text field, and press Enter.
- In the Local Group Policy Editor window, navigate to the following location:
Local Computer Policy > Computer Configuration > Administrative Templates> Windows Components > Windows Update. - Double-click the No auto-restart with logged on users for scheduled automatic updates installations option.
- In the window that opens, select the circle next to Enabled in the upper-left corner of the screen.
- Click Apply, then OK.
To turn the automatic restart back on, follow the same steps, but select the Disabled option in Step 4.
Windows XP users
- Click Start, then Run.
- In the field that appears, type regedit to open the Registry Editor.
- Navigate to the following registry key:
HKEY_LOCAL_MACHINE\Software\Policies\Microsoft\Windows\WindowsUpdate\AU - Find NoAutoRebootWithLoggedOnUsers and change the DWORD value to a 1. Automatic restart should now be disabled after the update.
To turn the automatic restart back on, follow the same steps, but change the DWORD value to a 0 in Step 4.
Microsoft made a change in Service Pack 2 for Windows XP, allowing updates to be installed when the user initiates a computer restart or shut down. This feature stops the automatic restart from occurring.
How to add Group Policy Editor in Windows 10 or 11
If your computer has the Home edition of Windows 10 or Windows 11, follow the steps below to install the Group Policy Editor utility.
- Press the Windows key and type cmd in the search field. On the right side of the search results window, select the Run as administrator option for the Command Prompt utility.
- In the command prompt window, copy and paste the following command at the prompt and press Enter.
FOR %F IN ("%SystemRoot%\servicing\Packages\Microsoft-Windows-GroupPolicy-ClientTools-Package~*.mum") DO (DISM /Online /NoRestart /Add-Package:"%F")
- At the prompt, copy and paste the following command and press Enter.
FOR %F IN ("%SystemRoot%\servicing\Packages\Microsoft-Windows-GroupPolicy-ClientExtensions-Package~*.mum") DO (DISM /Online /NoRestart /Add-Package:"%F")
The Group Policy Editor utility is now installed and available to use. A computer restart is not necessary.