
How to connect Xbox to a computer
This page provides instructions for connecting your Xbox to your computer, for viewing media content on your computer through your Xbox. Instructions for flashing your Xbox or copying Xbox games to your computer are not provided.
Setting up Xbox sharing on the PC
Connect the Xbox to your home network using a network cable or, if the Xbox has a wireless adapter, using the wireless connection.
Next, make sure your computer has Windows XP Service Pack 2 or a later version of Windows (e.g., Windows Vista, 7, 8, or 10). Additionally, Windows Media Player 11 or higher must be installed on your computer.
Windows Media Player 12
With Windows Media Player 12, in the Library, find the Stream option in the menu bar (shown below). Click Stream and select Turn on media streaming with HomeGroup. Make sure the Xbox is listed and the Allowed check box is checked (shown below).
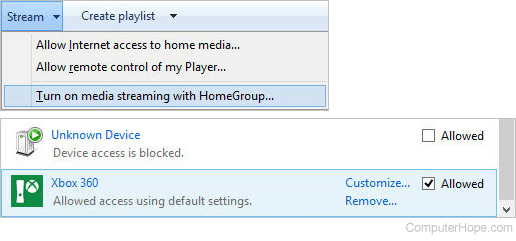
If media streaming is not turned on, you receive a prompt. Once it is turned on, under Stream in Media Player, set up media streaming to your homegroup (home network). You are required to set up a password for your homegroup, used to connect your Xbox to the homegroup and view media content on your computer.
Windows Media Player 11
In Windows Media Player 11, go to the Library, then Media Sharing. Click the box for Share My Media and click OK. The Xbox console should show momentarily, and when it does, select Allow. Then, on your Xbox, go to the Media section and select the media to play from your computer.
Setup complete
Doing the steps above effectively turns your Xbox into a media center system, connecting your computer to your Xbox, TV, and home theater system.
Connecting to the PC on the Xbox
Push the Xbox button in the center of the remote for the Xbox Guide, then select Media and choose System Video Player, System Music Player, or Picture Viewer. Once selected, you can browse that type of media on your computer.