
How to enable or disable write protection on a USB flash drive

There are several ways to enable or disable write protection of your USB (universal serial bus) flash drive. Depending on your device, you can use a hardware switch to toggle write protection or change the read-only settings for the device through the operating system.
Some suggestions on this page require you to have administrator privileges on the computer to perform the necessary actions for enabling or disabling write protection.
Write-protection hardware switch
Some USB flash drives have a write protection switch on the side or bottom. The write protection switch is useful for keeping the contents of your drive safe from malware when you must view them on a public computer. If your device has this switch, move it to the "Lock" position. This action effectively sets all files and the device to read-only mode.
Using DiskPart to change read-only settings
You can use the Windows DiskPart command-line utility to enable or disable read-only mode on your USB flash drive.
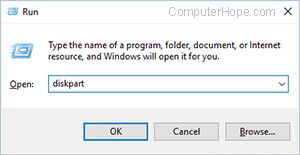
- Press Windows key+R to open the Run box. Type diskpart and press Enter.
- If you receive a User Account Control prompt asking for permission to continue, click Yes.
- At the DISKPART> prompt, type list disk and press Enter.
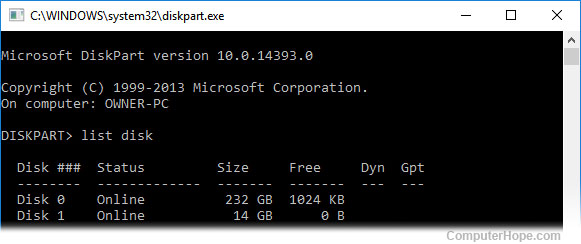
Use the disk size to determine which one is your USB flash drive. In this example, we know that Disk 1 is our USB flash drive because its size is 14 GB.
- Select your USB flash drive with the select disk command. In this example, we want to work with disk 1, so the command is select disk 1.

- You can list the attributes of the disk with the command attributes disk.

- To clear the read-only attribute (making the disk writable), use the command attributes disk clear readonly.

Or, to set the read-only attribute (making the flash disk write-protected), use the command attributes disk set readonly.

- When you are finished, type exit to quit the program.
If, after typing the exit command, the write protected message still appears when adding files, remove the stick from the computer, wait a few seconds, and then put back into the computer. Then, try again.
Change security permissions in flash drive properties
If using DiskPart, as detailed above, does not work to clear the read-only attribute of a USB flash drive, the security permissions may need to be changed. The security permissions may be set so that all users only have Read permissions to files on the flash drive.
Follow the steps below to check if security permissions need to be changed.
If the steps below don't work for your flash drive, it may prevent permission changes from being locked by a security program. In these cases, you may be unable to make the flash drive writable. You may need to have administrator privileges on the computer to change permissions.
- Open My Computer or File Explorer.
- Find the USB flash drive in the list of drives connected to the computer.
- Right-click the flash drive icon and select Properties in the pop-up menu.
- On the General tab, check the File system entry to see how the flash drive is formatted. Select the appropriate link below based on the file system type.
NTFS (NTFS file system)
- In the Properties window, click the Security tab.
- Click the Edit button below the Group or user names section.
- In the Permissions window, click the Everyone entry, if not already selected. In the Permissions for Everyone section, ensure the Allow checkbox is checked for the Modify entry. If it's not checked, check the box.
- Click the OK button on the Permissions and Properties window to save the security permissions change.
If the USB flash drive is still read-only after checking the Allow checkbox in step 7, repeat the steps and check the checkbox for the Full Control entry. Verify if the USB flash drive lets you modify its contents now.
To set the flash drive to read-only for everyone, in step 7, uncheck all boxes in the Allow column, except for the Read entry.
FAT (file allocation table) file system
- In the Properties window, click the Sharing tab.
- On the Sharing tab, click the Advanced Sharing button.
- On the Advanced Sharing window, click the Share this folder checkbox.
- Click the Permissions button.
- In the Permissions window, click the Everyone entry, if not already selected. In the Permissions for Everyone section, ensure the Allow checkbox is checked for the Change entry. If it's not checked, check the box.
- Click the OK button on the Permissions, Advanced Sharing, and Properties windows to save the permissions change.
If the USB flash drive is still read-only after checking the Allow checkbox in step 9, repeat the steps and check the checkbox for the Full Control entry. Verify if the USB flash drive lets you modify its contents now.
To set the flash drive to read-only for everyone, in step 9, uncheck all boxes in the Allow column, except for the Read entry.
Change write protection through the Windows registry
By following the steps below, you can enable or disable write protection on your USB flash drive through the Windows registry.
- Open the Windows Registry Editor.
- Navigate to the following registry location.
HKEY_LOCAL_MACHINE\SYSTEM\CurrentControlSet\Control\StorageDevicePolicies
If the StorageDevicePolicies key does not exist under Control, do the following.
- Right-click the Control key and select New > Key.
- Type StorageDevicePolicies as the new key name and press Enter.
- Double-click the WriteProtect value.
If you created a new key for StorageDevicePolicies, you must enter the WriteProtect value first, then double-click it.
- Right-click the new StorageDevicePolicies key and select New > DWORD (32-bit) Value.
- Type WriteProtect as the new value name and press Enter.
- To enable write protection, change the WriteProtect value to 1 and click OK.
To disable write protection, change the WriteProtect value to 0 and click OK. - Close the Windows Registry Editor and restart your computer.
Turn off BitLocker protection
It's possible your computer has BitLocker installed and enabled, adding write protection to USB flash drives. You can determine if BitLocker protection is enabled and turn it off using the steps below.
To turn off BitLocker; you must have the BitLocker password or recovery key. Without that, you cannot turn off BitLocker and must format the USB flash drive.
- Open File Explorer and in the left navigation pane, click Computer or This PC, depending on your version of Windows.
- In the list of storage drives in or connected to the PC, find the USB flash drive. If there is a padlock icon on or next to that flash drive, BitLocker is enabled. If you do not see a padlock icon, BitLocker is not enabled.
- Right-click the USB flash drive entry and select Manage BitLocker.
- In the BitLocker Drive Encryption window, select the USB flash drive, then click the Turn Off BitLocker option.
- Enter the BitLocker password or choose to enter the BitLocker recovery key.
BitLocker should decrypt the USB flash drive and disable write protection. After it completes, you can try copying files to the device.
Fix USB flash drive issues with chkdsk
If you still can't enable or disable write protection on your USB flash drive after trying the suggestions above, your flash drive may have errors that need to be fixed. Follow the steps below to try and fix drive errors using the chkdsk tool.
- Open an elevated command prompt in Windows.
- Once the command prompt window opens, change the drive letter to that of the USB flash drive.
- Type the command below to check for any errors on the flash drive and fix those errors. Change <drive_letter> to the flash drive's drive letter before running the command.
chkdsk <drive_letter> /f /r /x
For example, if your flash drive is the F: drive, type chkdsk f: /f /r / x.
- Press Enter to execute the command.
Format the USB flash drive
If you are unsuccessful at enabling or disabling write protection on your USB flash drive, formatting may be the only option. Formatting can fix drive errors and corruption, allowing you to enable or disable write protection.
Formatting the USB flash drive erases all data. This process should only be performed as a last option.
If you still cannot enable or disable write protection after formatting the flash drive, it's likely the drive is bad, and should be replaced.
Protecting individual files
You can always change the write protection on individual files and folders on your removable disk. See the following page for further help and information about adjusting files.