
How to add, modify, or delete a table in Microsoft Word
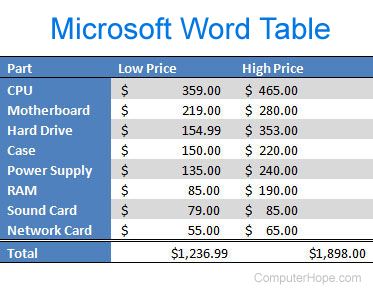
You can insert a table in a Microsoft Word document to display data in a tabular format. A table is a great way to represent multiple fields of associated data. For example, a list of prices is easier to read when displayed in a table.
You can also create a table in Microsoft Excel and then copy and paste it in a Microsoft Word document, keeping all the same formatting. See: How to insert and customize a table in Microsoft Excel.
Adding a table
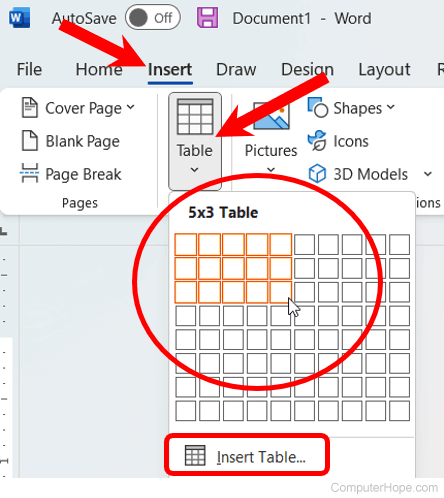
- In Microsoft Word, place the mouse cursor where you want to add the new, blank table.
- Click the Insert tab in the Ribbon.
- Click the Table button and select how many cells, rows, and columns you want the table to display. You can also click Insert Table and enter the number of columns and rows for the inserted table.
Inserting or deleting a row or column
In a Microsoft Word table, you can add or remove a row or column at any time. Select a link below for the version of Word you are using.
Insert a row or column in Word Online
In Microsoft Word Online (the web version), follow the steps below to insert a row or column.
Insert a row
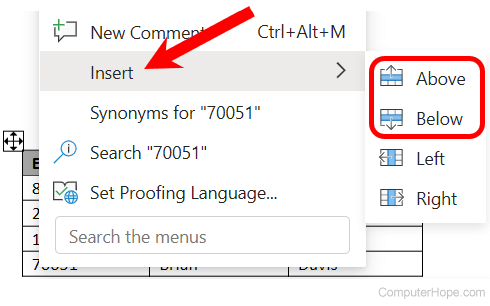
- Move the mouse cursor inside a cell in the row where you want to insert a new row.
- Right-click with your mouse to open the pop-up menu, select Insert, then select Above or Below, depending on where you want to insert the row.
Insert a column
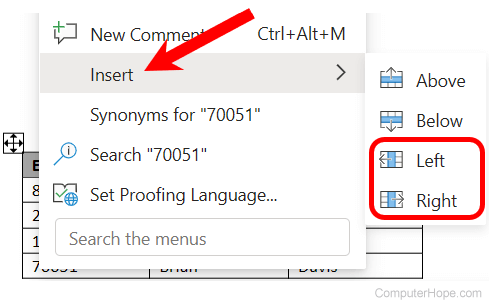
- Move the mouse cursor inside a cell in the row where you want to insert a new row.
- Right-click with your mouse to open the pop-up menu, select Insert, then select Left or Right, depending on where you want to insert the column.
Insert a row or column in Word 365 and earlier
In the Microsoft Word desktop application (Word 365 and earlier), follow the steps below to insert a row or column.
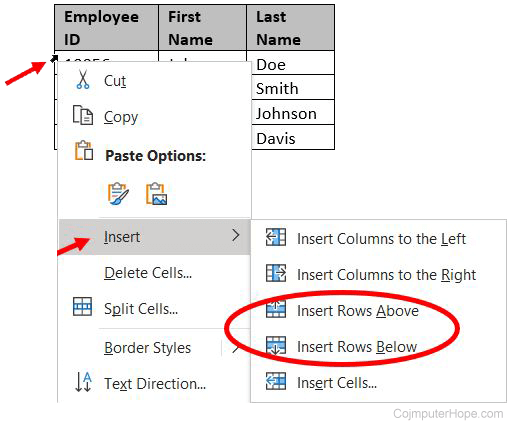
Insert a row
- Move the mouse cursor inside the left edge of a cell in the row where you want to insert a new row. The cursor changes to a small black arrow pointing to the top-right.
- Using your mouse, right-click to open the pop-up menu, select Insert, then select Insert Rows Above or Insert Rows Below, depending on where you want to insert the row.
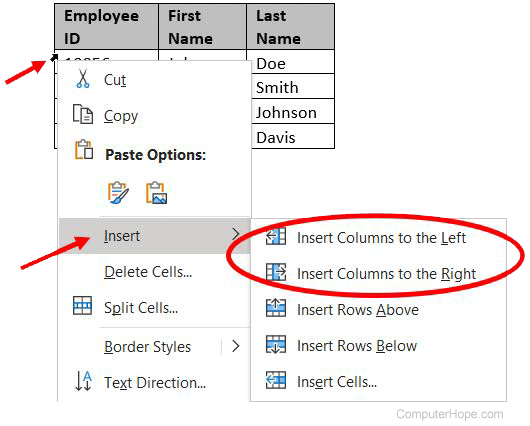
Insert a column
- Move the mouse cursor inside the left edge of a cell in the column where you want to insert a new column. The cursor changes to a small black arrow pointing to the top-right.
- Using your mouse, right-click to open the pop-up menu, select Insert, then select Insert Columns to the Left or Insert Columns to the Right, depending on where you want the row inserted.
Delete a row or column in Word Online
In Microsoft Word Online (the web version), follow the steps below to delete a row or column.
Delete a row
- Move the mouse cursor inside the left-most cell in the row you want to delete.
- Click-and-drag to the right to select the entire row.
- Right-click with your mouse to open the pop-up menu, select Delete, then select Row.

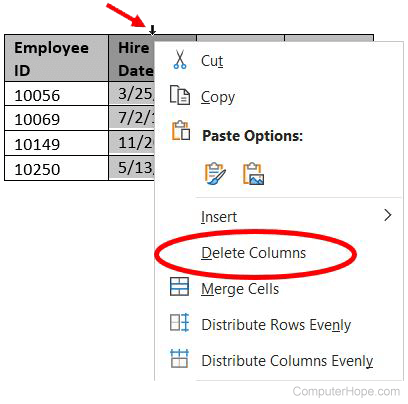
Delete a column
- Move the mouse cursor to the left side of a cell in the column you want to delete.
- Click-and-drag to the right of the cell to select the entire cell.
- Right-click with your mouse to open the pop-up menu, select Delete, then select Column.
Delete a row or column in Word 365 and earlier
In the Microsoft Word desktop application (Word 365 and earlier), follow the steps below to delete a row or column.
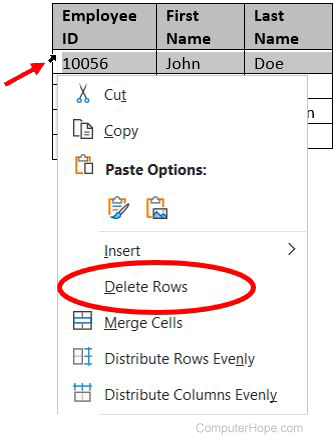
Delete a row
- Move the mouse cursor inside the left edge of a cell in the row you want to delete. The cursor changes to a small black arrow pointing to the top-right.
- Using your mouse, double-click to select the entire row in the table.
- Right-click with the mouse to open the pop-up menu, and select Delete Rows.
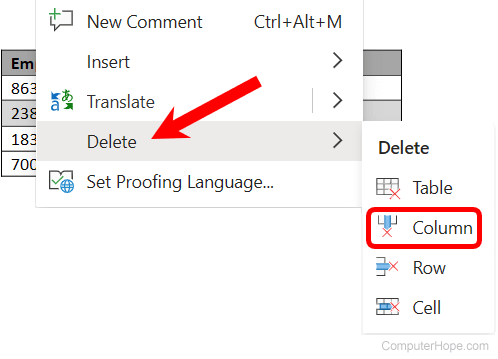
Delete a column
- Move the mouse cursor inside the top edge of the topmost cell in the column you want to delete. The cursor changes to a small black arrow pointing downward.
- Using your mouse, click once to select the entire column in the table.
- Right-click with the mouse to open the pop-up menu, and select Delete Columns.
Moving the table
After the table is added to the document, it can be moved anywhere else in the document. To move the table, hover your mouse cursor over the table, then click-and-drag the arrows in the top-left corner of the table.
Resizing the table
To resize a table in Microsoft Word Online (the web version) or the Microsoft Word desktop application, select the version of Word you are using and follow the instructions.
Microsoft Word Online
In Word Online, you can only resize a row or column, not the entire table.
Resize a row
- Place the mouse cursor between two rows, changing the cursor to two horizontal lines with an arrow pointing up and an arrow pointing down
 .
. - Click-and-drag the mouse up or down to change the row height.
Resize a column
- Place the mouse cursor between two columns or at the right edge of the rightmost column. The cursor changes to two vertical lines with an arrow pointing left and an arrow pointing right
 .
. - Click-and-drag the mouse left or right to change the column width.
Microsoft Word desktop application
In Microsoft Word 365 and earlier versions, you can adjust the size of the entire table, resizing rows and columns.
- Move the mouse cursor to the bottom-right corner of the table until the cursor changes to a double-headed arrow.
In Word 365, instead of a double-headed arrow, there is a small empty square at the bottom-right corner of the table.
- Click-and-drag the table in the direction you want the table to expand or shrink.
Changing the look of the table
To change the look of a table in Microsoft Word Online (the web version) or the Microsoft Word desktop application (Word 365 and earlier), select the version of Word you're using.
Microsoft Word Online
- After adding the table, move your cursor to a cell in the table, and click the Table Design tab in the Ribbon.
- In the Table Design tab, you can adjust cell shading, border style and color, and table style.
Repeat header row of the table on each page
Unfortunately, Word Online doesn't support repeating a table header row on each page the table spans across. That feature is only available in the Word desktop application.
Microsoft Word desktop application
- After adding the table, move your cursor to a cell in the table, and click the Design tab in the Ribbon.
- In the Design tab, you can adjust the Header Row, Total Row, and how the rows appear. You can also adjust the table's overall look by clicking one of the table styles.
Repeat header row of the table on each page
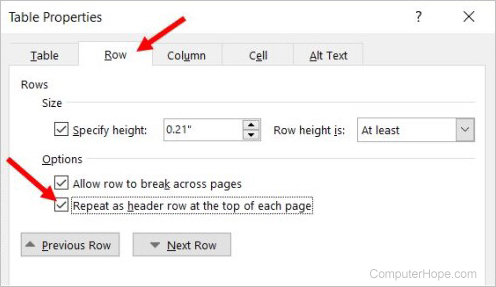
If the table spans more than one page, you may want to have the table header row displayed on each additional page the table spans across. You can make the header row visible on each page by following the steps below.
- Right-click the header row of the table and select Properties in the pop-up menu.
- In the Table Properties window, click the Row tab.
- Check the box for the Repeat as header row at the top of each page option, and click OK.
Deleting a table
To delete a table in Microsoft Word Online (the web version) or the Microsoft Word desktop application, select the version of Word you are using and follow the instructions.
Microsoft Word Online
- Move your mouse cursor over the table you want to delete.
- At the upper-left corner of the table, a small square with the move icon
 inside it is displayed. Move your mouse cursor over that icon and click it to select the entire table.
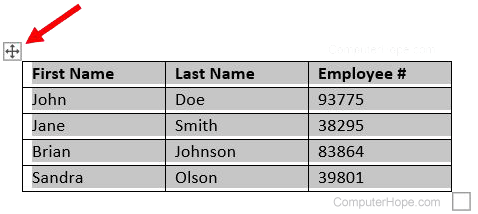
- Right-click anywhere in the table, and in the pop-up menu, select Delete, and select Table.
Microsoft Word desktop application
- Move your mouse cursor over the table you want to delete.
- At the upper-left corner of the table, a small square with the move icon inside it is displayed. Move your mouse cursor over that icon and click it to select the entire table.
- Right-click anywhere in the table and select Delete Table in the pop-up menu.