
How to format a hard drive, SSD, or USB flash drive
There are multiple types of drives or devices for storing data to format and erase all data. Popular drives and devices include the following:
- IDE (integrated drive electronics) or SATA (Serial AT Attachment) hard drive
- SSD (solid-state drive)
- External or removable storage drives also referred to as portable drives
- SD card
- Local Disk
- Memory Stick
- USB flash drive
- Memory cards
Select a formatting option from the list below, and follow the steps to erase all data on these drives.
To format a hard drive and reinstall Windows, see: How to erase a hard drive and start over?
To format a write-protected USB flash drive, you must first disable the write protection, then proceed with formatting the flash drive. See: How to enable or disable write protection on a USB flash drive.
Basic format using My Computer in Microsoft Windows
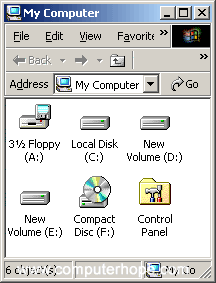
- Press the Windows key, type My Computer, and press Enter.
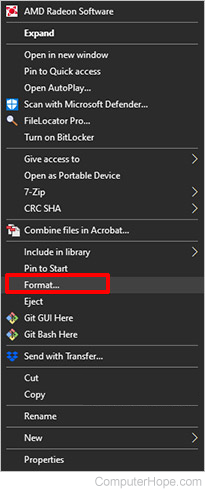
- Find the appropriate drive icon and right-click it.
- In the drop-down menu, select the Format option.
- Most options are set by default in the Format window, and you can most likely use those default settings.
Quick Format is optional. The Quick Format feature formats the drive faster but makes it easier to recover data using specialized software.
- Click Start to begin the format process.
Basic format using the Windows command line
- Open the Windows command prompt.
- At the prompt, type format and the appropriate drive letter, and press Enter. For example, if the hard drive you are formatting is drive E:, type format E:
- When asked to erase all contents on the hard drive, type Y to proceed.
You may see a prompt to Enter the current volume label for drive E: or something similar, depending on what drive letter you are formatting. You need to know the volume for the hard drive before starting the format process. Before executing the format command, type vol e: (replace e: with the hard drive letter being formatted) and press Enter. The volume name displayed, for example, with Volume in drive E is MyData, "MyData" is the volume name.
Zero-fill format using the Windows command line
The zero-fill format option is only available in Windows Vista and later.
For a more thorough erasing of data on a storage drive or device, you can zero fill it, overwriting all data on the hard drive with zeroes. Zero filling makes it impossible for someone to recover data from the hard drive that was overwritten.
To zero-fill a hard drive, use the following command at the Windows command prompt.
format e: /p:count
The command above tells Windows to format the hard drive (in this case, the E: drive) by writing zeroes to every sector. Replace the count text with the number of times you want the hard drive to be formatted. After the first round of zero-fill formatting, the format process fills every sector with a random number between zero and nine. The more times you format the drive with the count option, the more securely the hard drive is erased.
Basic format using the DOS command line
If you have a Windows recovery disc or a Windows installation disc, you can access the DOS command prompt and erase a hard drive. Using the following format method lets you erase the primary hard drive on the computer (e.g., the C: drive).
To format the primary hard drive and don't have a recovery disc, you can use a Windows installation disc instead. If you don't have a Windows recovery disc or USB drive, you need another computer to format the drive.
- Insert the Windows recovery or installation disc in the CD (compact disc) or DVD (digital versatile disc) drive.
- Restart the computer. As the computer is booting up, a message like Press any key to boot from CD is displayed. Press any key on the keyboard to make the computer boot to the Windows recovery or installation disc.
If you do not see the message Press any key, the computer's boot sequence is likely not set to boot from the CD or DVD drive first. In your BIOS setup, configure the boot sequence, so the CD or DVD drive is listed first.
- Once the computer has finished booting to the disc, a Recovery Options box should appear. Click Next to proceed through the recovery process.
- After a few moments, a System Recovery Options screen should appear. Select the Use recovery tools that can help fix problems starting Windows option.
- Select the operating system you want to repair and click Next.
- On the next screen, select the Command Prompt option.
- The recovery process should exit and return you to the command prompt. At the command prompt, type the following command: format e: (change the e: drive letter to the drive letter you are formatting).
- When asked to erase all contents on the drive, type Y to proceed.
You need to know the correct volume for the drive you want to format. For example, you may see a prompt to Enter the current volume label for drive E: or similar, depending on what drive letter you are formatting. Before executing the format command, you can type vol e: (replace e: with the hard drive letter being formatted) and press Enter. The volume name displayed, for example, with Volume is drive E is MyData, "MyData" is the volume name.
Changing the file system (e.g., FAT32 and NTFS)
Some operating systems require different file systems, like exFAT, FAT, FAT32, or NTFS, to run correctly. To change the file system on your USB drive, follow the steps below.
- Connect your USB drive to your computer.
- Open File Explorer by pressing the Windows key, typing Explorer, and pressing Enter. For this example, our USB is called HP V100W (D:).
- Locate and right-click the USB drive. You may need to scroll down in the left menu to find it.

- In the pop-up menu, select Format.
- In the Format window, click the down arrow under File system.
- Choose the best option for your needs. FAT32 (file allocation table) or NTFS (NTFS file system) are the most common file systems used on computers.
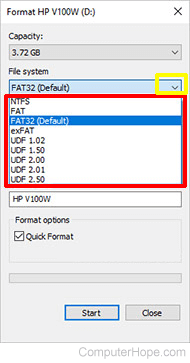
- Click the Start button to format the USB drive to the selected file system.