
How to manage user accounts

If you are the administrator (owner) of your computer system, you can create, edit, and view details about user accounts. Below, find instructions for managing user accounts in Microsoft Windows, macOS, and Linux operating systems.
Windows 10 and 11
- Press Windows key, type Control Panel, and press Enter.
- Click the User Accounts option in the Control Panel.

- If using the View by Category option in the Control Panel, click the User Accounts link.

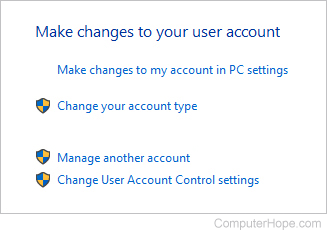
- In the User Accounts window, the middle section lets you change various aspects of user accounts. Clicking the Manage another account link takes you to a menu where you can add, edit, or remove user accounts.
Windows 8
- From the Windows desktop, open the Charms menu by pressing Windows key+C and select Settings.
- In the Settings window, select Control Panel.
- Click the User Accounts option.
- If using the View by Category option in the Control Panel, click the User Accounts link.
You can add or remove user accounts or guest accounts in the User Accounts window. You can also select a user account and make necessary changes, including changing the user account name.

Windows Vista and 7
In both Windows Vista and Windows 7:
- Open the Control Panel.
- Click Add or remove user accounts.
In the User Accounts window, you can add or remove user accounts. You can also select a user account and make necessary changes, including changing the user account name.

Windows XP
- Open the Control Panel.
- Double-click the User Accounts icon.
In the User Accounts window, you can add or remove user accounts. You can also select a user account and make any necessary changes, including changing the user account name.

Windows 2000
Changing settings for a user account in Windows 2000 requires you to be logged in with an administrator account.
- Open the Control Panel.
- Double-click the Users and Password icon.
In the Users and Passwords window, you can add or remove user accounts. You can also select a user account and make any necessary changes, including changing the user account name.

Apple macOS
To manage user accounts in macOS, follow the steps below for your OS (operating system) version.
macOS X 13 to present
- At the top of the screen, on the far-left side of the menu bar, click the Apple icon.
- Select System Settings from the Apple menu.

- In the left section, scroll down and click the Users & Groups selector.
- All of the users are listed in the section to the left.
macOS X 10.6 (Snow Leopard) to macOS 12 (Monterey)
- In the menu bar, click the Apple icon to open the Apple menu.
- In the Apple menu, click System Preferences.
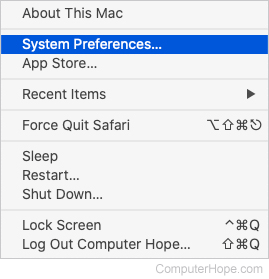
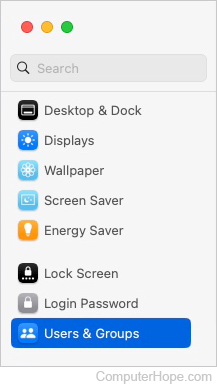
- Click the Users & Groups shortcut icon.
![]()
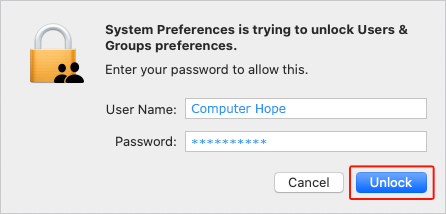
- Click the lock symbol in the lower-left corner of the Users & Groups window.
![]()
- When prompted, enter your password and click the Unlock button.
- In the Users & Groups window, you can select different user accounts from the section on the left and then edit them.


macOS X 10.3 (Panther) to 10.5.8 (Leopard)
- Log in using an administrator account.
- In the Apple menu, select System Preferences.
- In the View menu, select Accounts.
- You may need to click the lock button if it appears to be locked. Enter the administrator password.
In the Accounts window, you can add or remove user accounts. You can also select a user account and make changes.

macOS X 10.2 to 10.2.8 (Jaguar)
- Log in using an administrator account.
- In the Apple menu, select System Preferences.
- In the View menu, select Accounts.
- You may need to click the lock button if it appears to be locked.
In the Accounts window, you can add or remove user accounts. You can also select a user account and make changes.

macOS X 10.1.5 (Puma) or earlier
- Log in using an administrator account.
- In the Apple menu, select System Preferences.
- In the View menu, select Users.
- You may need to click the lock button if it appears to be locked.
In the Users window, you can add or remove user accounts. You can also select a user account and make changes.

Linux
To add a user account, use the adduser command. See the adduser command page for additional information about this command.
To remove a user account, use the deluser command. See the deluser command page for additional information about this command.
To change the user settings, such as group membership, default login shell, and home directory, use the usermod command. See the usermod command page for additional information about this command.