Snipping Tool
Updated: 12/26/2023 by Computer Hope

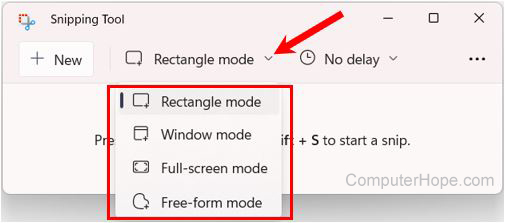
The Snipping Tool is a feature introduced in Windows 7 and is also available in Windows 8, Windows 10, and Windows 11. It can take a screenshot of the entire screen, window, or a rectangular area of the screen and save that screenshot as an image file. For example, if you wanted to send a recipe to a friend but didn't want to send the whole web page, you could use this tool to capture only the recipe. The picture shows the Windows Snipping Tool.
Using the Windows Snipping Tool
To use this tool, follow the instructions below.
Windows 11
- Click Start.
- Type snipping tool and press Enter.
- Click the drop-down menu to the right of the + New option, and select the preferred capture mode.

- Click the New option or press Windows key+Shift+S to start a new snipping action.
- If you selected Window mode, select the window you want to capture.
- If you selected Rectangle mode or Free-form mode, press and hold the left mouse button, drag the mouse to highlight the area you want to capture, then release the mouse button.
- The captured image is displayed in the Snipping Tool window, and additional options appear on the toolbar. You can Save, Copy, or Share the captured image. You can also write a custom message in the snip, highlight text in the snip, or erase the text.
Windows 8 and Windows 10
- Click Start.
- Type snipping tool and press Enter.
- Click the Mode option and choose the Free-form Snip, Rectangle Snip, Window Snip, or Full-screen Snip option.
- Click the New option to start a new snipping action.
- If you selected Window Snip, select the window you want to capture.
- If you selected Free-form Snip or Rectangle Snip, press and hold the left mouse button, drag the mouse to highlight the area you want to capture, then release the mouse button.
- Once you have highlighted the snip you want to save, additional options appear on the toolbar. You can choose from Save Snip, Copy, or Send Snip. You can also write a custom message on the snip, highlight in the snip, erase the text or highlighting you added, or edit the snip in the Microsoft Paint program.
Windows 7
Note
This feature is not available on Windows 7 Starter Edition.
- Click Start.
- Type snipping tool and press Enter.
- Click the Mode option and choose the Free-form Snip, Rectangle Snip, Window Snip, or Full-screen Snip option.
- If you selected Window Snip, select the window you want to capture.
- If you selected Free-form Snip or Rectangle Snip, press and hold the left mouse button, drag the mouse to highlight the area on the screen you want to capture, then release the mouse button.
- Once you have highlighted the snip you want to save, additional options appear on the toolbar. You can choose from Save Snip, Copy, or Send Snip. You can also write a custom message on the snip, highlight in the snip, erase the text or highlighting you added, or edit the snip in the Microsoft Paint program.
Clipboard, Greenshot, Screenshot, Software terms, Windows Accessories
