
How to install an IDE/EIDE Zip drive
Before getting started
- Write down important information from the top or bottom of the hard drive, such as the model number, serial number, and its specifications.
- Ensure you are familiar with ESD (electrostatic discharge) and its potential dangers.
- When physically installing the zip disk drive, ensure the computer is powered down and unplugged.
Set the jumpers
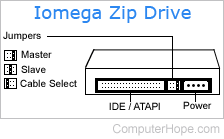
When installing the IDE/EIDE zip drive ensure that the Zip drive has the proper jumper setting. The Zip drive is set as the secondary device.
Drive bays
An internal zip drive is always going to occupy or need a 3.5-inch drive bay. If no 3.5-inch drive bay is available, the computer needs a drive bracket and partial front bezel to cover the empty portion. Drive brackets are included with the internal zip disk drive package. If your computer does not accept the drive bracket, you may want to consider any of the below recommendations.
- Contact the computer manufacturer for drive brackets compatible with your computer.
- Visit a local computer store for alternate brackets.
The front bezel is only obtainable through the computer manufacturer.
For links to many computer and hardware manufacturers, see our support listing.
Attach cables
Once the Zip disk drive is installed into the computer, connect the IDE/EIDE interface cable to the back of the zip drive. Often, the red or blue side of the cable represents pin 1. It should connect with the colored side of the cable facing the power connection.
When connecting the IDE/EIDE cable to the back of the Zip drive, connect the power cable to the back of the drive. This cable is often keyed and only goes in one direction.
BIOS setup
After connecting the Zip Drive, replace the case back and connect the keyboard, monitor, and power to the computer. We do not recommend you connect all the cables yet because if there are issues, you may have to disconnect them again.
As with any IDE/EIDE device, a Zip drive must be properly configured in your computer's BIOS. After you install your drive, turn on your computer. Then, as the computer is booting, enter the BIOS setup.
In BIOS, verify that the IDE/EIDE device is either set up as Auto or is set up as a 100 MB HDD. It is important to note that older computers may not properly detect an IDE/EIDE device and it may be required that a BIOS update be obtained.
For additional help and information, see: Computer BIOS help and support.
Software setup
Once the drive is installed and automatically or manually configured in BIOS, additional software needs to be installed. Use the disk included with your Zip drive (on floppy or CD (compact disc)) to install the drivers for your Zip drive. Note: For users who have Microsoft Windows 98, 2000, Me or later the drive should be automatically detected and installed, but the default installation will not install the Iomega Tools.
Drivers for the Iomega Zip drives is on our removable and tape drive drivers page.