
How to password protect Microsoft Word and Excel documents
Users may want to protect a Microsoft Word document or Excel spreadsheet to prevent other users from opening, adding to, changing, removing data, or any other unauthorized use. It is possible to set up a password that secures a document, requiring users to enter the password to open, view, or modify the document. It is also possible to set a password to prevent users from modifying specific parts of an Excel spreadsheet. Choose from the options below for steps to apply password protection to a Word or Excel document.
Adding a password to your document doesn't hide the document. Password protection makes it so anyone who doesn't know the correct sequence of characters cannot access the document, if the protection is set up correctly.
Protect whole Word & Excel documents
The following steps provide users of Microsoft Word and Excel instructions on password protecting each page of their documents. It should be noted that it's generally a good idea to create a backup copy of your file without a password in case you forget it. Should you choose to do so, it is best not to store the unprotected file locally, but rather on a USB (universal serial bus) jump drive.
Word & Excel Online (web version)
Word & Excel Online do not support setting a password to protect entire documents and spreadsheets. Enabling the Protect option only sets the document or spreadsheet to open as read-only.
- Access the Microsoft Word Online or Excel Online application in your Internet browser and the document or spreadsheet you want to protect.
- Click the File tab.
- Click the Info option.
- Click the Protect Document or Protect Workbook option.
Word & Excel 2010 to 365
- Open Microsoft Word or Excel and the document or spreadsheet you want password protect.
- Click the File tab.
- Click the Info option.
- Click the Protect Document or Protect Workbook option.
- Click Encrypt with Password to require a password to open the document or Restrict Editing to limit or block other users from making edits to the document.
- Type a password in the Password text field and click OK.
- Type a password again in the Reenter password text field and click OK.
- Save the file to save the new password.
Word & Excel 2007
- Open Microsoft Word or Excel and the document or spreadsheet you want to password protect.
- In the top-left corner of the screen, click the Microsoft Office Button.
- In the drop-down menu, move your mouse cursor over Prepare and click Encrypt Document.
- Once you have selected a password, type it in the Password text field, then click OK.
- Type the password again in the Reenter Password text field and click OK.
- Save the file to save the new password.
Password to open - Entering a password for this option makes the file only readable by users who know the password.
Password to modify - Like read-only, this option allows the file to be viewed, but only users with the password may edit and save the file. However, realize that a user could open the file, and then copy its contents to another document.
Removing a password - To remove the password from a protected document, follow the steps in the previous section, but delete the characters entered in the Password field.
Protect parts of an Excel document
Protection can be configured in an Excel spreadsheet for individual cells, a single worksheet, or an entire workbook to prevent modification. Data in the protected cells, worksheet, or workbook cannot be added, changed, or removed. It's also possible to protect macros in the workbook from being removed or changed.
Select your Excel version below and follow the steps to protect a worksheet or its individual cells.
Protecting a single worksheet only covers that specific worksheet. Any other worksheets in the Excel file (workbook) are left open and unprotected.
Excel Online (web version)
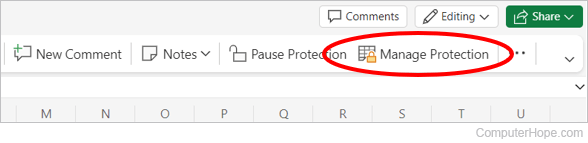
- In the Excel Ribbon, click the Review tab, and then Manage Protection.
- In the Manage Protection pane on the right, click the Protect Sheet toggle (A) to the On position.
- To set one or more cells to still be editable while the worksheet is protected, expand the Unlocked ranges section (B) and click the Add range button. Enter the cells or cell range to be editable. You can also highlight the cells in the worksheet to automatically enter the cell range.

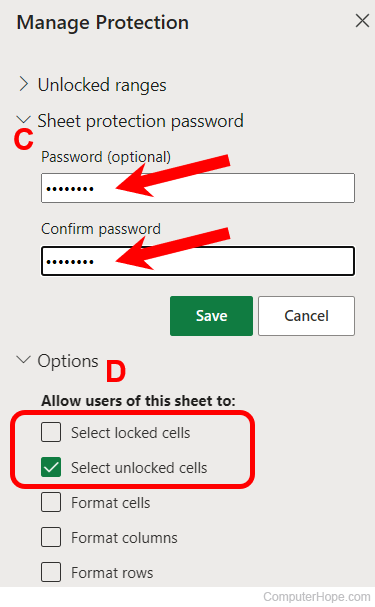
- Expand the Sheet protection password section (C), enter a password to lock the worksheet, enter the same password again to confirm it, and click the Save button.
- Expand the Options section (D). Make sure the Select unlocked cells option is checked and uncheck the Select locked cells option.
Excel 2007 to 365
- Select the cells to be protected.
- Click the Review tab, and click Protect Sheet on the right side.

- In the Protect Sheet window, make sure the Select unlocked cells option is checked. Also, make sure the Select locked cells option is unchecked.
- Enter a password to protect the worksheet and click OK.
- Enter the same password again when prompted to confirm the protection.
Following the steps above prevent users from adding or removing values in the cells you selected for protection. Only the cells you did not select will be editable.
To remove the protection from a workbook or worksheet, follow the same steps above. The options now say "Unprotect" instead of "Protect."
You must have the password to unprotect the worksheet or workbook. There is no way to unprotect without the password.
Excel 2003 and earlier
- Select the cells to be protected.
- Right-click the cells and select Format Cells.
- In the Format Cells window, click the Protection tab.
- Check the box for the Locked option and click OK.
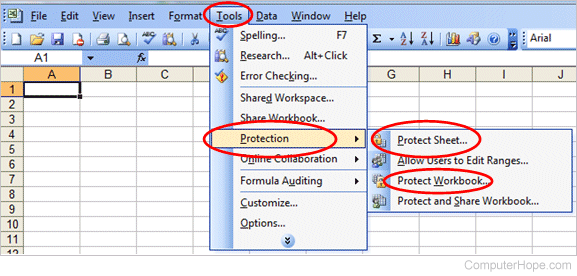
- In the main Excel menu, click Tools > Protection, then select Protect Sheet.
- In the Protect Sheet window, enter a password to protect the worksheet and click OK.
- Enter the same password again when prompted to confirm the protection.
To remove the protection from a workbook or worksheet, follow the same steps above. The options now say "Unprotect" instead of "Protect."
You must have the password to unprotect the worksheet or workbook. There is no way to unprotect without the password.