
How to disable the Microsoft Windows System Restore

Computer malware can hide in the System Restore area, making them difficult to delete and detect. Even with a computer antivirus protection program, it may be necessary to disable System Restore temporarily and then run antivirus in Windows Safe Mode. Disabling the System Restore can also help conserve hard drive space for anyone who needs more disk space.
Disabling the System Restore feature should only be a troubleshooting step and not a solution. We still recommend keeping the System Restore functionality enabled in case you encounter problems down the road. After disabling this feature, don't forget to re-enable it later.
Select your version of Windows below and follow the instructions to turn off System Restore.
If you're disabling System Restore to verify there aren't any hidden viruses or malware on the computer, complete the steps for your operating system and reboot the computer to Safe Mode. Then, run your antivirus program. See: How to open Safe Mode.
Windows 8, 10, and 11
- Press the Windows key and type system restore.
- In the search results, select the Create a restore point entry.
A Windows restore point is not created by selecting Create a restore point.
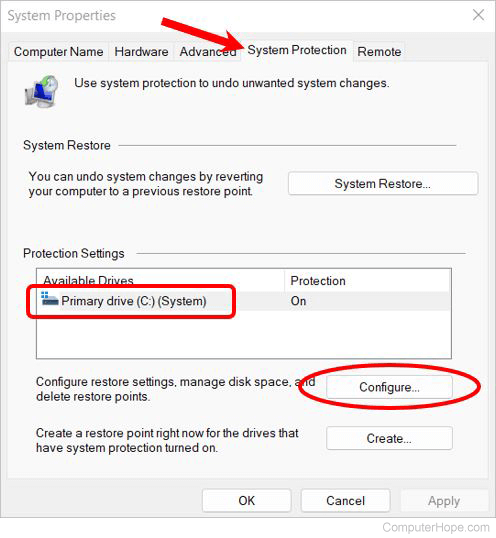
- In the System Properties window that opens, make sure the System Protection tab is selected.
- In the Protection Settings section, select the disk drive that you want to turn off System Restore.
- Click the Configure button.
- In the System Protection window, click the Disable system protection radio button.
- Click the OK button on the System Protection and System Properties windows to save the changes and turn off System Restore.
If you encounter problems while disabling the System Restore functionality, reboot the computer to Safe Mode and repeat these steps.
Windows Vista and 7
- On the Windows desktop, right-click the My Computer icon and select Properties.
If the My Computer icon is not available on your Windows desktop, open the Windows Control Panel, click or double-click the System and Maintenance icon, and then System.
- In the left navigation pane, click System Protection.
- In the window that opens, uncheck the box next to the disk drive that you want to disable System Restore.
- In the System Protection dialog box, click the Turn System Restore Off button.
- Click the OK button to save the changes and turn off System Restore.
If you encounter problems while disabling the System Restore functionality, reboot the computer to Safe Mode and repeat these steps.
Windows XP and earlier
- Click Start.
- In the Start menu, click Programs, Accessories, and then Tools.
- In the System Restore window, click the System Restore Settings link.
- In the System Properties window, check the Turn off System Restore box.
- Click Apply and then OK.
If you encounter problems while disabling the System Restore functionality, reboot the computer to Safe Mode and repeat these steps.