
How to adjust the settings of a home router
All modern Wi-Fi routers provide a configuration interface (administration panel) that you can access in your web browser. Follow the steps on this page to access and configure your home router.
Typical reasons to change your router's settings
Reasons you might need to change the configuration of your home router include:
- Changing the Wi-Fi name (SSID) of your wireless network.
- Changing the password (encryption key) of your wireless network.
- Changing your router's firewall rules to allow inbound or outbound traffic on specific network ports.
- Changing the domain name servers (DNS) used by your router to resolve network addresses.
- Changing the username and password used to access your router's administration interface.
- Enabling or disabling remote administration for your router, which allows the administrator to configure the router from a computer outside the network.
- Setting parental controls to restrict access to specific websites from your network.
How do I configure my model of router?
Every router is different. Even routers made by the same manufacturer may use different configuration tools, depending on the model. So to configure your router, it's important to consult the manual that corresponds with your exact router model. If you don't know which model router you have, check the router enclosure for the identifying information.
If you no longer have the printed manual that came with your router, you can find the documentation online, at your manufacturer's support website. Here are some quick links to the support sites for popular routers:
- TP Link
- Netgear
- Linksys
- D-Link
- Starry
- Synology
- Xfinity (Comcast) wireless gateway.
- Verizon FiOS wireless router
Accessing the router's configuration interface
Most modern routers provide an administration Control Panel that can be accessed through your web browser. You can connect to it in your web browser, as if it were a website. The page is served to your browser directly from your router.
To connect to your router's web interface, follow these steps:
- Connect to your local network - You need to connect to your LAN through your router to access the router's web interface. This connection can be either wireless, or wired (using an Ethernet cable connected to one of your router's Ethernet ports). For detailed instructions about how to create a wired connection to your router, see: Where do I find my WEP, WPA, or WPA2 key?
- Open a new browser window - You can use any Internet browser such as Firefox, Chrome, Edge, or Safari.
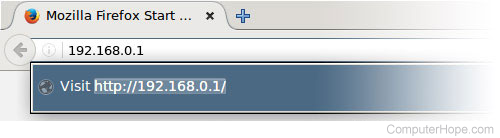
- Navigate to your router's local address - In the address bar, type the IP address of your router. This depends on your browser's configuration, but it is usually one of the following:
192.168.0.1
192 .168.1.1
10.0.0.1
10.0.1.1
In the image below, the address 192.168.0.1 is entered into the address bar.
If none of the above listed IP addresses work for you, consult your manual. Some routers may reserve a special local address that automatically brings you to your router's web interface. For instance, many Netgear routers can be accessed by navigating to routerlogin.net.
You can also find your router's address by asking your computer's network hardware what it is. See determining your router address, below, for more information.
- Log into the web interface - If you successfully navigate to your router, you will see a login prompt, which looks different depending on your model of router and which browser you're using. It may look as simple as the example below.
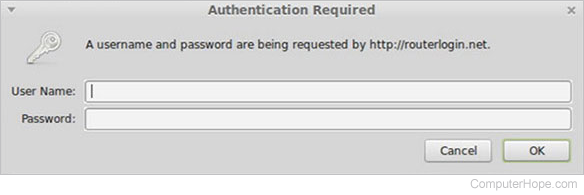
At this prompt, enter your router's administrator username and password — note that this not the same as the password to connect to your network.
If you don't know this information, consult your router's manual. It may also be printed on the router itself. Some router manufacturers create a unique login for each router, and some use a default that's the same for every unit of that model.
If you're still stuck, you can always try one of the traditional default combinations:
| username | password |
|---|---|
| admin | password |
| admin | admin |
| admin | |
| administrator | password |
| administrator | |
| user | password |
| user |
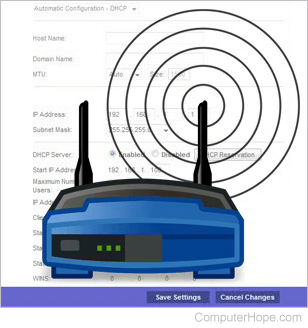
- After entering the correct username and password, you can access the web interface, which look similar to the following example.
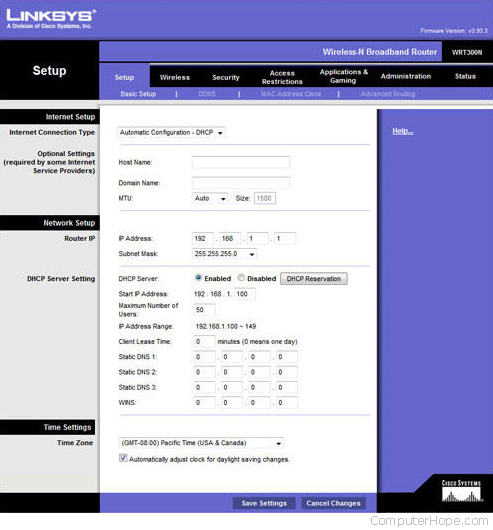
From here, you can access all the configurable options on your router.
Be careful! If you change something you don't understand, you might accidentally disable or degrade the performance of your network. If you change any settings, record those changes on paper or in a text file for future reference.
Changing your router's name and password
Once you can access your router (see the previous section for instructions), you may change the default Wi-Fi name (SSID) and password. To do so, follow the instructions below. However, realize that every router is a bit different so the steps used to find the wireless password section of your router may vary. If you cannot find the wireless security section, consult your router's owner's manual.
- Log into your router (see the previous section for instructions).
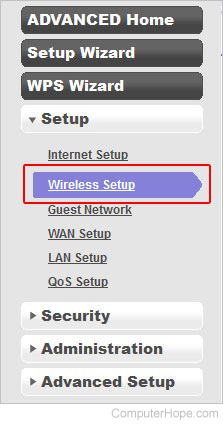
- Look for a Setup or Wireless Setup subsection, usually on the left side or top of the window.
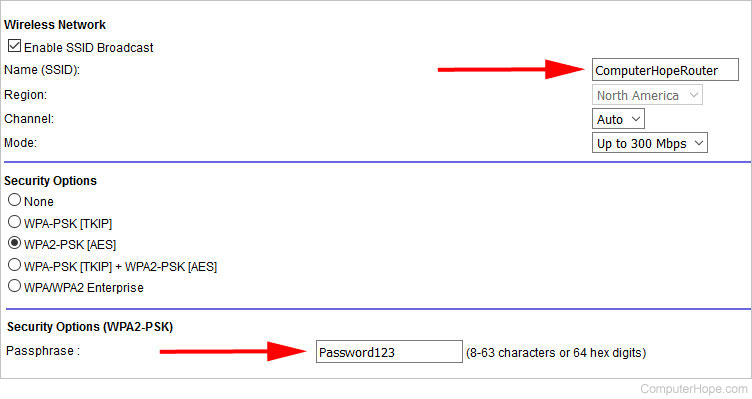
- In the Wireless Setup menu, enter you're preferred router name and password in the for the Name (SSID): and Passphrase: sections.
- Click the
 button to save the new settings, and then exit the router configuration screen.
Resetting the router to factory defaults (if necessary)
If you make a mistake configuring your router, or if you can't log in with your router's default username and password, you can reset your router to its factory default settings. On most wireless routers, a button devoted to this function is located in back of the device. The button may or may not be labeled. It may also be recessed and require a paperclip to press it. Check your manual for details.
Holding in this button for a certain number of seconds resets the router to its original settings. Ten seconds is usually enough.
Among other things, this resets your wireless network name (SSID) and key (network password) to their defaults. After a reset, you must re-establish any connections to the wireless network using these default values.
Determining router address
To authoritatively determine your router's IP address, query your network device for its current configuration. There are different ways to do this, depending on your operating system:
Windows Command Prompt
How to use the Windows command line (DOS). window. You can do this by pressing Windows key+X (hold down the Windows key and press X) to open the Power Users menu, then selecting Command Prompt.
At the command prompt, type ipconfig and press Enter to open the ipconfig command.
ipconfig
Your router's IP address is listed in the output as your default gateway:
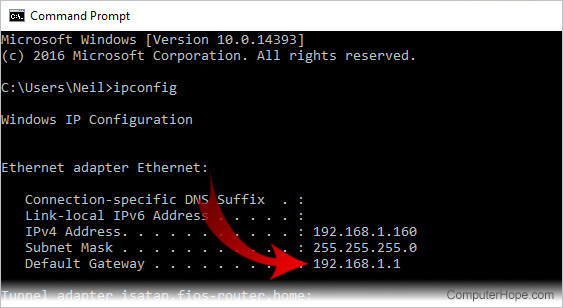
In this example, the router's address is 192.168.1.1.
Windows PowerShell
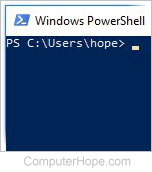
Beginning in 2017, Windows 10 uses the PowerShell as its default command prompt. It's an enhanced version of the traditional command prompt.
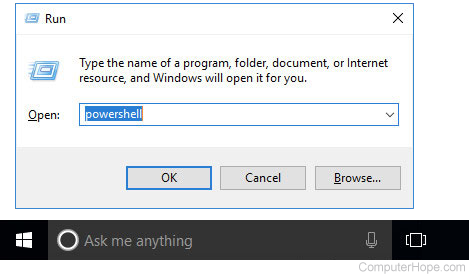
To run PowerShell, press Windows key+R (hold down the Windows key and press R). In the Run menu, type powershell and press Enter (or click OK).
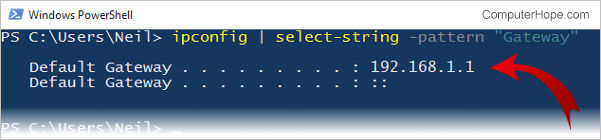
At the PowerShell prompt, run ipconfig to open the ipconfig command.
ipconfig
Ethernet adapter Ethernet:

   Connection-specific DNS Suffix  . : your-router-name
   Link-local IPv6 Address . . . . . : fa88::3203:8d2e:f035:757a%4
   IPv4 Address. . . . . . . . . . . : 192.168.1.154
   Subnet Mask . . . . . . . . . . . : 255.255.255.0
   Default Gateway . . . . . . . . . : 192.168.1.1

Tunnel adapter
[...interface-specific output...]
PowerShell lets you isolate text in your output. By piping the command to select-string, which is similar to the unix tool grep, you can display only those lines containing the string "Gateway":
ipconfig | select-string --pattern "Gateway"
Linux shell

In Linux, use the route command with the -n option. The command must run as root.
In a terminal window, run:
sudo route -n
Kernel IP routing table
Destination     Gateway         Genmask         Flags Metric Ref    Use Iface
0.0.0.0         192.168.1.1     0.0.0.0         UG    1024   0        0 eth0
169.254.0.0     0.0.0.0         255.255.0.0     U     1000   0        0 eth0
192.168.1.0     0.0.0.0         255.255.255.0   U     0      0        0 eth0
This output represents the kernel's routing table, using numeric addresses (-n). The gateway address is listed in the second column of the table, next to the destination 0.0.0.0, which is your local computer.
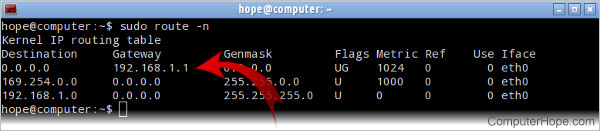
In the example above, the router's address is 192.168.1.1.
macOS terminal

In macOS, the syntax of route uses the keyword get and requires a destination address.
Open a new terminal (Applications → Utilities → Terminal) and run:
sudo route -n get 0.0.0.0 | grep gateway
Sample output:
gateway: 192.168.1.1