
How to create a new user in Windows

Having additional accounts in Windows can be helpful in many instances. For example, you may want to set up parental restrictions for your children or protect the primary account's sensitive information. Also, separate accounts allow different users to customize features such as selecting a specific background, screensaver, or theme.
To create a new user account on a Windows computer, select the version of Windows you're using from the list below and follow the instructions.
You must have an Administrator account to create new users.
Creating a user in Windows 11

- Press the Windows key, type Control Panel, and press Enter.
- Select User Accounts.

- Click User Accounts again.

- Near the middle of the window, click Manage another account.
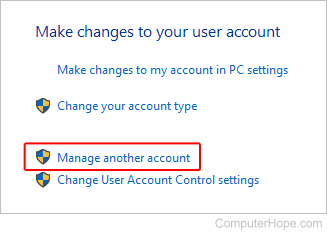
- Below the box containing current user accounts, click the
 link.
link. - If the new user has a Microsoft account, click the Add account button for the Add a family member option.

If the new user does not have a Microsoft account, add a local account by clicking Add account for the Add other user option.

Select a link below for the type of user account you are adding and follow the remaining steps.
Add Microsoft user account
- Enter your account credentials as prompted to verify your identity and Microsoft account.
- On the Add someone window, enter the e-mail address associated with the new user's Microsoft account, then click Next.
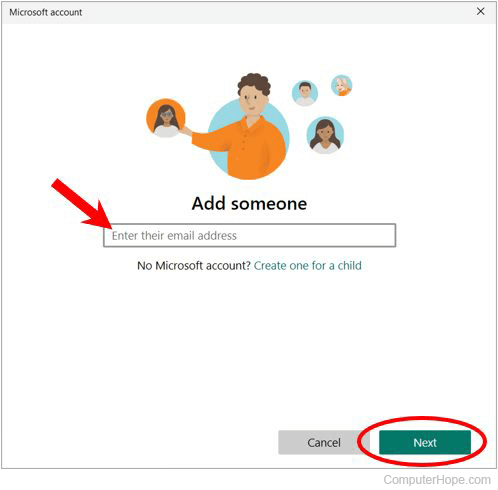
- Follow the remaining prompts and enter the required information to add the new user account.
Add local user account
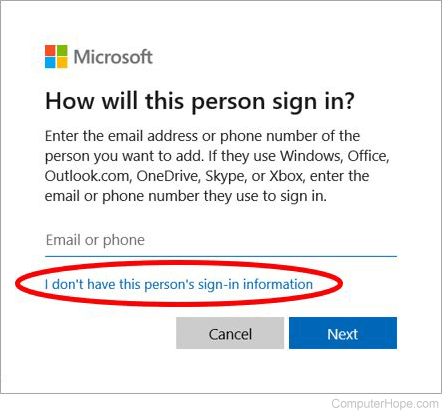
- Click the I don't have this person's sign-in information link.
- In the next window, click the Add a user without a Microsoft account link.
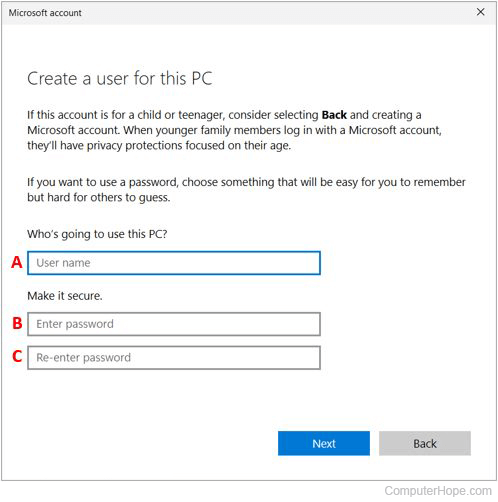
- Enter a username (A) for the new local account, enter the account's password (B), and enter the password again (C).
- After entering the password a second time, additional fields are displayed. Select three security questions from drop-down menus, and enter an answer for each selected security question.
- Click the Next button to finish creating the local user account.
Creating a user in Windows 8 and 10
- Press the Windows key, type Control Panel, and press Enter.
- Select User Accounts.
- Click User Accounts again.
- Near the middle of the window, click Manage another account.
- To the bottom-left of the box containing current user accounts, click the link.
- Near the bottom of the window, click Add a new user in PC settings.
- Click the
 next to Add a family member or Add someone else to this PC.
 - Follow the guided instructions to create a new user account.
During the account creation process, choose the type of account to create: standard user or administrator.
Create a user in Windows Vista and 7

- Open the Control Panel.
- Click Add or remove user accounts.
- Click Create a new account.
- Enter the account name you want to use and select the type of account. For most accounts, we suggest using Standard user.
- Click the Create Account button.
During the account creation process, choose the type of account to create: standard user or admin user.
After the account is created, the name, password, picture, parental controls, and other settings can be changed by clicking the account in the account listing.
Creating a user in Windows XP

- Open the Control Panel.
- Open User Accounts.
- In the User Accounts window, click the Create a new account link.
- Enter the name for the account and click Next.
- Select the account type. For most accounts, we suggest using a Limited account.
- Click the Create Account button.
During the account creation process, choose the type of account to create: standard user or admin user.
After the account is created, the name, password, picture, parental controls, and other settings can be changed by clicking the account in the account listing.
Creating a user in Windows Command Prompt
In Windows 11, a local account can only be created through the command line. It's not possible to add Microsoft accounts to Windows 11 using this method.
- Open the Windows Command Prompt with elevated permissions.
- At the command prompt, type net user /add <username> <password>, where <username> is the name of the new account, and <password> is the new account's password.
For example, to create a new account named myaccount, with a password of $peCia1Acc0unt, type the following.
net user /add myaccount $peCia1Acc0unt
- The new account is created with standard permissions. To change the account to have administrator privileges, type net localgroup administrators <username> /add, where <username> is the new account created in step 2 above.
Continuing with our example above, to change the new myaccount user account to an administrator account, type the following command.
net localgroup administrators myaccount /add