
How to edit or rename a read-only file

To make updates to a file or change its name, the file cannot be read-only. To modify a read-only file, follow the suggestions below to disable that feature and allow it to be edited.
Close all other programs
When a program opens a file, it may lock the file or set the file as read-only. Verify that more than one program is not using the same file by closing all other open programs and windows and then saving the file again.
Remove the read-only attribute
Some read-only files can be changed to allow for edits by removing the read-only attribute in the file properties.
- Right-click the file and select Properties.
- Uncheck the box for Read-only and click OK.
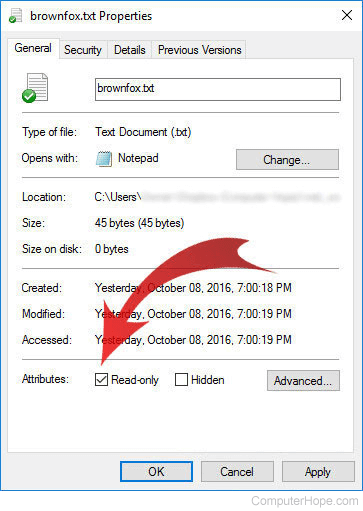
- If the Read-only attribute is removed, the file should now be editable.
Save a new copy of the file
Sometimes a file is set as read-only due to a hidden setting and not because of a read-only attribute. You can save a new copy of the file to remove the read-only setting on the file.
- Open the read-only file.
- Use the Save or Save As option in the program used to view the file to save a new copy of the file. Make sure to save the new copy of the file as a different file name than the original.
- Close the read-only file, then open the new copy of the file and try modifying and saving the file's contents.
Corrupt file
If the suggestions above do not work, the file you're trying to edit may be corrupted, preventing the option to modify it. Try rebooting the computer and re-opening the file to make sure another program has not locked the file. If the file still doesn't open, the file would need to be restored from a backup, re-downloaded, or re-created by the original writer to fix this issue.