Protect and unprotect a cell or worksheet in Microsoft Excel
When you create a spreadsheet, you may enter data or formulas that you do not want other users to change. Protecting a cell or worksheet can be essential to maintaining the integrity of data and formulas in a spreadsheet.
In Microsoft Excel, you can protect one or more cells, or protect an entire worksheet, preventing other users from changing the data in the cells or worksheet. After locking and protecting cells or worksheets, to edit them again, you must unprotect them. Select a link below to learn how to protect and unprotect a cell or worksheet in Microsoft Excel.
How to protect a cell
To protect a cell in Microsoft Excel, follow the steps below.
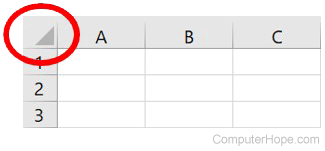
- Select all cells in the worksheet by clicking the Select All button, found above the row numbers and to the left of the column headers.
- Press Ctrl+1 to open the Format Cells window. You can also use Ctrl+Shift+F combination to open the Format Cells window.
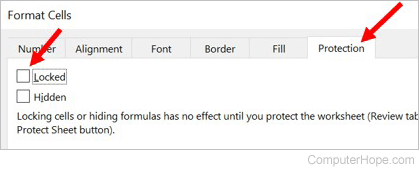
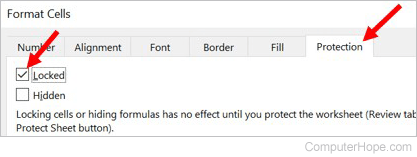
- In the Format Cells window, click the Protection tab.
- Uncheck the box for the Locked option, then click OK.
- In the worksheet, select the cell you want to lock and protect.
If necessary, you can select more than one cell to protect. For help to select more than one cell, see: How to select one or more cells in a spreadsheet program.
- Open the Format Cells window by pressing Ctrl+1 combination again.
- Click the Protection tab, check the box for the Locked option, then click OK.
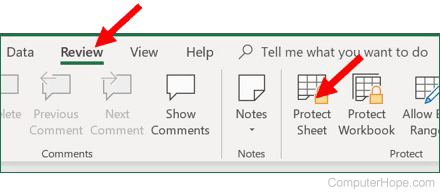
- In the menu bar, click the Review tab.
- In the Protect group, click the Protect Sheet option.
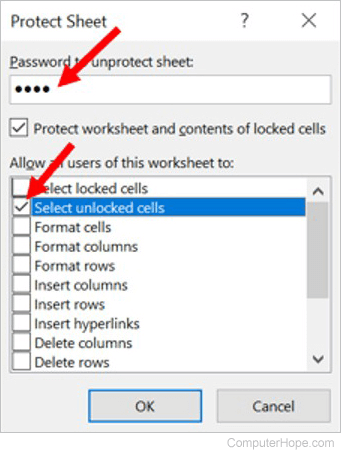
- The Protect Sheet window opens. Enter a password for unlocking the protected cells in the Password to unprotect sheet text field.
- In the Allow all users of this worksheet to section, make sure only the box for the Select unlocked cells option is checked, then click OK.
- Enter the password again in the Confirm Password window and click OK.
How to protect a worksheet
To protect a worksheet in Microsoft Excel, follow the steps below.
- Select all cells in the worksheet by clicking the Select All button, found above the row numbers and to the left of the column headers.
- Press Ctrl+1 to open the Format Cells window. You can also use Ctrl+Shift+F combination to open the Format Cells window.
- In the Format Cells window, click the Protection tab.
- Make sure the box for the Locked option is checked. Click the box to check it if it's not already checked.
A smaller solid black box inside the Locked checkbox ![]() means some cells in the worksheet are currently locked and other cells are unlocked.
means some cells in the worksheet are currently locked and other cells are unlocked.
- In the menu bar, click the Review tab.
- In the Protect group, click the Protect Sheet option.
- The Protect Sheet window opens. Enter a password for unlocking the protected cells in the Password to unprotect sheet text field.
- In the Allow all users of this worksheet to section, make sure only the box for the Select unlocked cells option is checked, then click OK.
- Enter the password again in the Confirm Password window and click OK.
How to unprotect a cell or worksheet
To unprotect a cell or worksheet in Microsoft Excel, follow the steps below.
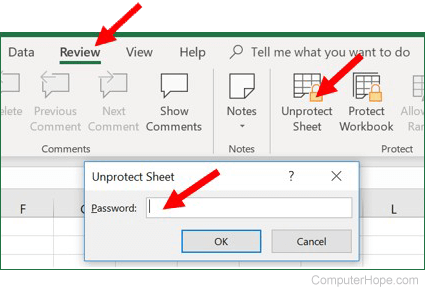
- In the menu bar, click the Review tab.
- In the Protect group, click the Unprotect Sheet option.
- In the Unprotect Sheet sheet window that pops up, enter the password to unlock the worksheet, then click OK.