
Why do I get jagged fonts in Photoshop?
In Adobe Photoshop, you may notice your text has a jagged, pixelated appearance. While text layers act as vector smart objects that can be infinitely scaled, Photoshop tries to provide a preview of how the image looks when rasterized (turned into pixels) and exported. This jaggedness can be caused by several settings, including your anti-aliasing method, project resolution, or the amount of zoom you're using while working.
If your fonts appear more jagged than intended, and no filters are causing this, review the following sections to help troubleshoot the problem.
You are zoomed too close
Raster-based image editing programs like Photoshop are based on pixels, not mathematical vectors. Because of this, you can always zoom far enough into an image that it appears pixelated. If your text appears too pixelated, try zooming out to see if your magnification is the cause. Zooming out until the percentage (found in the bottom-left corner) is 100% provides a more accurate preview of how your final exported image would look.
You can zoom out in Photoshop by:
- Pressing and holding Alt (Windows) or Option (Mac) while scrolling down using the mouse wheel or touchpad.
- Pressing - (hyphen key) while holding Ctrl (Windows) or Command (Mac).
- With the Zoom tool
 selected, holding Alt (Windows) or Option (Mac) and clicking anywhere in the canvas.
A good way to know if you've zoomed too far into an image is by enabling the pixel grid. This way, you can see the individual gridlines when you are zoomed in far enough to see them. To enable the pixel grid:
- Select View in the menu bar.
- Click the Show option.
- Make sure Pixel Grid has a check mark next to it by clicking it.
Anti-aliasing is disabled or changed

Photoshop uses a feature called anti-aliasing to smooth the edges of text. There are several methods to choose from that affect the smoothness of text in different ways. If you're unfamiliar anti-aliasing, it can easily be disabled or changed accidentally. If your anti-aliasing is set to None, the edges appear more jagged than if one of the anti-aliasing options is selected.
To change the anti-aliasing method of a text layer in Photoshop:
- Click your text layer in the Layers panel.
- Select the Type tool
 in the Tools panel.
 - In the Tool options panel at the top of the screen, select the drop-down menu next to the anti-aliasing icon
 .
.
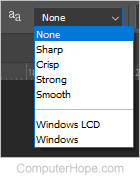
- Select an option, such as Crisp or Smooth, to see if the look of your text improves.
The image's resolution is too low
If the methods above do not resolve the issue, you may want to check the resolution of your image. The preset you used when you created your document should default to 72 PPI (pixels per inch) for web graphics or 300 DPI (dots per inch) for printed graphics. If the resolution is lower than these defaults, your text and images may appear blocky.
To change the resolution of your Photoshop document:
- In the menu bar, select Image.
- Select Image Size.
- In the Image Size window, type a number between 72 and 300 in the Resolution field (A).

- Click OK (B) to save your changes.