
Automate your work with AutoHotkey
AutoHotkey is a free and powerful tool that lets you automate almost anything on your Windows computer in any program. Computer Hope uses this tool daily to help answer common questions asked in e-mail quickly and perform other common repetitive tasks. If you do anything daily that requires you to repeat the same actions, we highly recommend using this tool. This page demonstrates some of this program's capabilities.
This tool can automate tasks in gaming, some online games may consider this cheating and if caught it may result in a ban.
To follow with this page's examples, please download and install AutoHotkey before following any of these steps. Otherwise, skim this page for a better understanding of the program before downloading and installing it on your computer.
Edit the script
After AutoHotkey is installed to create and edit a script right-click anywhere on the desktop or in a folder, click New, and choose AutoHotkey script. Name the script whatever you want, then right-click the script file and select Edit the script.
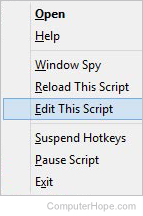
If you plan on always using the same scripts you can also load AutoHotkey at startup, right-click the AutoHotkey icon (![]() ) in the Windows notification area, and click Edit this script. The default script (AutoHotkey.ahk) opens in your default text editor and allow you to add or change your script. Each time AutoHotkey loads when your computer starts this default script loads this script.
) in the Windows notification area, and click Edit this script. The default script (AutoHotkey.ahk) opens in your default text editor and allow you to add or change your script. Each time AutoHotkey loads when your computer starts this default script loads this script.
Script basics
Each script in AutoHotkey can also be assigned a keyword (hotstring) or a personalized keyboard shortcut. When using a keyboard shortcut any shortcut can be used as long as Windows has not already assigned those keys to another task. Each keyboard shortcut can be comprised of any of the following modifier keys and any other letters, numbers, or other keys on the keyboard followed by two colons (::).
- Windows key represented as a "#"
- Alt represented as a "!"
- Ctrl represented as a "^"
AutoHotkey includes two example scripts, the first one (as shown in the picture) opens the AutoHotkey web page when you press the Windows key and Z at the same time. Which can be done now if you have AutoHotkey installed and the default autohotkey.ahk loaded. Otherwise, this line can be added to a new script, saved, and ran to allow this shortcut to work.
#z::Run www.autohotkey.com
Most scripts are more than one line. However, in the above example, it's only one line and needs no additional commands. In the following script example, the script has multiple lines, and as shown, must be finalized with the "return" command to prevent anything following this script from being executed.
^!n::
IfWinExist Untitled - Notepad
WinActivate
else
Run Notepad
return
The script above starts with the keyboard shortcut Ctrl+Alt+N, the next four lines are an if else command, which in English translate to "if an untitled Notepad window exists then make that window active, else run a new Notepad."
Creating your first script
With your basic understanding of how this program works, lets create your first script to print "Hello World!" anywhere you want. Move the cursor to the end of your new script file or the default Autohotkey.ahk script file and add the following line.
::Hello::Hello World{!} My first script. ;Example comment
In this first example, we are not using a shortcut, only the keyword "hello" to execute the script. Also, because "!" is a modifier key command for Alt its been surrounded by curly brackets, which indicates the key, not a command. Finally, this script also contains a comment at the end, which is everything from the semicolon to the end of the line. In AutoHotkey scripts, all text between a semicolon and the end of the line is considered to be a comment. You can use comments to help explain the code in the script.
Any time you make any changes to a script it must be reloaded or run for those changes to work.
To load the script, double-click the script file or right-click the script file and choose Run Script. If you're editing a running script, make sure to reload the script by right-clicking the AutoHotkey icon (![]() ) in the Windows notification area and choose the Reload This Script.
) in the Windows notification area and choose the Reload This Script.
Once the script is loaded, you should be able to type "hello" in the following text box and after pressing space or any punctuation the script type out "Hello World! My first script."
If you don't want to have to press the space or punctuation, you can add an asterisk between the two first colons.
Next, in the next example, we are creating a script that is executed with a keyboard shortcut. Edit the script and add the following three lines to your script.
#F2::
send Hello World{!}
return
After these three lines are added, save the file as the same file name and then reload the script. If done successfully, clicking in the text box below and pressing Windows key+F2 would print "Hello World!" to the screen.
Any keyboard shortcuts can also be added, data can be copied to and from the clipboard, and the script can sleep for any set time. Edit the script again and make the following changes to the script created earlier.
#F2::
send Hello World{!}
send {CTRLDOWN}{SHIFTDOWN}{HOME}{CTRLUP}{SHIFTUP}
send {CTRLDOWN}c{CTRLUP}{END}
example = %clipboard%
StringUpper,example,example
sleep, 1000
send, - new hello = %example%
return
In the example above, lines three and four have introduced how keys can be pressed in the script to perform other keyboard shortcuts. The third line is pressing Ctrl+Shift+Home to highlight all text before the cursor, and the next line is pressing Ctrl+C to copy the highlighted text. Anytime a key is pressed down (e.g., {CTRLDOWN}), make sure it is let go with up (e.g., {CTRLUP}), otherwise it remains down and cause problems.
The fifth line introduces a variable and the %clipboard% command which contains anything in your clipboard. With this line, all contents in the clipboard are assigned to the "example" variable.
The next command is making the example variable all uppercase using the StringUpper command and assigning the uppercase text back to the example variable. The StringLower command could also be used to make everything lowercase.
Next, the sleep command is a great command for making the script sleep for any length of time. 1000 equals 1 second. This command is useful and often necessary if the script has to wait for the computer to open a program or window.
Finally, the last send command adds " - new hello =" with the hello world now all in uppercase. This revised version of the script can be tested again in the text box.
Scripting the mouse
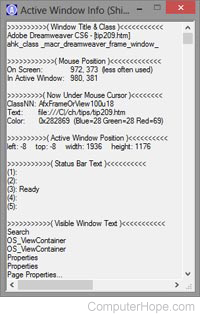
Although almost anything can be done using keyboard shortcuts, there are still times you may want to click somewhere on the screen. Using the click command, click any location of the screen as shown in the following example. To determine where you want to click, use the Window Spy utility that can be opened by right-clicking the AutoHotkey icon (![]() ) and clicking Window Spy. As you move your mouse, the "In Active Window" displays the location of your mouse cursor's current position. Once you've determined where you want to click, add the Click command with where you want the mouse to click.
) and clicking Window Spy. As you move your mouse, the "In Active Window" displays the location of your mouse cursor's current position. Once you've determined where you want to click, add the Click command with where you want the mouse to click.
#F2::
Click 980,381
return
With this command, once Windows key+F2 is pressed, the mouse clicks once at 980,381.
Run a program
If you run a program often, it can be open in a script by typing run and the name of the file you want to run. Earlier in this page we gave an example of how to run Notepad by typing "run notepad" in the script. If you're familiar with the Windows Run, many of the same commands and ways you run a program or open a file work in AutoHotkey. Below are some additional examples of what the run command can do in AutoHotkey.
Run, wordpad.exe, C:\My Documents, max
In the first example, this would open WordPad with the default directory C:\My Document, and open the window maximized.
Run, www.computerhope.com
Any Internet URL (uniform resource locator) can be added after the run command to open that web page in your default browser.
Run, mailto:[email protected]?subject=My Subject&body=Body text example.
Here is another example of the run command, which is sending an e-mail using your default e-mail client and sending the e-mail to [email protected]. The subject of the e-mail is "My Subject," and the body of the message is "Body text example."
Using variables
Like other programming and scripting languages, AutoHotkey supports variables in the script. As seen earlier, we demonstrated copying the clipboard contents to a variable. A variable in AutoHotkey can be either a string or an integer and does not need to be declared like other programming languages.
In our first example, we are using an integer variable to add two numbers together and display the results in a message box.
#F2::
example := 5+5
msgbox, Example is equal to %example%
return
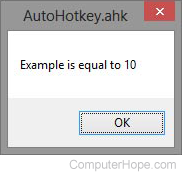
In the example above, "example" is our variable name, and := is assigning the integer expression as the value of 5+5 (10). Once the variable is assigned, we are using the msgbox command to open a message box and print its value. Whenever you are sending, printing, or assigning a variable it must begin and end with a percent symbol. After saving and reloading the script above, when pressing Windows key+F2 you should see a message box similar to the example shown on this page.
In the next example, we are assigning the variable a string value, and once again displaying the results in a message box.
#F2::
example := "Nathan"
msgbox, Hello World! My name is %example%
return
In the above example, we are assigning the example variable to "Nathan" and because it's a string it must be surrounded in quotes. When Windows key+F2 is pressed this time, the script opens a message box saying "Hello World! My name is Nathan".
To have a variable with a string and integer, place the expression outside the quotes, as seen in the following example.
#F2::
example := "Example: " 5+5
msgbox, Mixed variable is %example%
return
When executed, the message box displays "Mixed variable is Example: 10"
Conditional statements
Conditional statements are also supported with AutoHotkey and support the operators and (&&), or (||), and not (!). Below are a few examples of how conditional statements can be used.
#F2::
example := 5
if example = 5
msgbox, true
else
msgbox, false
return
In the example above, the variable is assigned to 5 and the conditional statement verifies it's equal to 5. Because this is true, the msgbox prints true. If the example value was not equal to 5, the msgbox would have returned false.
You would think after seeing the first conditional statement example that you could put quotes around a string in the variable and conditional statement; however, this does not work. To match a string, surround your expression with parentheses, as shown in the following example.
#F2::
example := "computer"
if (example = "hope")
msgbox, true
else
msgbox, false
return
In the example above, if the example variable equals hope, print true, otherwise print false. Because the example variable is assigned as "computer" this script returns false.
Creating a loop
If there is a script that you want repeat, place the script in a loop, as seen in the following example script.
#F2::
loop, 5
{
send Hello World{!}
sleep 300
}
return
Once the script above is added, and the script re-loads or runs, you should be able to click the text box and press Windows key+F2 to print Hello World! five times. The loop can be extended to repeat as often as you want.
Regular expressions
Like other scripting languages, AutoHotkey also supports regular expressions (regex), which lets you replace any text in a string with other text. A regex is useful when you may want to change the formatting of text or remove unnecessary data in a string.
#F2::
example := "[email protected]"
example:= RegExReplace(example, "@.*", "")
msgbox, Username is %example%
return
In the example above, the third line with RegExReplace replaces the @ and everything after it with nothing. As a result, the example variable only shows the username account of the e-mail address. When Windows key+F2 is pressed, the message box displays "Username is support".