
Using AutoHotkey to switch Virtual Desktops in Windows 10
One of the best features of Windows 10 is the Task View, which you can use to create virtual desktops. These desktops are a great way to distribute and organize the windows of your open applications. You can press Windows key+Tab (hold down the Windows key and press Tab) to see them in the Task View.
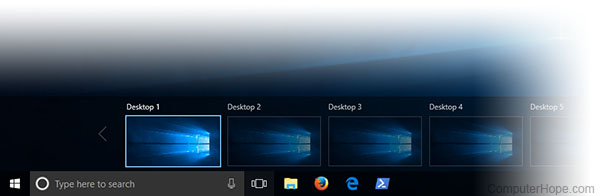
However, one feature not provided by Microsoft is the ability to instantly switch to a specific virtual desktop with a keyboard shortcut. For instance, if you are on Desktop 2 and you want to switch to Desktop 6, you have to hold down Windows key+Ctrl+→ four times. It would be easier to have a shortcut that automatically switches to desktop number 6, regardless of which desktop you're using.
This tutorial shows you how to create keyboard shortcuts to switch directly to any virtual desktop by number. We accomplish this using the free Windows utility, AutoHotkey.
Creating the script
- The installer exits, and a new text file opens in Notepad. The file is our script. (A script is a plain text file containing commands to be run by another program, in this example, AutoHotkey.)
The script on this page is based on Windows Desktop Switcher, an open source script hosted on GitHub at github.com/pmb6tz/windows-desktop-switcher.
- Copy and paste the following script to your Notepad document:
; Globals
DesktopCount = 2 ; Windows starts with 2 desktops at boot
CurrentDesktop = 1 ; Desktop count is 1-indexed (Microsoft numbers them this way)
;
; This function examines the registry to build an accurate list of the current virtual desktops and which one we're currently on.
; Current desktop UUID appears to be in HKEY_CURRENT_USER\SOFTWARE\Microsoft\Windows\CurrentVersion\Explorer\SessionInfo\1\VirtualDesktops
; List of desktops appears to be in HKEY_CURRENT_USER\SOFTWARE\Microsoft\Windows\CurrentVersion\Explorer\VirtualDesktops
;
mapDesktopsFromRegistry() {
 global CurrentDesktop, DesktopCount
 ; Get the current desktop UUID. Length should be 32 always, but there's no guarantee this couldn't change in a later Windows release so we check.
 IdLength := 32
 SessionId := getSessionId()
 if (SessionId) {
 RegRead, CurrentDesktopId, HKEY_CURRENT_USER\SOFTWARE\Microsoft\Windows\CurrentVersion\Explorer\SessionInfo\%SessionId%\VirtualDesktops, CurrentVirtualDesktop
 if (CurrentDesktopId) {
 IdLength := StrLen(CurrentDesktopId)
 }
 }
 ; Get a list of the UUIDs for all virtual desktops on the system
 RegRead, DesktopList, HKEY_CURRENT_USER, SOFTWARE\Microsoft\Windows\CurrentVersion\Explorer\VirtualDesktops, VirtualDesktopIDs
 if (DesktopList) {
 DesktopListLength := StrLen(DesktopList)
 ; Figure out how many virtual desktops there are
 DesktopCount := DesktopListLength / IdLength
 }
 else {
 DesktopCount := 1
 }
 ; Parse the REG_DATA string that stores the array of UUID's for virtual desktops in the registry.
 i := 0
 while (CurrentDesktopId and i < DesktopCount) {
 StartPos := (i * IdLength) + 1
 DesktopIter := SubStr(DesktopList, StartPos, IdLength)
 OutputDebug, The iterator is pointing at %DesktopIter% and count is %i%.
 ; Break out if we find a match in the list. If we didn't find anything, keep the
 ; old guess and pray we're still correct :-D.
 if (DesktopIter = CurrentDesktopId) {
 CurrentDesktop := i + 1
 OutputDebug, Current desktop number is %CurrentDesktop% with an ID of %DesktopIter%.
 break
 }
 i++
 }
}
;
; This functions finds out ID of current session.
;
getSessionId()
{
 ProcessId := DllCall("GetCurrentProcessId", "UInt")
 if ErrorLevel {
 OutputDebug, Error getting current process id: %ErrorLevel%
 return
 }
 OutputDebug, Current Process Id: %ProcessId%
 DllCall("ProcessIdToSessionId", "UInt", ProcessId, "UInt*", SessionId)
 if ErrorLevel {
 OutputDebug, Error getting session id: %ErrorLevel%
 return
 }
 OutputDebug, Current Session Id: %SessionId%
 return SessionId
}
;
; This function switches to the desktop number provided.
;
switchDesktopByNumber(targetDesktop)
{
 global CurrentDesktop, DesktopCount
 ; Re-generate the list of desktops and where we fit in that. We do this because
 ; the user may have switched desktops via some other means than the script.
 mapDesktopsFromRegistry()
 ; Don't attempt to switch to an invalid desktop
 if (targetDesktop > DesktopCount || targetDesktop < 1) {
 OutputDebug, [invalid] target: %targetDesktop% current: %CurrentDesktop%
 return
 }
 ; Go right until we reach the desktop we want
 while(CurrentDesktop < targetDesktop) {
 Send ^#{Right}
 CurrentDesktop++
 OutputDebug, [right] target: %targetDesktop% current: %CurrentDesktop%
 }
 ; Go left until we reach the desktop we want
 while(CurrentDesktop > targetDesktop) {
 Send ^#{Left}
 CurrentDesktop--
 OutputDebug, [left] target: %targetDesktop% current: %CurrentDesktop%
 }
}
;
; This function creates a new virtual desktop and switches to it
;
createVirtualDesktop()
{
 global CurrentDesktop, DesktopCount
 Send, #^d
 DesktopCount++
 CurrentDesktop = %DesktopCount%
 OutputDebug, [create] desktops: %DesktopCount% current: %CurrentDesktop%
}
;
; This function deletes the current virtual desktop
;
deleteVirtualDesktop()
{
 global CurrentDesktop, DesktopCount
 Send, #^{F4}
 DesktopCount--
 CurrentDesktop--
 OutputDebug, [delete] desktops: %DesktopCount% current: %CurrentDesktop%
}
; Main
SetKeyDelay, 75
mapDesktopsFromRegistry()
OutputDebug, [loading] desktops: %DesktopCount% current: %CurrentDesktop%
; User config!
; This section binds the key combo to the switch/create/delete actions
LWin & 1::switchDesktopByNumber(1)
LWin & 2::switchDesktopByNumber(2)
LWin & 3::switchDesktopByNumber(3)
LWin & 4::switchDesktopByNumber(4)
LWin & 5::switchDesktopByNumber(5)
LWin & 6::switchDesktopByNumber(6)
LWin & 7::switchDesktopByNumber(7)
LWin & 8::switchDesktopByNumber(8)
LWin & 9::switchDesktopByNumber(9)
;CapsLock & 1::switchDesktopByNumber(1)
;CapsLock & 2::switchDesktopByNumber(2)
;CapsLock & 3::switchDesktopByNumber(3)
;CapsLock & 4::switchDesktopByNumber(4)
;CapsLock & 5::switchDesktopByNumber(5)
;CapsLock & 6::switchDesktopByNumber(6)
;CapsLock & 7::switchDesktopByNumber(7)
;CapsLock & 8::switchDesktopByNumber(8)
;CapsLock & 9::switchDesktopByNumber(9)
;CapsLock & n::switchDesktopByNumber(CurrentDesktop + 1)
;CapsLock & p::switchDesktopByNumber(CurrentDesktop - 1)
;CapsLock & s::switchDesktopByNumber(CurrentDesktop + 1)
;CapsLock & a::switchDesktopByNumber(CurrentDesktop - 1)
;CapsLock & c::createVirtualDesktop()
;CapsLock & d::deleteVirtualDesktop()
; Alternate keys for this config. Adding these because DragonFly (python) doesn't send CapsLock correctly.
;^!1::switchDesktopByNumber(1)
;^!2::switchDesktopByNumber(2)
;^!3::switchDesktopByNumber(3)
;^!4::switchDesktopByNumber(4)
;^!5::switchDesktopByNumber(5)
;^!6::switchDesktopByNumber(6)
;^!7::switchDesktopByNumber(7)
;^!8::switchDesktopByNumber(8)
;^!9::switchDesktopByNumber(9)
;^!n::switchDesktopByNumber(CurrentDesktop + 1)
;^!p::switchDesktopByNumber(CurrentDesktop - 1)
;^!s::switchDesktopByNumber(CurrentDesktop + 1)
;^!a::switchDesktopByNumber(CurrentDesktop - 1)
;^!c::createVirtualDesktop()
;^!d::deleteVirtualDesktop()
- Save the file.

- This script, AutoHotkey.ahk, is located in your Documents folder. Open a new File Explorer window (press Windows key+E) and go to Documents.

- Run the script by double-clicking the file. You won't see anything happen, but AutoHotkey is now running the script.
How does it work?
The script works by tracking which virtual desktop you're currently using. Holding down the winkey and pressing a number between 1 and 9 automatically switches left or right the correct number of times to get to the desired desktop. (If you press the number of a desktop that doesn't exist yet, nothing will happen.)
Testing your new hotkeys
To test it out, first create a new virtual desktop. To do this, click the Task View icon on your Taskbar (or press Windows key+Tab), then click + New Desktop. Or, use the keyboard shortcut Windows key+Ctrl+D.
Do this once for each new virtual desktop you want to create. Each additional desktop is oriented to the right of the previous.
Now, you can switch to any of these desktops using the keyboard shortcuts defined in the script. Hold down Windows key and press a number between 1 and 9, and you are automatically switched to that numbered desktop. For instance, press Windows key+3 to switch to the third virtual desktop from the left.
Stopping the script
To stop using the script, go to your system tray and right-click the AutoHotkey icon, which looks like a big green "H" to bring up the AutoHotkey Windows Notification menu.
If you don't see the icon, use the caret ^ button to show hidden icons.
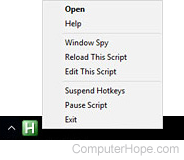
In this menu, you can Suspend Hotkeys, Pause Script, or Exit AutoHotkey entirely. Any of these actions return your hotkeys to normal.
Running your script automatically when Windows starts
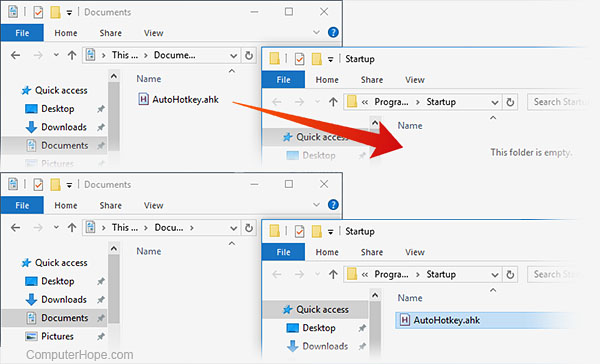
To run the script automatically every time you start Windows, move the script to your Startup folder.
In Windows 10 and Windows 11, the Startup folder is located at:
[Your home folder]\AppData\Roaming\Microsoft\Windows\Start Menu\Programs\Startup
This folder is normally hidden, so you can only get to it in File Explorer if you select View → View Hidden Files at the top of the Explorer window.
However, you also can access the Startup folder directly by entering the full directory path in the Run box. Press Windows key+R to open the Run box, then type the full directory path. You can use the environment variable %APPDATA% to automatically fill in the beginning of the path name. For instance, you can type this in the Run box:
%APPDATA%\Microsoft\Windows\Start Menu\Programs\Startup
When you press Enter, that folder opens in a new File Explorer window.
Now move your script to this folder. If you still have your Documents folder open in another window, drag-and-drop AutoHotkey.ahk into the Startup folder.
If you decide that you don't want to run the script automatically every time you start Windows, open this folder again and move the script somewhere else. You can always run it manually by double-clicking it, no matter where it is on your computer.
Additional notes
This script overrides the default Windows shortcuts for Win+(Number), which normally open up items on your taskbar (Win+1 opens the first item, etc). However, some built-in Windows applications such as Settings or Store ignore AutoHotkey's script. If you're on one of these windows when trying hotkeys, it uses the Windows hotkey behavior, and opens something from your Taskbar instead of a new desktop. Another thing to realize is that AutoHotkey is actually switching left and right between your virtual desktops, quickly, one by one. If it bumps into a virtual desktop where one of these special applications is open, it stops switching and stays on that desktop.
Unfortunately, the default Windows shortcuts cannot be disabled, which is inconvenient, but unless you have one of these application windows open, the AutoHotkey script works fine. The script usually works perfectly with 95% of your other programs.
However, if you prefer, you can edit your AutoHotkey script to use a different key combination.
Editing your AutoHotkey script
Open Notepad (Start → Windows Accessories → Notepad).
In Notepad, open the AutoHotkey file. If you already have the Startup folder open, you can drag-and-drop the icon onto the Notepad window to open the file.
Or, you can open it by going to File → Open in Notepad and entering the file name %APPDATA%\Microsoft\Windows\Start Menu\Programs\Startup\AutoHotkey.ahk.
When the file is open, you can make changes to the script to suit your needs. For instance, if you would prefer to use the hotkey combination Caps Lock+(Number), look for these lines in the script:
LWin & 1::switchDesktopByNumber(1)
LWin & 2::switchDesktopByNumber(2)
LWin & 3::switchDesktopByNumber(3)
LWin & 4::switchDesktopByNumber(4)
LWin & 5::switchDesktopByNumber(5)
LWin & 6::switchDesktopByNumber(6)
LWin & 7::switchDesktopByNumber(7)
LWin & 8::switchDesktopByNumber(8)
LWin & 9::switchDesktopByNumber(9)
In these lines, change LWin to CapsLock:
CapsLock & 1::switchDesktopByNumber(1)
CapsLock & 2::switchDesktopByNumber(2)
CapsLock & 3::switchDesktopByNumber(3)
CapsLock & 4::switchDesktopByNumber(4)
CapsLock & 5::switchDesktopByNumber(5)
CapsLock & 6::switchDesktopByNumber(6)
CapsLock & 7::switchDesktopByNumber(7)
CapsLock & 8::switchDesktopByNumber(8)
CapsLock & 9::switchDesktopByNumber(9)
Save your changes, and double-click the script to update it in AutoHotkey. If you made any mistakes in your script, AutoHotkey does not run it, and gives you an error message. Otherwise, it asks you to update the script that is already running:
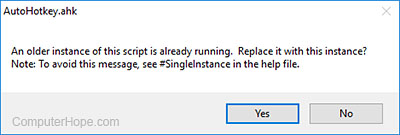
Choose Yes to make your new changes take effect.
If you have an idea for a different hotkey combination, you can change it to any hotkey combination that is not already in use.
Picking a key combination
AutoHotkey has its own special words and characters that it uses for representing keyboard keys in its scripts. For instance, the Ctrl key is represented by an exclamation mark. To use Ctrl+(Number) as your hotkey combination, you could change "CapsLock &" to "!" in your script. Then the lines would look like this:
!1::switchDesktopByNumber(1)
!2::switchDesktopByNumber(2)
!3::switchDesktopByNumber(3)
!4::switchDesktopByNumber(4)
!5::switchDesktopByNumber(5)
!6::switchDesktopByNumber(6)
!7::switchDesktopByNumber(7)
!8::switchDesktopByNumber(8)
!9::switchDesktopByNumber(9)
Notice that when you use a symbol rather than a word, you shouldn't use " & " in the script syntax. This rule is one of the special rules AutoHotkey uses in its scripting language.
You can find a complete list of all the special words and symbols for AutoHotkey scripts on the AutoHotkey list of keys page.