
Linux xxd command
On Unix-like operating systems, the xxd command displays a file as its hexadecimal values and ASCII representation and allows edits to that. xxd was developed by Juergen Weigert in 1990.
What is xxd?
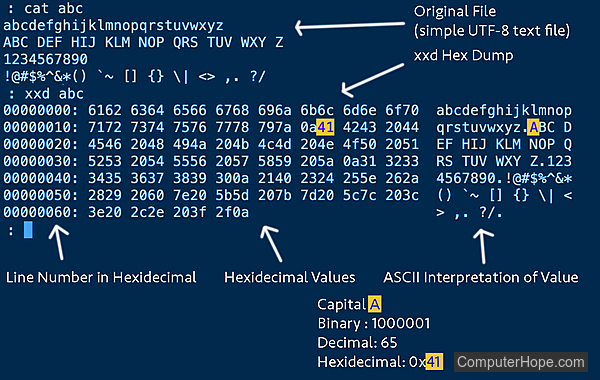
The xxd program takes a file or standard input and outputs a hex dump that uses only ASCII or EBCDIC characters. This output hex dump can be safely emailed and reconstructed at the destination. It can also take an equivalently formatted hex dump and convert it back to binary form, allowing binary files to be edited or patched as text.
Syntax
The following is the general syntax of the xxd command. Note that if a parameter is included with a long option name, such as -autoskip, the same parameter could be specified with the corresponding short option, such as -a.
Display command help or version:
xxd [-h | -help] [-v | -version]
Create hex dump:
xxd [options] [infile [outfile]]
Convert a hex dump to binary:
xxd [-r | -revert] [options] [infile [outfile]]
Options:
 [-a | -autoskip] [-b | -bits] [-c cols | -cols cols] [-C | -capitalize]
 [-E | -EBCDIC] [-e] [-g bytes | -groupsize bytes] [-i | -include]
 [-l len | -len len] [-o offset] [-p | -ps | -postscript | -plain]
 [-seek offset] [-s [+][-]seek] [-u]
Options
If no display switches are specified, xxd behaves as if -c16 were specified (16 octets per row).
| a, -autoskip | Toggle autoskip: A single '*' replaces null-lines. Default off. |
| b, -bits | Switch to bits (binary digits) dump, rather than hex dump. This option writes octets as eight digits "1"s and "0"s instead of a normal hex dump. Each line is preceded by a line number in hexadecimal and followed by an ASCII (or EBCDIC) representation. The command line switches -r, -p, -i do not work with this mode. |
| c cols, -cols cols | Format <cols> octets per line. Default 16 (-i: 12, -ps: 30, -b: 6). Max 256. No maximum for -ps. With -ps, 0 results in one long line of output. |
| C, -capitalize | Capitalize variable names in C include file style, when using -i. |
| E, -EBCDIC | Change the character encoding in the right-side column from ASCII to EBCDIC. This does not change the hexadecimal representation. The option is meaningless in combinations with -r, -p, or -i. |
| e | Switch to little-endian hex dump. This option treats byte groups as words in little-endian byte order. The default grouping of 4 bytes may be changed using -g. This option only applies to hex dump, leaving the ASCII (or EBCDIC) representation unchanged. The command line switches -r, -p, -i do not work with this mode. |
| g bytes, -groupsize bytes | Separate the output of every <bytes> bytes (two hex characters or eight bit-digits each) by a whitespace. Specify -g 0 to suppress grouping. <Bytes> defaults to 2 in normal mode, 4 in little-endian mode and 1 in bits mode. Grouping does not apply to postscript or include style. |
| h, -help | Print a summary of available commands and exit. No hex dumping is performed. |
| i, -include | Output in C include file style. A complete static array definition is written (named after the input file), unless xxd reads from stdin. |
| l len, -len len | Stop after writing <len> octets. |
| o offset | Add <offset> to the displayed file position. |
| p, -ps, -postscript, -plain | Output in postscript continuous hex dump style. Also known as plain hex dump style. |
| r, -revert | Reverse operation: convert (or patch) hex dump into binary. If not writing to stdout, xxd writes into its output file without truncating it. Use the combination -r -p to read plain hex dumps without line number information and without a particular column layout. Additional whitespace and line breaks are allowed anywhere. |
| seek offset | When used after -r: revert with <offset> added to file positions found in hex dump. |
| s [+][-]seek | Start at <seek> bytes abs. (or rel.) infile offset. + indicates that the seek is relative to the current stdin file position (meaningless when not reading from stdin). - indicates that the seek should be that many characters from the end of the input (or if combined with +: before the current stdin file position). Without -s option, xxd starts at the current file position. |
| u | Use uppercase hex letters. Default is lowercase. |
| v, -version | Show version string. |
Exit status
xxd has the following return codes.
| 0 | No errors encountered |
| -1 | Operation not supported ( xxd -r -i still impossible). |
| 1 | Error while parsing options. |
| 2 | Problems with input file. |
| 3 | Problems with output file. |
| 4,5 | Desired seek position is unreachable. |
Examples
The following examples show some ways that xxd can be used. See the xxd man page for additional examples by typing man xxd in the command prompt.
How to print the first 20 bytes of a file
xxd -l 20 myfile
xxd -l 0x14 myfile
xxd -l 024 myfile
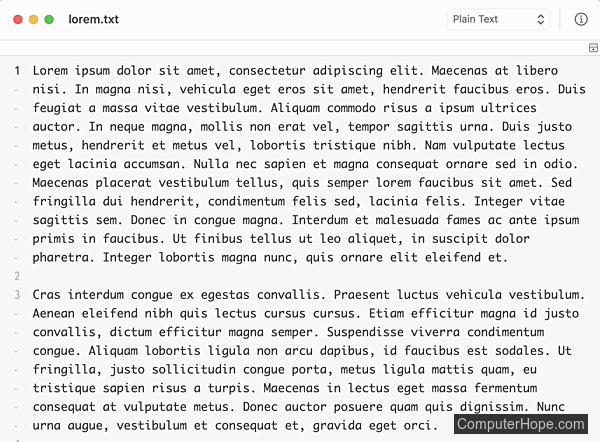
All three commands above read the contents of myfile, take the first 20 bytes, and print those as the hex dump. The first command specifies the length in decimal (20), the second specifies the length in hexadecimal (0x14), and the third specifies the length in octal (024). Below shows this in use on a two paragraph lorem ipsum file saved as UTF-8 (8 bits per character).
ch@computerhope ~ : xxd -l 20 lorem.txt
00000000: 4c6f 7265 6d20 6970 7375 6d20 646f 6c6f  Lorem ipsum dolo
00000010: 7220 7369                                r si
ch@computerhope ~ : xxd -l 0x14 lorem.txt
00000000: 4c6f 7265 6d20 6970 7375 6d20 646f 6c6f  Lorem ipsum dolo
00000010: 7220 7369                                r si
ch@computerhope ~ : xxd -l 024 lorem.txt
00000000: 4c6f 7265 6d20 6970 7375 6d20 646f 6c6f  Lorem ipsum dolo
00000010: 7220 7369                                r si
The first line, first character, is a capital L. This is represented in hexadecimal as 4c above.
Capital L
Binary 0b1001100
ASCII Decimal 76
Hex 0x4C
How to print the last 20 bytes of a file
xxd -s -20 myfile
xxd -s -0x14 myfile
xxd -s -024 myfile
All three commands above read the contents of myfile, go to the end of the file, seek backwards (the - sign) 20 bytes, and print from then forward as the hex dump. The first command specifies the length in decimal (20), the second specifies the length in hexadecimal (0x14), and the third specifies the length in octal (024). Below shows this in use on a two paragraph lorem ipsum file saved as UTF-8 (8 bits per character).
ch@computerhope ~ : xxd -s -20 lorem.txt
00000583: 2c20 6772 6176 6964 6120 6567 6574 206f  , gravida eget o
00000593: 7263 692e                                rci.
ch@computerhope ~ : xxd -s -0x14 lorem.txt
00000583: 2c20 6772 6176 6964 6120 6567 6574 206f  , gravida eget o
00000593: 7263 692e                                rci.
ch@computerhope ~ : xxd -s -024 lorem.txt
00000583: 2c20 6772 6176 6964 6120 6567 6574 206f  , gravida eget o
00000593: 7263 692e                                rci.
How to print the first 5 bytes of a file as bits
xxd -l 5 -b myfile
The command above reads the contents of myfile, takes the first 5 bytes, and prints those as a binary dump. Below shows this in use on a two paragraph lorem ipsum file saved as UTF-8 (8 bits per character).
ch@computerhope ~ : xxd -l 5 -b lorem.txt
00000000: 01001100 01101111 01110010 01100101 01101101           Lorem
How to inspect a text file for nonprinting characters
xxd myfile
This is useful for finding and fixing bad data. In the following code, a BELL character is inserted between the first o and r in the lorem.txt file as a demonstration. It is not visible in a text editor, nor using cat or head, although the system bell sound plays when using cat or head. nonprinting characters can break data imports and data usage, and may be corrupt data.
ch@computerhope ~ : cat lorem.txt
Lorem ipsum dolor sit amet, consectetur adipiscing elit. Maecenas at
 libero nisi. In magna nisi, vehicula eget eros sit amet, hendrerit
faucibus eros. Duis feugiat a massa vitae vestibulum. Aliquam commodo
risus a ipsum ultrices auctor. In neque magna, mollis non erat vel,
...
ch@computerhope ~ : xxd lorem.txt
00000000: 4c6f 0772 656d 2069 7073 756d 2064 6f6c  Lo.rem ipsum dol
00000010: 6f72 2073 6974 2061 6d65 742c 2063 6f6e  or sit amet, con
00000020: 7365 6374 6574 7572 2061 6469 7069 7363  sectetur adipisc
00000030: 696e 6720 656c 6974 2e20 4d61 6563 656e  ing elit. Maecen
00000040: 6173 2061 7420 6c69 6265 726f 206e 6973  as at libero nis
...
The bell character plays a system-defined tone instead of displaying. This is hexadecimal 07 above and is translated into a period because it has no ASCII visual representation.
BELL Character
Binary 0b111
ASCII Decimal 7
Hex 0x07
How to edit binary
The xxd man page has one-liner steps for editing. This example breaks down the steps for clarity.
- Convert the file to its hex dump.
xxd myfile > hexdumpfile
The command above reads the contents of myfile, converts it into a hex dump, and writes that to hexdumpfile. Below shows this in use on a two paragraph lorem ipsum file saved as UTF-8 (8 bits per character).
ch@computerhope ~ : xxd lorem.txt > lorem_hex.txt
ch@computerhope ~ : head -5 lorem_hex.txt
00000000: 4c6f 0772 656d 2069 7073 756d 2064 6f6c  Lo.rem ipsum dol
00000010: 6f72 2073 6974 2061 6d65 742c 2063 6f6e  or sit amet, con
00000020: 7365 6374 6574 7572 2061 6469 7069 7363  sectetur adipisc
00000030: 696e 6720 656c 6974 2e20 4d61 6563 656e  ing elit. Maecen
00000040: 6173 2061 7420 6c69 6265 726f 206e 6973  as at libero nis
- Edit the hex dump.
Use any text editor. In the example below, we changed the BELL character (0x07) to capital L (0x4c).
00000000: 4c6f 4c72 656d 2069 7073 756d 2064 6f6c  Lo.rem ipsum dol
00000010: 6f72 2073 6974 2061 6d65 742c 2063 6f6e  or sit amet, con
00000020: 7365 6374 6574 7572 2061 6469 7069 7363  sectetur adipisc
00000030: 696e 6720 656c 6974 2e20 4d61 6563 656e  ing elit. Maecen
The number of characters per row must remain the same or the translation is truncated or filled with 0x00 to create the correct number of characters.
Editing the line number or the ASCII character representation has no effect on the conversion back to binary.
- Convert the hex dump back to its binary.
xxd -r hexdumpfile > myfile
The command above reads the contents of hexdumpfile, reverts it back to its binary form, and writes that to myfile. Below shows this in use on the file created and edited in steps 1 and 2.
ch@computerhope ~ : xxd -r lorem_hex.txt > lorem2.txt
ch@computerhope ~ : xxd lorem2.txt
00000000: 4c6f 4c72 656d 2069 7073 756d 2064 6f6c  LoLrem ipsum dol
00000010: 6f72 2073 6974 2061 6d65 742c 2063 6f6e  or sit amet, con
00000020: 7365 6374 6574 7572 2061 6469 7069 7363  sectetur adipisc
00000030: 696e 6720 656c 6974 2e20 4d61 6563 656e  ing elit. Maecen
How to create a text file
echo "some hexadecimal values" | xxd -r -p > myfile
The command above prints the hexadecimal values which is sent to the xxd command via the pipe. The -r reverts and -p means plain hex, with no line information given. This is redirected from printing to the screen and is saved as myfile. If > myfile isn't included, the results are printed to stdout.
ch@computerhope ~ : echo "4c0a" | xxd -r -p > capital_L.txt
ch@computerhope ~ : cat capital_L.txt
L
ch@computerhope ~ : echo "436f6d7075746572486f70650a" | xxd -r -p > computerhope.txt
ch@computerhope ~ : cat computerhope.txt
ComputerHope
Hexadecimal 0A is a line feed character and is marking the end of the text file.
How to use xxd in vim
xxd can be used in the vim text editor when in normal mode (also sometimes called command mode). This is useful for quick data checks and specialized edits.
How to convert the whole file
In the vim normal or command mode, convert the entire file to its hex dump or revert it back by typing the characters below.
:%!xxd
:%!xxd -r
How to convert the current line
In the vim normal or command mode, navigate to the line to convert, and then type the characters below to convert it to its hex dump or revert it back to its original.
!!xxd
!!xxd -r
The current line in binary and text may spawn multiple lines when translated to the hex dump. Reverting back to the original text needs to be done line-by-line or using marked locations.
How to convert between marked locations
- In the vim normal or command mode, mark the lines to be converted by typing the characters below. This creates two marked locations, named a and b.
ma
mb
In vim, the current cursor position can be marked, or saved, so it can be returned to later using its identification. Use lowercase letters for non-persistent marks. To place a mark, use m followed by its letter. To reference the line a mark is on, use an ' (apostrophe) followed by its letter. To delete a mark, use :delmarks followed by its letter.
- In the vim normal or command mode, convert the marked lines by typing the characters below.
:'a,'b!xxd
:'a,'b!xxd -r
To use xxd's revert command, the marks may have to be redone as the conversion may erase them.
Related commands
cat — Output the contents of a file.
head — Prints the first lines of a text file.
less — Displays text one screen at a time, with navigation options.
more — Display text one screen at a time.
pg — Browse page by page through text files.
tail — Print the last lines of a text file.
vim — Command line text editor.