
How to replace a capacitor on a computer motherboard
Replacing a capacitor on a motherboard is a very detailed process and takes a steady hand to achieve. Each capacitor is attached to a motherboard very precisely, using solder. When you replace one, the same precision must be used, or you risk permanent damage to your machine.
Locate the defective capacitor
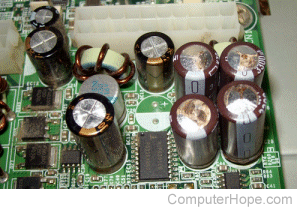
The first step in the repair process is to identify the capacitor that needs to be replaced. Usually, a bad capacitor has some manner of bulge on the top of it. Bulges are sometimes very subtle which makes them difficult to detect. Another sure sign that a capacitor is bad is if it has leaked.
Remove the damaged capacitor
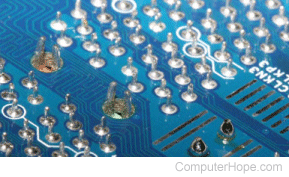
The capacitors junction point is on the bottom of the motherboard, so it needs to be removed to access the underside. Using your soldering iron, heat the existing solder at the junction point for each (usually two total) leg of the capacitor. Then, gently pull the capacitor away from that leg on the top side of the motherboard.
If you run into any issues melting the existing solder on the motherboard, try adding a little bit of new solder, then heating them together.
Replace the old capacitor
After removing the bad capacitor, you must clean the holes before you can put a new one in place. To clean the holes, heat the leftover solder in the holes and, using a "solder sucker," remove any excess. When the holes are clean, you can proceed with installing a new capacitor. There's a positive and a negative leg on each capacitor, so make sure you insert the legs through their corresponding holes in the motherboard. The motherboard should have markings to indicate which hole is positive and negative.
The positive leg, or terminal, is slightly longer than the negative leg.
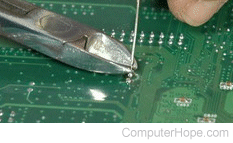
After you have inserted the capacitor legs into the correct holes, clip off the excess wiring from each leg. Clip them to the length of about two millimeters from the underside of the motherboard. Now you can apply fresh solder at each junction point. You should only need a drop of solder to secure the leg at each junction point. With the bad capacitor being replaced, you can test out the motherboard to see if it works properly again.
Make sure the new solder does not touch any of the existing solders at another junction point as this could cause circuits to cross and short out the motherboard.