
How to split an Excel cell using the Text to Columns function
If you have data in a cell that needs to be separated into multiple columns, Microsoft Excel uses the term Text to Columns. For example, if in an Excel table, cell A1 shows the name "John Doe" (first and last name), Text to Columns can split the first and last name to appear in multiple columns. This page explains how to use this feature.
Split cells using Text to Columns in Excel
To learn how to use the Text to Columns function in Excel, follow the steps below.
Before using the Text to Columns function, decide to keep or overwrite the original data. See step 7 below with the example videos, to see what option works best for your data.
- Open the spreadsheet that needs the data rearranged in Microsoft Excel.
- To the right of the column containing your data, make sure there are the same number of empty columns as words in your first column. For example, if the original column contains the name "John Doe," you want two blank columns to the right.
- Highlight the cells in the column you want to use.
- In the Ribbon, click the Data tab, then click the Text to Columns option.

- As long as all names or data contain the same delimiter (Space, Comma, etc.), click Delimited, then click Next.
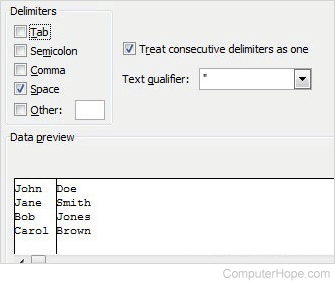
- Depending on your delimiter, choose that option from the checkboxes on the Convert Text to Columns Wizard window. For this example, the names are separated by a space. So, we uncheck any boxes that are checked, and check the box for Space. Leave all other options as default, then click Next.
- The next screen displays a Data preview of how your data looks when converted. If your data appears as it should, you now have two options. If you need to leave the original column intact, and create two new columns for first and last name, under Destination, change $A$1 to a different cell. For the sake of this example, we'll change it to $B$1. If you're ok with the original data being overwritten, leave all options at their default settings. Click Finish.
Examples of using Text to Columns
The video examples below show both Text to Columns options. The first one shows leaving the original data intact, and having two new columns created. The second shows the first name overwriting the original data, and the last name creating a new column.
Leaving original data intact
Overwriting the original data
How to split cells using Calc and early versions of Excel
Below are the steps to merge cells in Microsoft Excel and Sun OpenOffice Calc.
- Open Calc or Excel.
- Highlight the merged cell you want to split. A merged cell expands into multiple columns or rows.
- Click the Merge cells button in the formatting bar. Below is an example of the button in each of the versions of Excel and Calc.

Microsoft Excel 2000 users
Unfortunately, splitting a cell in Excel 2000 is not as easy as clicking the merge button as explained above (this was introduced in later versions of Excel). To split a cell in Excel 2000, follow the steps below.
- Highlight the merged cell you want to split. A merged cell expand into multiple columns or rows.
- Click the Format drop-down menu.
- Click the Alignment tab.
- On the Alignment tab, uncheck the Merge cells check box.
Split unmerged cell using a formula
In Excel, you can also split an unmerged cell using the Text to Columns option.
- Select the cells you want to split into two cells.
- On the Data tab, click the Text to Columns option.
- In the Convert Text to Columns Wizard, to split the text in the cells based on a comma, space, or another character, select the Delimited option. To split the text based on a specific number of character length, select the Fixed width option. Then click the Next button.
- For the Delimited option, select the character you want to use for splitting the data. For the Fixed width option, select where you want to split the text by clicking in the Data preview section of the Wizard window. Then click the Next button.

- In the last step, select any specific text formatting options for the split text. Then click the Finish button.