
How to create a Windows restore point

A restore point can be created automatically or manually, depending on the user's actions. Windows creates an initial restore point when a user installs Windows for the first time on a computer, and again when Windows updates are installed. If you encounter problems after an installation or update, a restore point returns the operating system to a previous, functional state.
It's a good idea to create a restore point when your computer is working properly. Furthermore, we recommend creating one before making significant system changes or installing new or unknown software. This way, if anything goes wrong, you can revert the operating system back to that restore point.
To manually create a restore point, follow the steps that correspond to your version of Windows.
Windows 11
To create a restore point in Windows 11, follow the steps below.
- Press the Windows key, type restore, and select Create a restore point in the search results.
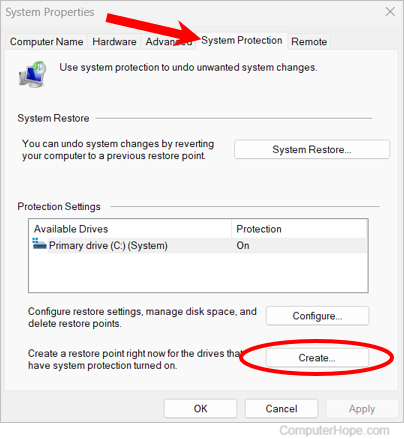
Alternatively, in File Explorer, right-click This PC and select Properties in the pop-up menu. In the System > About window, at the bottom of the Device specifications section, click the Advanced System Settings link. - In the System Properties window, click the System Protection tab if it's not already selected.
- Click the Create button near the bottom-right corner to generate a restore point.
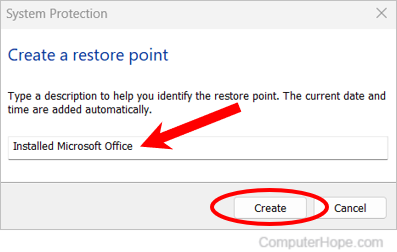
- In the new window, enter a description for the restore point in the text field and click the Create button. It's recommended you describe an activity associated with the restore point. For example, we're creating a restore point called "Installed Microsoft Office" with the intention of installing Office after we're done.
Windows 8 and 10
To create a restore point in Windows 8 and Windows 10, follow the steps below.
- In the Search bar, type restore, then select Create a restore point. Or, in File Explorer, right-click This PC, then choose Properties, Advanced System Settings, System Protection.
- Click Create a restore point.
- In the System Properties window, click the Create button.
- In the new window, enter a description for the restore point in the text field and click the Create button. It's recommended you describe an activity associated with the restore point. For example, we're creating a restore point called "Installed Microsoft Office" with the intention of installing Office after we're done.
Windows Vista and Windows 7
To create a restore point in Windows Vista and Windows 7, follow the steps below.
- Click the Start orb, find Computer (or My Computer) in the Start menu, then right-click it with your mouse and select Properties.
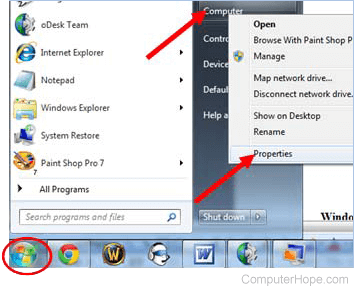
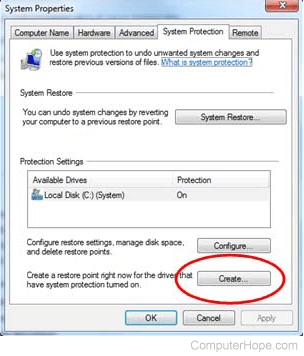
- On the left side, select the System protection option to open the System Properties window.
- Click the Create button.
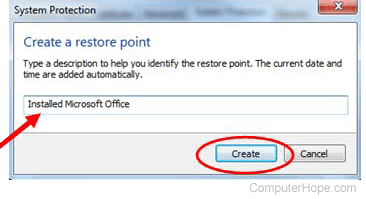
- In the new window, enter a description for the restore point in the text field and click the Create button. It's recommended you describe an activity associated with the restore point. For example, we're creating a restore point called "Installed Microsoft Office" with the intention of installing Office after we're done.
After the restore point is created, it is available to rollback to if needed.
To rollback Windows to an earlier time, on the System Protection tab, click the System Restore button and follow the prompts to initiate the rollback.
Windows XP
To create a restore point in Windows XP, follow the steps below.
- Click Start, All Programs, Accessories, System Tools, and System Restore.
- In the System Restore window, select the Create a restore point option and click the Next button.

- Enter a description for the restore point in the Restore point description text field and click the Create button.
After the restore point is created, it is available to rollback to if needed.
To rollback Windows to an earlier time, on the System Protection tab, click the System Restore button and follow the prompts to initiate the rollback.
What happens when activating a restore point?
Essentially, activating a restore point is like taking your computer back in time; it undoes any recent Windows file updates or software changes, such as program installations or removals.
For example, if software is installed after a restore point is created, performing a Windows restore also usually removes that newly-installed software. It also removes any changes it may have made to existing files.
Alternatively, if software is uninstalled after creating a restore point, performing a restore would bring back the uninstalled program and its associated system files.
Sometimes, a restore point doesn't remove a program. For instance, if you installed Discord on your computer and that program modified a Windows system file during the installation, Windows would restore the system file to its original state. However, Discord remains on the computer. This change may cause Discord not to work correctly, even though it's still installed. If this happens, you must reinstall the program.