
How to set up a home network
Setting up a home network allow users to share files, share printers, share broadband Internet access, play network games and more. Before you configure a network, decide everything that you must accomplish with it. Below are links to different computer networks you can run at your home.
Peer-to-Peer network
Advantages and capabilities:
Connect two commuters.
Able to share files, play network games.
Disadvantages:
Limited to two computers can connected to the network.
Estimated setup time:
10-15 Minutes
Required hardware and software:
- Two computers with 10/100 Ethernet network cards installed and working
- Network crossover cable.
Microsoft Windows 95 and 98 steps
- Verify network cards are installed correctly in Device Manager and that you have the latest network drivers for the installed network cards. If problems are found with the network cards, see the basic network troubleshooting page.
- Connect the two computers to each other.
- Open Network properties by clicking Start > Settings > Control Panel and double-clicking "Network."
- Verify your network card is listed as a network component. Note that this is not the dial-up adapter.
- Verify that TCP/IP and IPX/SPX are installed for your network adapter. If one or both protocols are not listed for your network adapter, install the protocol.
- Once the protocols are installed under the Network window, click the button "File and Print Sharing." In this window, you must specify if you want to enable file and print sharing on this computer. Perform this configuration on each of the computers.
- Setup the TCP/IP protocol by highlighting the TCP/IP protocol for the network adapter and clicking the "Properties" button.
- In Properties, select the option "Specify an IP address." Enter a value similar to the example below.
IP Address: 102.55.92.1
Subnet Mask: 255.255.255.192
The above IP address must differ for each computer. Therefore, on the other computer it could be 102.55.92.2 with the same subnet mask. - Once the IP address and Subnet mask are specified, close out of all windows and reboot the computer.
Microsoft Windows Me, 2000, and XP steps
- Verify network cards are installed correctly in Device Manager and that you have the latest network drivers for the installed network cards. If problems are found with the network cards, see the basic network troubleshooting page.
- Connect the two computers to each other.
- Open Network properties by clicking Start > Settings > Control Panel, and double-clicking "Network and Dial-up connections."
- Double-click the "Local Area Connection."
- Click the "Properties" button.
- Verify that TCP/IP and IPX/SPX are installed for your network adapter. If one or both of these protocols are not listed for your network adapter, install the protocol.
- Once the protocols are installed under the Network window, verify that File and Print sharing is installed. If this is missing and you want to enable file and print sharing on this computer, click the install button and install File and Print sharing.
- Setup the TCP/IP protocol by highlighting the Internet Protocol (TCP/IP) protocol for the network adapter and clicking the "Properties" button.
- In the properties, select the option "Specify an IP address." Enter a value similar to the below values.
IP Address: 102.55.92.1
Subnet Mask: 255.255.255.192
The above IP address must differ for each computer. Therefore, on the other computer it could be 102.55.92.2 with the same subnet mask. - Once the IP address and Subnet mask are specified, close out of all windows and reboot the computer.
Network with file sharing
Advantages and capabilities:
More than two computers can connect to the network.
Disadvantages:
Requires additional hardware and money.
Estimated setup time:
20-30 minutes.
Required hardware and software:
- Computers with 10/100 Ethernet network cards installed and working
- Standard network cables.
- Network Switch or Hub
Microsoft Windows 95 and 98 Steps:
- Verify network cards are installed correctly in Device Manager and that you have the latest network drivers for the installed network cards. If problems are found with the network cards, see the basic network troubleshooting page.
- Connect each computer the network switch or hub.
- Open Network properties by clicking Start > Settings > Control Panel and double-clicking "Network."
- Verify your network card is listed as a network component. Note that this is not the dial-up adapter.
- Verify that TCP/IP and IPX/SPX are installed for your network adapter. If one or both of these protocols are not listed for your network adapter, install the protocol.
- Once the protocols are installed under the Network window, click the button "File and Print Sharing." In this window, you must specify if you want to enable file and print sharing on this computer. Perform this configuration on each of the computers.
- Setup the TCP/IP protocol by highlighting the TCP/IP protocol for the network adapter and clicking the "Properties" button.
- In Properties, select the option "Specify an IP address." Enter a value similar to the below values.
IP Address: 102.55.92.1
Subnet Mask: 255.255.255.192
The above IP address must differ for each computer. Therefore, on the other computer it could be 102.55.92.2 with the same subnet mask. - Once the IP address and Subnet mask are specified, close out of all windows and reboot the computer.
Microsoft Windows Me, 2000, and XP steps
- Verify network cards are installed correctly in Device Manager and that you have the latest network drivers for the installed network cards. If problems are found with the network cards, see the basic network troubleshooting page.
- Connect each computer the network switch or hub.
- Open Network properties by clicking Start > Settings > Control Panel and double-clicking "Network."
- Double-click the "Local Area Connection."
- Click the "Properties" button.
- Verify that TCP/IP and IPX/SPX are installed for your network adapter. If one or both of these protocols are not listed for your network adapter, install the protocol.
- Once the protocols are installed under the Network window, verify that File and Print sharing is installed. If this is missing and you want to enable file and print sharing on this computer, click the install button and install File and Print sharing.
- Setup the TCP/IP protocol by highlighting the Internet Protocol (TCP/IP) protocol for the network adapter and clicking the "Properties" button.
- In Properties, select the option "Specify an IP address." Enter a value similar to the below values.
IP Address: 102.55.92.1
Subnet Mask: 255.255.255.192
The above IP address must differ for each computer. Therefore, on the other computer it could be 102.55.92.2 with the same subnet mask. - Once the IP address and Subnet mask are specified, close out of all windows and reboot the computer.
Network with modem Internet sharing
Advantages and capabilities:
All computers in house can share the same modem connection.
Disadvantages:
- Requires additional hardware and money.
- Because a modem doesn't have much bandwidth, if multiple users are browsing or downloading files, this causes what appears to be a very slow connection.
Estimated setup time:
30-40 minutes.
Required hardware and software:
- Computers with 10/100 Ethernet network cards installed and working.
- Network router, switch or hub
- Computer running a software proxy.
Microsoft Windows 95 and 98 Steps:
- Verify network cards are installed correctly in Device Manager and that you have the latest network drivers for the installed network cards. If problems are found with the network cards, see the basic network troubleshooting page.
- Connect each computer the network switch or hub.
- Open Network properties by clicking Start > Settings > Control Panel and double-clicking "Network."
- Verify your network card is listed as a network component. Note that this is not the dial-up adapter.
- Verify that TCP/IP and IPX/SPX are installed for your network adapter. If one or both of these protocols are not listed for your network adapter, install the protocol.
- Once the protocols are installed under the Network window, click the button "File and Print Sharing." In this window, you must specify if you want to enable file and print sharing on this computer. Perform this configuration on each of the computers.
- Setup the TCP/IP protocol by highlighting the TCP/IP protocol for the network adapter and clicking the "Properties" button.
- In Properties, select the option "Specify an IP address." Enter a value similar to the below values.
IP Address: 102.55.92.1
Subnet Mask: 255.255.255.192
The above IP address must differ for each computer. Therefore, on the other computer it could be 102.55.92.2 with the same subnet mask. - Once the IP address and Subnet mask are specified, close out of all windows and reboot the computer.
- Once the network is set up and is working, install and then set up a proxy on one of the computers on the network. This computer manages the Internet connection for each of the other computers on the network.
Microsoft Windows Me, 2000, and XP Steps
- Verify network cards are installed correctly in Device Manager and that you have the latest network drivers for the installed network cards. If problems are found with the network cards, see the basic network troubleshooting page.
- Connect each computer the network switch or hub.
- Open Network properties by clicking Start > Settings > Control Panel and double-clicking "Network and Dial-up connections."
- Double-click the "Local Area Connection."
- Click the "Properties" button.
- Verify that TCP/IP and IPX/SPX are installed for your network adapter. If one or both of these protocols are not listed for your network adapter, install the protocol.
- Once the protocols are installed under the Network window, verify that File and Print sharing is installed. If this is missing and you want to enable file and print sharing on this computer, click the install button and install File and Print sharing.
- Setup the TCP/IP protocol by highlighting the Internet Protocol (TCP/IP) protocol for the network adapter and clicking the "Properties" button.
- In Properties, select the option "Specify an IP address." Enter a value similar to the below values.
IP Address: 102.55.92.1
Subnet Mask: 255.255.255.192
The above IP address must differ for each computer. Therefore, on the other computer it could be 102.55.92.2 with the same subnet mask. - Once the IP address and Subnet mask are specified, close out of all windows and reboot the computer.
- Once the network is set up and is working, install and set up a proxy on one of the computers on the network. This computer manages the Internet connection for each of the other computers on the network.
Network with broadband Internet sharing
Advantages and capabilities:
All computers in house can share the broadband Internet connection.
Disadvantages:
- Requires additional hardware and money.
Estimated setup time:
40-50 minutes.
Required hardware and software:
- Computers with 10/100 Ethernet network cards installed and working.
- Network router, switch or hub
- Computer running a software proxy.
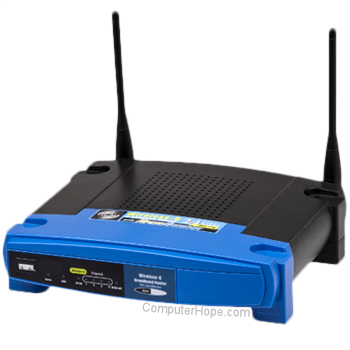
Router requirements:
When purchasing a network router, look for the below features.
- WAN Port
- Uplink ports
- Support for NAT (network address translation)
Hardware setup:
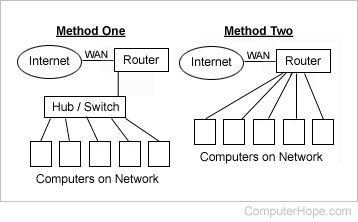
As illustrated in the above picture, you see there are two methods of setting up this network. We recommend "Method One" be chosen because it offers for more computers to connect to it. However, not purchasing a network hub or switch can save money.
Method one
- Connect the broadband Internet connection to the WAN (wide area network) port on the router.
- Connect a network hub or switch to the router.
- Connect each of the computers to the hub or switch.
- Enter the network settings provided by the broadband provider in your network router.
Method two
- Connect the broadband Internet connection to the WAN port on the router.
- Connect each computer to the router. If there are not enough ports for each of the computers, you must set up the network using the steps in the first method.
- Enter the network settings provided by the broadband provider in your network router.
Microsoft Windows 95 and 98 Steps:
- Verify network cards are installed correctly in Device Manager and that you have the latest network drivers for the installed network cards. If problems are found with the network cards, see the basic network troubleshooting page.
- Connect each computer the network switch or hub.
- Open Network properties by clicking Start > Settings > Control Panel, and double-clicking "Network."
- Verify your network card is listed as a network component. Note that this is not the dial-up adapter.
- Verify that TCP/IP and IPX/SPX are installed for your network adapter. If one or both of these protocols are not listed for your network adapter, install the protocol.
- Once the protocols are installed under the Network window, click the button "File and Print Sharing." In this window, you must specify if you want to enable file and print sharing on this computer. Perform this configuration on each of the computers.
- Setup the TCP/IP protocol by highlighting the TCP/IP protocol for the network adapter and clicking the "Properties" button.
- In Properties, verify that "Obtain IP address automatically" is selected.
- Once the network settings are set up and all network peripherals are on, reboot the computer.
- To verify the router has released network values to the computer, Start > Run, type winipcfg, and click OK. Additional information and help with winipcfg is on our winipcfg page. Verify when looking at the IP Configuration that you are looking under the network adapter and not the PPP (point-to-point protocol) adapter.
Microsoft Windows Me, 2000, and XP Steps:
- Verify network cards are installed correctly in Device Manager and that you have the latest network drivers for the installed network cards. If problems are found with the network cards, see the basic network troubleshooting page.
- Connect each computer the network switch or hub.
- Open Network properties by clicking Start > Settings > Control Panel, and double-clicking "Network and Dial-up connections."
- Double-click the "Local Area Connection" option.
- Click the "Properties" button.
- Verify that TCP/IP and IPX/SPX are installed for your network adapter. If one or both of these protocols are not listed for your network adapter, install the protocol.
- Once the protocols are installed under the Network window, verify that File and Print sharing is installed. If this is missing and you want to enable file and print sharing on this computer, click the install button and install File and Print sharing.
- Setup the TCP/IP protocol by highlighting the Internet Protocol (TCP/IP) protocol for the network adapter and clicking the "Properties" button.
- In Properties, verify that "Obtain IP address automatically" is selected.
- Once the network settings are set up and all network peripherals are on, reboot the computer.
- To verify the router has released network values to the computer, click Start > Run, type command, and click OK. In the MS-DOS window, type ipconfig and press Enter. Additional information about ipconfig is on our ipconfig page.