
How to install and use Git on Windows

By default, Git is installed on Linux and macOS computers as a command line option. However, Microsoft Windows does not include a Git command. Below are the steps to install and use Git and GitHub on Microsoft Windows.
Installing Git on Windows
- Open the Git website.
- Click the Download link to download Git. The download should automatically start.
- Once downloaded, start the installation from the browser or the download folder.
- In the Select Components window, leave all default options checked and check any other additional components you want installed.
- Next, in the Choosing the default editor, used by Git unless you're familiar with Vim we highly recommend using a text editor you're comfortable using. If Notepad++ is installed, we suggest using it as your editor. If Notepad++ is not installed, you can cancel the install and install Notepad++ and then restart the GitHub install.
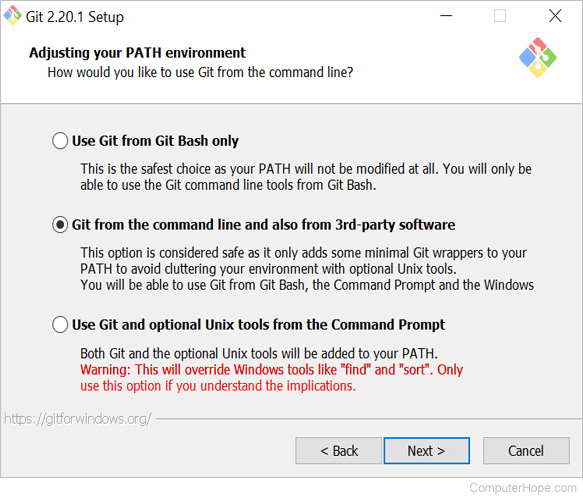
- Next, in the Adjusting your PATH environment, we recommend keeping the default Use Git from the command line and also from 3rd-party software as shown below. This option lets you use Git from either Git Bash or the Windows Command Prompt.
- Next, we recommend leaving the default selected as Use OpenSSH.
- Next, in Choosing HTTPS transport backend, leave the default Use the OpenSSL library selected.
- In the Configuring the line ending conversions, select Checkout Windows-style, commit Unix-style line endings unless you need other line endings for your work.
- In the Configuring the terminal emulator to use with Git Bash window, select Use MinTTY (the default terminal of MSYS2).
- On the Configuring extra options window, leave the default options checked unless you need symbolic links.
- Click the Install button
- Once completed, you can check the option to Launch Git Bash to open a Bash command line or, if you selected the Windows command line, run Git from the Windows command line.
We highly recommend you use Git from the command line and not use a GUI (graphical user interface). You'll only be using the command line to interface with Git to manage the files. Editing can still be done through a text editor or IDE (integrated development environment) of your choice. If you're new to the command line, you can find help with navigating the Windows command line and Linux (Bash) through the links below.
Configuring and connecting to a remote repository
In our example, we're using GitHub as a storage for our remote repository. Below are the steps to connect to a GitHub repository. If you are new to GitHub, see: How to create a GitHub repository.
- From the command line, move to the directory you want to contain your Git repository.
- Type the following command to configure your Git username, where <your name> will be your GitHub username.
git config --global user.name "<your name>"
- After entering the above command, you'll be returned to the command prompt. Next, enter your e-mail address by typing the following command, where <your e-mail> is your e-mail address.
git config --global user.email "<your e-mail>"
- Once the above steps are completed, you'll be ready to connect to a remote repository. To find the repository address, go to a repository on GitHub and click the Clone or download repository link to get the address. For example, we've created a repository called "example" at https://github.com/Computerhope/example.git address. Copy the address to your clipboard.
- Once copied go back to the command line and type the following command, where <URL> is the address you copied. To paste that address into the command line right-click in the command line window and click paste.
git clone <URL>
- Once the Git repository is created, you'll have a new directory in your current directory with the name of the Git repository.
- Once the Git remote repository is cloned to your local repository, a new folder in the current directory should appear with the name of the Git repository. For example, in our "example" Git we would have a new directory called "example". Use the cd command to change into the new directory.
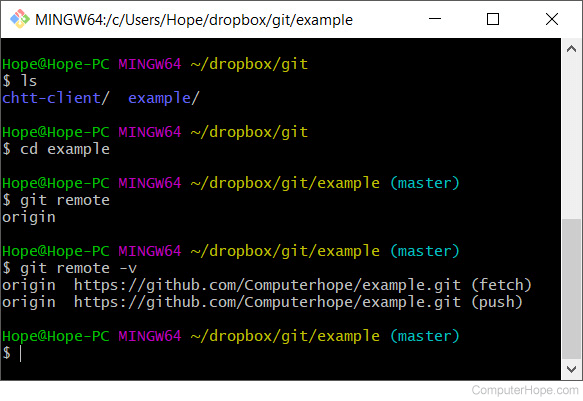
- Once in the new directory, type the following command to list the remote repositories.
git remote
- If successful, the output is "origin," a special name that refers to the remote repository.
- To see the aliases (URL or path), type the following command.
git remote -v
Running each of the above commands give you an output similar to what is shown in our example below.
Now that you've connected to a remote repository on GitHub you're ready to start working on the files and pushing and pulling files as you update the files.
Working in your local repository and pushing files
After following the above steps and cloning a remote repository, you can work on the files as you normally would. You can create new files or edit existing files from the command line or your favorite text editor. Below, are the steps of creating a new file, pushing that file, editing an existing file, and pushing the update.
Creating a new file and pushing to remote repository
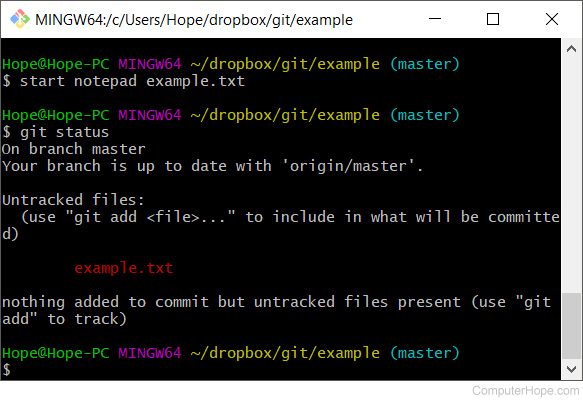
- Create a new file in the Git directory by typing the following command from either the Bash or Windows command line. The following command opens and creates a file called example.txt in Notepad. In Git Bash, you could also use the touch command to create a blank new file and then type "start <name of file>" to open the file in your favorite text editor.
start notepad example.txt
- In the text editor, enter some text into the file and save and exit the file.
- Back at the command line type the following command to get the current status of your branch and untracked files.
git status
- Git displays a window similar to the example shown below, showing that the file we created is new and untracked by Git.
- We'll now want to add this file to Git to be tracked by typing the following command. If your file is not named "example.txt," you'd want to change the text to the name of your file.
git add example.txt
- After entering the above command, the file is added as a new file also known as staging. Typing git status again shows you in green that the file is a new file that is ready to be committed.
- Next, type the following command to commit the changes made in the local workspace to the local repository. In the example below, our notes "First example" should be notes that would make sense everyone working on your project.
git commit -m "First example"
You can also type git commit with no additional tags or options. However, when doing this it opens a vim like editor that can be difficult for those not familiar with the vim to use. If you type this command press "i" to enter insert mode and type the notes for the commit on the first line, press Esc, and then type ":wq" to save, exit, and commit. We suggest using the above command because it's easier for more people to use.
- Finally, now that changes are moved from your workspace into your local repository it's ready to be pushed to the remote repository. Type the following command to push all changes to the remote repository.
To follow the progress, you can type git status again to see the current status. You can also type git log to see a log of changes.
git push
You'll be asked for your GitHub username and password if your computer has not logged in to Git from the command line.
Once the file is pushed, it appears in your GitHub remote repository and is available to everyone else who're working with the same repository.
Modifying a file and pushing to remote repository
- Edit and modify one or more files in your Git.
- Type git status to see the status of all the files not yet committed from the workspace to the local repository.
- Type the following command to add all files. The single period indicates that you want all files to be added to the local repository. Some people may also use git add -A to add all.
You can also use wildcards instead of a period. For example, if you wanted to add all text files you could type *.txt instead of a single period to only add text files.
git add .
- Once the files are added, type the following command to commit. Change the notes to apply to your commit.
git commit -m "Second update"
- Finally, type git push to push the commit to the remote repository.
If you're working with a lot of other people, we'd recommend you pull (explained below) before committing. If your local repository is not the same as the remote repository (excluding your new changes), the commit fails. For example, if someone has added new files to the remote repository while you've been working and you try commit, it fails until you pull.
Pulling or fetching updates from the remote repository
If it's been awhile since you've committed any work, perform the git pull command to get the latest updates from the remote repository and merge them into your local repository. By pulling updates from a repository before committing, it verifies your local repository and the remote repository are the same and prevents merge conflicts.
To get all changes without merging, run the git fetch command to grab all of the latest updates from the remote repository without merging changes.
How to deal with a Git merge conflict
When multiple people are working with the same files, you're going to encounter merge conflicts. When a conflict occurs, Git modifies your local files and it is up to you to manually fix the files with the conflicts.
Use the git status command to see the status and merge conflict information.
Open the file with the conflict to start correcting the errors. In the example file below, we had a text file with one line of text and in the local repository we added the text "update1" to the file. However, during the same time, the remote repository file was modified and added "update2" to the file on the same line. Git marks conflicts with "<<<<<<< HEAD" for lines in the current branch and everything after "=======" as the remote changes followed by ">>>>>>> < hash >" to mark the end.
Another file that is uploaded in-between pulls.
<<<<<<< HEAD
update1
=======
update2
>>>>>>> 62ee0eeba2e5b94d10574c1a6a68216e9b392e4c
To resolve this merge conflict, we would need to decide what text we wanted to keep, update, or remove. In this example, we want to keep "update1" and "update2" in the order they're listed so we would only need to remove the Git markings to make the file resemble the following example.
Another file that is uploaded in-between pulls.
update1
update2
If you're working with a big file, it's a good idea to search the file for "HEAD" because there may be more than one conflict.
Once the changes are made in the file, we could save the file and then perform the following git commands to update the fixes.
git add .
git commit -m "Fixed the merge conflict"
git push origin master
The example given in this merge conflict is a basic example. When dealing with a file with more than a few lines of text or big sections of code, a merge conflict can get more confusing. To make it easier to deal with merge conflicts, you can use the command git mergetool to use a merge tool, such as WinMerge or another popular merge tool.
Creating a Git branch
Creating a branch lets you create a duplicate of the master (trunk) and make several updates without affecting the master. For example, when developing a program if a big fix was need that could take weeks or months, a branch could be created for that fix. Once you've fixed the bug, you could merge your branch back into the master.
To create a branch in your local repository, follow the steps below.
- In the Git master directory, type the following command, where "<New Branch>" is the name of the new branch name. For example, we could call the branch "examplebranch".
git branch <New Branch>
- Next, type the following command to switch to the branch.
git checkout <Branch Name>
- After entering the above command, the prompt (in Git Bash) changes from "master" to the branch name to indicate you're working in a branch.
- From this point, you can continue to use Git and modify the files how you have in the past.
- To see all available branches, you can use the git branch command. For example, typing git branch displays your local repository branches. Typing git branch -a displays all local and remote repositories.
- If you need to push the branch to the remote repository, you can run the following command.
git push --set-upstream origin <Branch Name>
- Finally, if you need to switch back to the master branch, you can type the following command.
git checkout master
How to merge a branch back into the master
After completing your work, you'll want to merge it back into the master or another branch by following the steps below.
- Move into the branch you want to merge into. For example, if you wanted to merge back into the master, type the following command.
git checkout master
- Once in the master, type the following command to merge the branch.
git merge <Branch Name>
- Once the merge is performed, add the files.
- Next, commit the changes.
- Once merged and committed, push the merge by typing the following command. If you get conflicts during the merge, see our how to deal with merge conflicts section.
git push
How to delete a local and remote branch
If, after merging a branch you no longer want to keep the local or remote branch, you can perform the following commands.
To delete the local branch, type the following command.
git branch -d <Branch Name>
To delete the remote branch, type the following command.
git push origin --delete <Branch Name>