
How to use the Windows command line (DOS)
This page covers the basics of navigating and using the Microsoft Windows command line. On this page, you learn how to move around in the command line, find files, manipulate files, and other important commands. Realize that there are over 100 different commands used in MS-DOS and the Windows command line. If you are interested in learning about the command line in more detail, see our DOS and command prompt overview, which gives a description and example for every command.
Get into the Windows command line
Open a Windows command line window by following the steps below. If you need additional information or alternative methods for all versions of Windows, see: How to get to an MS-DOS prompt or Windows command line.
Understanding the prompt
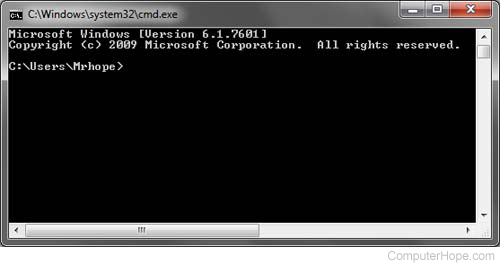
After following the steps above, the Windows command line should be shown (similar to the example below). Windows often starts you at your user directory. In the example below, the user is Mrhope. So, C:\Users\Mrhope> is our prompt. This prompt shows that we're in the C: drive (default hard drive letter) and currently in the Mrhope directory, a subdirectory of the Users directory.
Key tips
- MS-DOS and the Windows command line are not case-sensitive.
- The files and directories shown in Windows are also found in the command line.
- When working with a file or directory with a space, surround it in quotes. For example, the directory My Documents would be "My Documents" when typed.
- File names can have a long file name of 255 characters and a three character file extension.
- When a file or directory is deleted in the command line, it is not moved into the Recycle Bin.
- If you need help with any of command, type /? after the command. For example, dir /? would give the options available for the dir command.
Listing the files
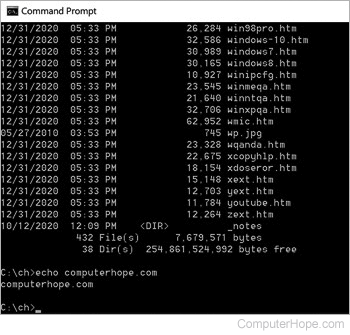
Let's learn your first command. Type dir at the prompt to list files in the current directory. You should get an output similar to the example image below. Without using any dir options, this is how dir output appears. As shown, you are given information including the creation date and time, directories (<DIR>), and the name of the directory or file. In the example below, there are 0 files listed and 14 directories, indicated by the status message at the bottom of the output.

Every command in the command line has options, which are additional switches and commands that can be added after the command. For example, with the dir command, you can type dir /p to list the files and directories in the current directory one page at a time. This switch is useful to see all the files and directories in a directory with dozens or hundreds of files. Each of the command options and switches is listed in our DOS command overview. We offer guides for individual commands, as well. For example, to see all the options for the dir command, refer to our dir command overview for a complete option listing.
The dir command can also be used to search for specific files and directories using wildcards. For example, to list files or directories that begin with the letter "A" you could type dir a* to list only the AppData directory, in this above example. See the wildcard definition for other examples and help with using wildcards.
Moving into a directory
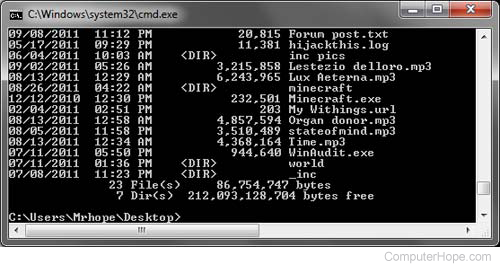
Now that we've seen a list of directories (shown below) in the current directory, move into one of those directories. To move into a directory, we use the cd command, so to move into the Desktop type cd desktop and press Enter. Once you've moved into a new directory, the prompt changes. So, in our example, the prompt is now C:\Users\Mrhope\Desktop>. You can see what files are found in this directory by typing the dir command again.
Understand the files
In the Desktop directory, as shown in the above example, there are 23 files and 7 directories, representing different file types. In Windows, you are familiar with files having icons that help represent the file type. In the command line, the same thing is accomplished by the file extensions. For example, "forum posts.txt" is a text file because it has a .txt file extension. Time.mp3 is an MP3 music file and minecraft.exe is an executable file.
Most users are only concerned with executable files, which as mentioned above, are files ending with .exe, .com, and .bat. When the file name is typed in the command line, the program runs, which is the same as double-clicking a file in Windows. For example, if we wanted to run minecraft.exe, typing minecraft at the prompt runs that program.
Realize that if the executable file you are trying to run is not in the current directory, you get an error. Unless you have set a path for the directory with the executable file, which is how the command line finds external commands.
To view the contents of a file, most versions of the command line use the edit command. For example, if we wanted to look at the log file hijackthis.log, we would type edit hijackthis.log at the prompt. For 64-bit versions of Windows that do not support this command, you can use the start command (e.g., type start notepad hijackthis.log) to open the file in Notepad. Additional information about opening and editing a file from the command line is available on the page linked below.
Moving back a directory
You learned earlier the cd command can move into a directory. This command also lets you go back a directory by typing cd.. at the prompt. When this command is typed, you'll be moved out of the Desktop directory and back into the user directory. To move back to the root directory type cd\ to get to the C:\> prompt. If you know the name of the directory you want to move into, you can also type cd\ and the directory name. For example, to move into C:\Windows>, type cd\windows at the prompt.
Creating a directory
Now with your basic understanding of navigating the command line, let's start creating new directories. To create a directory in the current directory, use the mkdir command. For example, create a directory called "test" by typing mkdir test at the prompt. If created successfully, you are returned to the prompt with no error message. After the directory is created, move into that directory with the cd command.
Switching drives
In some circumstances, you may want to copy or list files on another drive. To switch drives in the Windows command line, type the drive letter of the drive followed by a colon. For example, if your CD-ROM (compact disc read-only memory) drive is the D drive, you would type d: and press Enter. If the drive exists, the prompt changes to that drive letter. If the drive does not exist or is not accessible (e.g., no disc in CD-ROM drive), you get an error.
Creating a new file
You can create a new file from the command line using the edit command, copy con command, or using the start command to open a file.
Creating a new batch file
In the new test directory, let's create your first file. In most circumstances, you never need to create any file at the command line, but it is still good to understand how files are created. In this example, we are creating a batch file. A batch file is a file that ends with .bat and helps automate frequently used commands in the command line. We are calling this batch file example, so type edit example.bat at the prompt. As mentioned in the document on creating a file, if the edit command does not work, use the start command to open the batch file in Notepad. To perform this action, you type start notepad example.bat into the prompt.
Both of the commands above open a new blank example.bat window. In the file, type the three lines below, which clear the screen with the cls command and run the dir command.
@echo off
cls
dir
After these three lines are typed into the file, save, and exit the file. If you are in the edit command, click File (or press Alt+F) and then Save. After the file is saved and you are back at the command prompt, typing dir displays the "example.bat" file in the test directory.
Now, run the batch file to get a better understanding of what a batch file does. To run the batch file, type example at the prompt, which executes the batch file, clears the screen, and runs the dir command.
Moving and copying a file
Now that we've created a file, let's move it into an alternate directory. To help make things easier, create another directory for the files. So, type mkdir dir2 to create a new directory in the test directory called dir2. After the new directory is created, use the move command to move the example.bat file into that directory. To do this, type move example.bat dir2 at the prompt. If done successfully, you get a message indicating the file was moved. You could also substitute the move command for the copy command to copy the file instead of moving it.
Rename a file
After the file is moved into the dir2 directory, move into that directory with the cd command to rename the file. In the dir2 directory, use the rename command to rename the example file into an alternate name. Type rename example.bat first.bat at the prompt to rename the file to "first.bat." Now, when using the dir command, you see "first.bat" as the only file.
When renaming any file, make sure the file has the same file extension. If you were to rename the .bat file to a .txt file, it is no longer an executable file only a text file. Also, realize that renaming the file to a different file extension does not convert the file. For example, if you renamed the file as an .MP3, it may look like an MP3 in Windows, but it's not going to play music.
Deleting a file
Now that we've had our fun with our new file, delete the file with the del command. Type del first.bat to delete the first.bat file. If successful, you are returned to the prompt with no errors, and the dir command shows no files in the current directory.
When deleting files, you can also use wildcards to delete multiple files at once. For example, if the directory contained several .GIF image files you could type del *.gif to delete all files ending with the .gif file extension.
Renaming a directory
Go back one directory to get back to the test directory using the cd.. command mentioned earlier. Now, rename our dir2 directory to something else using the same rename command we used earlier. At the prompt, type rename dir2 hope to rename the directory to "hope." After this command is completed, type dir and you see one directory called "hope."
Removing a directory
While still in the test directory, remove the hope directory using the rmdir command. At the prompt, type rmdir hope to remove the hope directory.
If the directory you are trying to remove contains any files or directories, you'll receive an error. To prevent this error, use the /s option. For example, if the hope directory still had the first.bat file, you would need to type rmdir /s hope at the prompt.
Running a program
Any executable file can run from the command line by typing the name of the file. For example, if you listed files using the dir command and see a file named "myfile.exe," typing "myfile" at the command line runs that program.
How to list available commands
After getting a good understanding of using the command line from the steps shown above, you can move on to other available commands by typing help at the command line. Typing "help" displays a list of available commands with a brief description of each command.
Closing or exiting the command line window
After you are done with the Windows command line, you can type exit to close the window.
In conclusion
Now you have a good understanding of how to navigate the command line, create directories and files, rename directories and files, and delete. As mentioned earlier, there are hundreds of other commands you can use at the command line. To expand your knowledge further, we recommend looking at the options available for each command above and reviewing our commands overview page. You can also use our search to find any command by the name of the command or by the action it performs.