
How to convert a Word document to an Excel spreadsheet
Updated: 05/01/2023 by Computer Hope

If you have information in a Microsoft Word document, you must import to a Microsoft Excel spreadsheet, Excel provides functionality to do the conversion. Select the version of Word and Excel you're using and follow the steps to make a plain text version of your Word document, and import it in Excel.
Note
You must use the Microsoft Word and Microsoft Excel desktop applications to convert a Word document to an Excel spreadsheet. You cannot convert a Microsoft Word Online (the web version) document to a Microsoft Excel Online spreadsheet, as the necessary capabilities are not supported.
Microsoft Office 365
- Open the Word document containing the information you want to convert to Excel.
- In the Ribbon, click the File tab, and click the Save As option.
- Choose the location on your computer where you want to save the plain text file, enter a name for the file, and change the file type to Plain Text. For this example, the Word file is named "CH Test File," and the plain text file is named "CH Test File Plain." Once you've chosen the location and named the file, click Save.
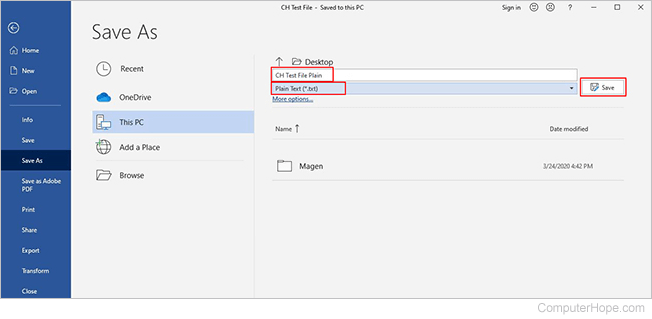
- A File Conversion pop-up window opens. Leave the Windows (default) checked, and click OK.
- You can now close the Word document and program.
- Open Microsoft Excel and click New > Blank workbook.
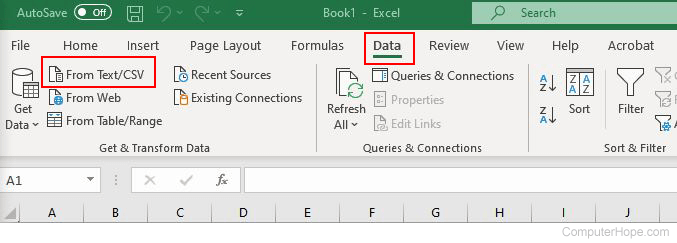
- In the Ribbon, click the Data tab, and click the From Text/CSV option.
- Find the location on the computer where you saved the plain text file in step 3. Click the file, and then click Import.
- Excel opens a blank pop-up box asking you to specify the File Origin, Delimiter, and Data Type detection. Verify the default information is correct and click Load. If any information isn't correct, make any necessary changes and click Load. The imported information is now in the correct format in Excel.
- Save the Excel file.
Microsoft Office 2016 and earlier versions
- Open the Word document containing the information you want to convert to Excel.
- In the Ribbon, click the File tab, and click the Save As option.
- Choose the location on your computer where you want to save the plain text file, enter a name for the file, and change the file type to Plain Text. Once you've chosen the location and named the file, click Save.
- A File Conversion pop-up window opens. Leave the Windows (default) checked, and click OK.
- You can now close the Word document and program.
- Open Microsoft Excel and click New > Blank workbook.
- In the Ribbon, click the Data tab, and click the From Text option.
- Find the location on the computer where you saved the plain text file in step 3. Click the file name, and then click Import.
- In the Text Import Wizard, on step 1 of 3, click Delimited, then click Next.
- On step 2 of 3, check the box next to the desired delimiters (space, comma, tab, etc.), then click Next.
- On step 3 of 3, review all information is correct, make any necessary changes, then click Finish.
- If you checked Existing Worksheet, select a cell where you want to put the data. Click OK. The imported information is now in the correct format in Excel.
- Save the Excel file.