
How to open and use the screenshot utility on a Mac
Updated: 03/10/2024 by Computer Hope

Capturing all or part of your screen is helpful for many reasons. For example, screenshots help you capture a scoreboard in a computer game, and snips can save a recipe from your favorite cooking site. In macOS, the screenshot utility lets you capture and record all or part of a Mac computer screen, such as an iMac or MacBook.
To learn how to open and use the screenshot utility, follow the steps in the sections below.
Opening the utility
Here are two ways to open the screenshot utility.
Using a keyboard shortcut
To use a keyboard shortcut, press the Command+Shift+5 keys at the same time.
Using Finder

- On the left side of the screen, under the Favorites section, click the
 selector.
 - After clicking Applications, click the Utilities shortcut in the section to the right.
![]()
- Locate and double-click the Screenshot icon.
![]()
Using the tools
Here is what each icon represents from left to right and how to use them:
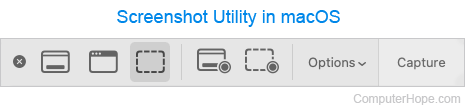
- Circled X - Closes the screenshot tool.
- Capture Entire Screen - As the name suggests, this tool screenshots everything you see on the screen. To use this feature, click the icon and then click once anywhere on the screen.
- Capture Selected Window - This tool works on a selected window and its surrounding shadow. To use this feature, click the icon and then click the window you want to capture.
- Capture Selected Portion - Like the Snipping Tool in Windows, this tool lets you capture a specific area of the screen. To use this feature, click the icon, click-and-drag your mouse cursor over the region you want to grab, and then release the mouse button.
- Record Entire Screen - As the name implies, this tool records everything you see on the screen. To use this feature, click the icon and then click once anywhere on the screen to start recording. When you're finished, click the stop button in the menu bar at the top of the screen.
![]()
- Record Selected Portion - This tool records a specific part of the screen's viewing area. Think of it like creating a "recording window" on your display device. To use this feature, click the icon, click-and-drag your mouse cursor over the region you want to record, and then release the left mouse button. When you're finished, click the stop button in the menu bar at the top of the screen.
![]()
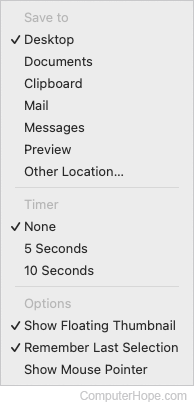
- Options - Allows you to choose where screenshots and recordings are saved, set a delay timer, and other features.
- Capture - Screenshots the area enclosed by the dotted outline displayed by the tool.