
How to change a computer DNS address
What is a DNS?

A DNS (domain name system) acts like a phonebook for Internet addresses. It's a networked computer system with a massive database of Internet domain names and their corresponding addresses, which is constantly kept up-to-date.
When you make a network request to a domain name, your computer needs to know where on the Internet that domain is located. It gets this information from the DNS. Your computer sends a request to the DNS containing the name of the domain, and the DNS responds with that domain's numeric IP address. Your computer then proceeds to connect to that address.
The process is called a domain name resolution: a domain name resolves to its corresponding address.
Your ISP (Internet service provider) usually provides its own default DNS for its customers, and the settings for this server are automatically configured via DHCP (Dynamic Host Configuration Protocol). But you don't have to use your ISP's DNS. There are many publicly available Domain Name Services, and you may want to use one of them instead. In addition to providing an alternative solution to your ISP, services like Cloudflare also encrypt and keep your DNS requests private from your ISP.
Alternate domain name services
Below lists most public DNS servers, current as of February 2024. There are two addresses listed for each: primary and a secondary, which acts as a backup if the first address is unavailable.
| DNS Provider | Primary Address | Secondary Address |
|---|---|---|
| Cloudflare IPv4 | 1.1.1.1 | 1.0.0.1 |
| Cloudflare IPv6 | 2606:4700:4700::1111 | 2606:4700:4700::1001 |
| Google Public DNS | 8.8.8.8 | 8.8.4.4 |
| OpenDNS | 208.67.222.222 | 208.67.220.220 |
| Verisign | 64.6.64.6 | 64.6.65.6 |
| Control D | 76.76.2.0 | 76.76.10.0 |
| DNS.WATCH | 84.200.69.80 | 84.200.70.40 |
| OpenNIC | 50.116.23.211 | 192.99.240.129 |
| Dyn | 216.146.35.35 | 216.146.36.36 |
| DNS Advantage | 156.154.70.1 | 156.154.71.1 |
| SafeDNS | 195.46.39.39 | 195.46.39.40 |
| Quad9 | 9.9.9.9 | 149.112.112.112 |
| Comodo Secure DNS | 8.26.56.26 | 8.20.247.20 |
| Norton ConnectSafe | 199.85.126.10 | 199.85.127.10 |
| GreenTeamDNS | 81.218.119.11 | 209.88.198.133 |
| SmartViper | 208.76.50.50 | 208.76.51.51 |
| CleanBrowsing | 185.228.168.9 | 185.228.169.9 |
| AdGuard DNS | 94.140.14.14 | 94.140.15.15 |
| AlternateDNS | 198.101.242.72 | 23.253.163.53 |
| Yandex.DNS | 77.88.8.8 | 77.88.8.1 |
You may decide to use one of these, or change your DNS to an address provided by your school or your employer's IT (information technology) department. Make sure you know the address(es) of your new DNS before you proceed.
If you're using Microsoft Windows, you can use the DNS Benchmark utility to run speed tests on multiple DNS providers to find which offers you the best performance.
Configuring your operating system
The steps for changing your computer's DNS settings will depend on what operating system you are running. Use the links below to navigate to the section which applies to you.
Before making any changes to your DNS configuration, we highly recommended writing down your current DNS address information so changs can be reverted if necessary.
If you cannot change your DNS addresses, you likely don't have the proper permissions to do so. If you have problems, contact your system administrator or IT department for assistance.
The following are step-by-step instructions for changing the DNS settings on Windows, OS X, Linux, and BSD (Berkeley Software Distribution) operating systems:
Windows 10
- Open the Control Panel.
- Click View network status and tasks
- Click Change adapter settings on the left portion of the window.
- Double-click the icon for the Internet connection you're using.
- Click the Properties button.
- Click and highlight Internet Protocol Version 4 (TCP/IPv4) and click Properties.
- If not already selected, select the Use the following DNS server addresses option.
- Enter the new DNS addresses and click OK and close out of all other windows.
Windows 8
- Access the Windows desktop screen.
- Press Ctrl+I on the keyboard to open the Settings menu and select the Control Panel option.
- Click the Network and Sharing Center icon.
- Click the Change adapter settings option in the left navigation pane.
- Double-click the icon for the Internet connection you are using. It may be labeled Ethernet if using wired Internet, or Wi-Fi if you're using a wireless connection. If you have multiple connections, make sure not to select the one with the red X. In the Properties or Status window that opens, click the Properties button.
- Select the Internet Protocol Version 4 (TCP/IPv4) option in the list of items on the Properties window and click the Properties button.
- If not already selected, select the Use the following DNS server addresses option.
- Enter the new DNS addresses and click OK and close out of all other windows.
Windows 7
- Open the Control Panel.
- Click View network status and tasks
- Click Change adapter settings on the left portion of the window.
- Double-click the icon for the Internet connection you're using. Often this will be labeled Local Area Connection or the name of your ISP. If you have multiple connections, make sure not to click the one with the red X.
- Click the Properties button.
- Click and highlight Internet Protocol Version 4 (TCP/IPv4) and click Properties.
- If not already selected, select the Use the following DNS server addresses option.
- Enter the new DNS addresses and click OK and close out of all other windows.
Windows Vista
- Open the Control Panel.
- Click View network status and tasks
- Click View status for the network connection.
- Click Properties and Continue.
- Click and highlight Internet Protocol Version 4 (TCP/IPv4) and click Properties.
- If not already selected, select the Use the following DNS server addresses option.
- Enter the new DNS addresses and click OK and close out of all other windows.
Windows XP
- Open the Control Panel.
- In the Control Panel window, double-click the Network Connections icon.
- Double-click the icon for the Internet connection you're using. Often this will be labeled Local Area Connection or the name of your ISP. If you have multiple connections, make sure not to click the one with the red X.
- Click the Properties button.
- Highlight Internet Protocol (TCP/IP) in the connection items list and click the Properties button.
- If not already selected, select the Use the following DNS server addresses option.
- Enter the new DNS addresses and click OK and close out of all other windows.
Windows 98
- Open the Control Panel.
- In the Control Panel window, double-click the Network icon.
- Highlight TCP/IP Ethernet adapter in the connection items list and click the Properties button.
- In the Properties window, click the DNS Configuration tab and select Enable DNS.
- If any DNS server is listed, highlight each and click the Remove button.
- Once no DNS is listed, type in the new addresses and click the Add button.
- Once the new addresses are added, click OK and close out of all other windows.
macOS
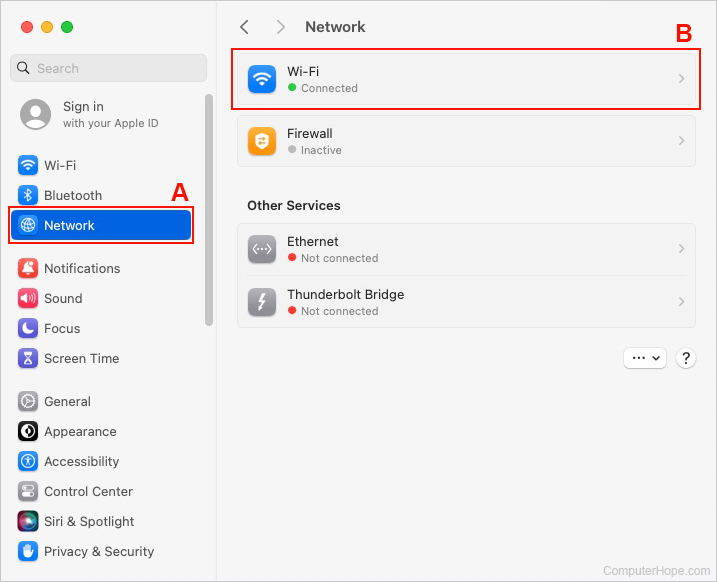
- In the menu bar, click the Apple icon to open the Apple menu and choose System Settings.

- On the left side of the screen, click Network (A). Then, in the section to the right, click the device you're using to connect to the Internet (B).
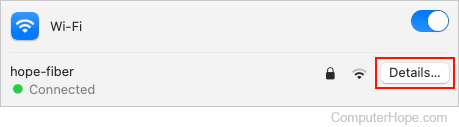
- On the right side of the connection, click the Details... button.
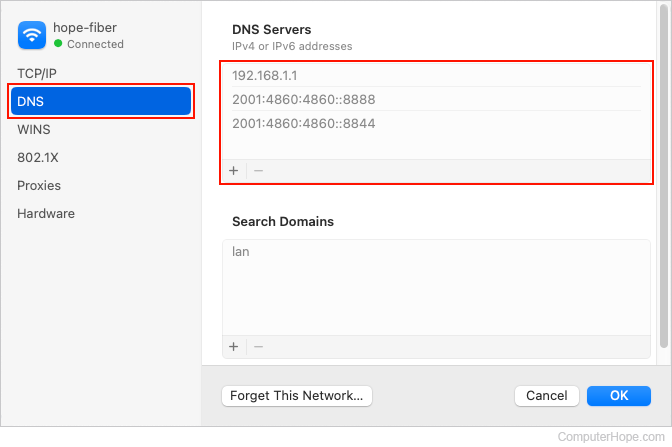
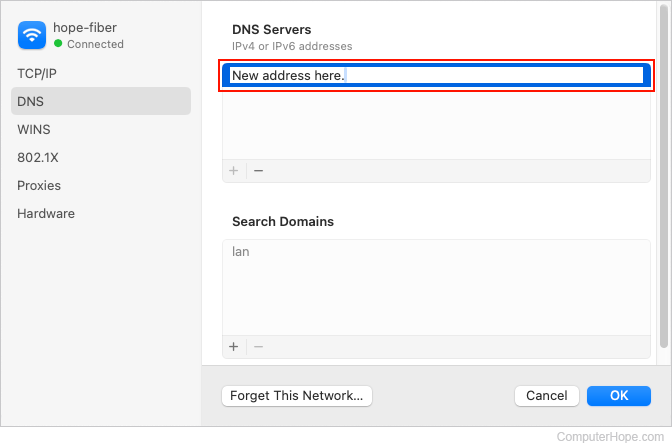
- On the left side of the new window, select the DNS tab. In the right pane, you can see your current DNS server addresses. Write these down in case you need to revert your changes later.
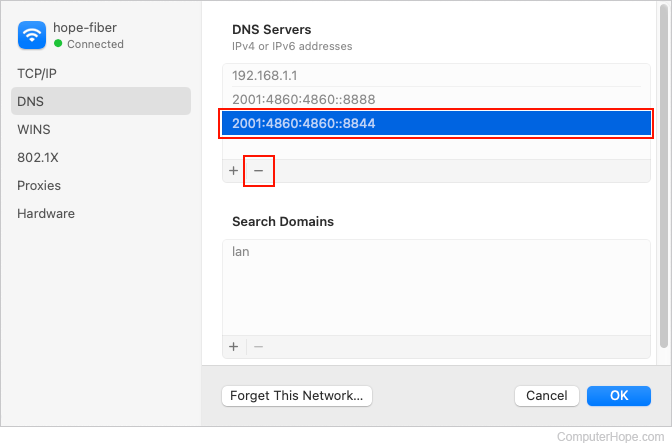
- Highlight one of your current DNS addresses, and click the minus ("-") button underneath the left pane to remove the highlighted address from the list. Do this for each of your current DNS addresses.
- Once the list is empty, click the plus ("+") button to add a new empty address (0.0.0.0). Highlight this address and type in a new one. Press Enter when you are done.
- Repeat step 7 for a secondary address, if you are adding one.
- Click OK to save the settings.
Linux
In Linux, the DNS server addresses are kept in the system file /etc/resolv.conf. (You need superuser privileges to edit this file.)
For instance, to edit this file with the nano text editor, use the command:
sudo nano /etc/resolv.conf
(We prefix the command with sudo to run nano with superuser permission.)
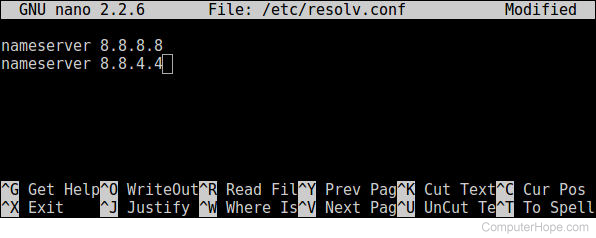
In your text editor, you can see the contents of /etc/resolv.conf. Each line that begins with the word nameserver contains a DNS address used by your system.
Once you have the file open, follow these steps:
- Make a note of the DNS addresses already listed. You may need this information later to revert your changes.
- Delete any lines beginning with nameserver.
- For each DNS address you want to add, add a line which reads nameserver address, where address is the address of the DNS. For instance, in the image below, we are configuring our system to use the primary and secondary Google Public DNS.
- Save the file. In nano, this is Ctrl-O, Enter.
- Exit the text editor. In nano, this is Ctrl-X.
BSD
BSD's resolver uses the same file and format as Linux. Edit /etc/resolv.conf as root and add a nameserver address line for each DNS you want to use.
The same is true for macOS X, which a derivative of BSD. If you'd like to change your Mac's DNS addresses directly, edit the nameserver lines in /etc/resolv.conf as the root user.