
How to insert a check mark

Adding a check mark (also called a tick) symbol to a document, spreadsheet, presentation slide, or a web page can be done several ways. Follow the steps below for the type of file, document, or page that you want to add a check mark.
A check mark should not be confused with the square root symbol ( √ ).
Copy and paste
With most computers, smartphones, tablets, and other devices, you can often create a check mark by copying and pasting the check mark from another location. For example, copying one of the following check marks from this web page and pasting it into another document or file.
- ✓
- ☑
- ✔
Microsoft Windows
If you're in Microsoft Windows you can use the emoji panel to insert a check mark into most programs. To do this option, press the keyboard shortcut Windows key+. and click the Symbols option and locate the checkmark. To insert the checkmark as an emoji or picture, you can also use the search option to search for these types of check marks.
Microsoft Word, Excel, and PowerPoint
Option one
- Open the Microsoft Word, Excel, or PowerPoint application.
- Click the Insert tab in the Ribbon at the top.
- In the Symbols section, on the far-right side of the Insert tab, click the Symbols icon.
- If using Microsoft Word, in the Symbols pop-down menu, click the More Symbols option. If using Microsoft Excel or PowerPoint, skip to the next step.
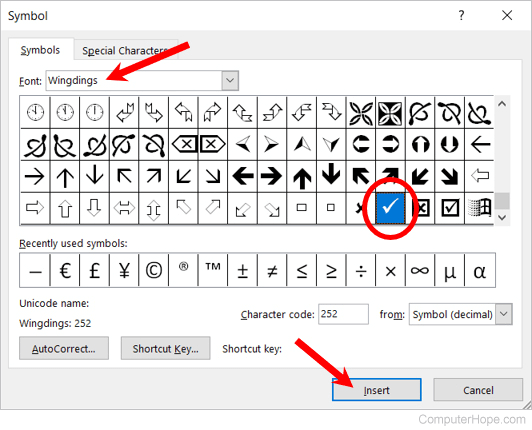
- In the Symbols window, click the Font drop-down list and select the Wingdings font.
- Below the Font list is the Wingdings symbols you can insert. Scroll to the bottom of the list of symbols and select the check mark symbol in the last row of symbols.
- Click the Insert button to insert the check mark into the document.
Option two
- Open the Microsoft Word, Excel, or PowerPoint application.
- On the Home tab, in the Font section, click the Font drop-down list and select the Wingdings font.
- Create a check mark symbol by pressing and holding Alt, and then typing 0252 using the numeric keypad on the right side of the keyboard.
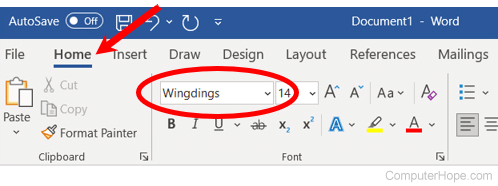
- After creating the check mark symbol, switch back to the desired font for text in the document.
Microsoft Notepad
Create a check mark in Notepad by inserting the ASCII (American Standard Code for Information Interchange) character check mark by following the steps below.
The instructions below also work for creating a check mark in other basic text editors, like Notepad++ and TextPad.
- Open Microsoft Notepad.
- In Notepad, press and hold Alt, type 251 using the number pad on the right side of the keyboard.
Other Microsoft Windows programs
On Microsoft Windows computers and most Windows programs, add a check mark using the Charmap (Character Map) utility. Below are the steps to add a check mark to most Microsoft programs using Charmap.
Copying a check mark from the Character Map to Notepad or other basic text editors does not work. We recommend using the instructions for creating a check mark in Notepad above.
- Open the Microsoft program and Character Map.
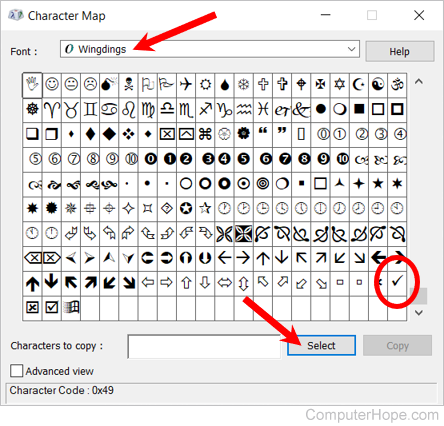
- In the Character Map window, select Wingdings as the font.
- Scroll down until you see the check mark (character code: 0x6FC).
- Click the check mark.
- Click the Select button.
- Once the check mark is entered in the characters to copy text box, click the Copy button.
- Switch back to the Microsoft program and paste the check mark in the document.
HTML web page
In the web page's HTML (HyperText Markup Language) source code, add one of the following Unicode HTML entities, depending on the type of check mark you want to insert.
- ☑ - inserts the " ☑ " symbol.
- ✓ - adds the " ✓ " symbol.
- ✔ - inserts the " ✔ " symbol.