
How to create and remove leaders in Microsoft Word
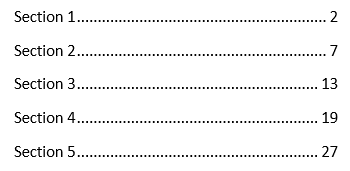
In Microsoft Word, leaders help readers connect text to numbers or other characters spaced out from left to right. Leaders help organize information and be a visual guide for readers. The picture shows dotted leaders with a three-inch tab stop.
How to create leaders in a Word document
- Open a new or existing Microsoft Word document.
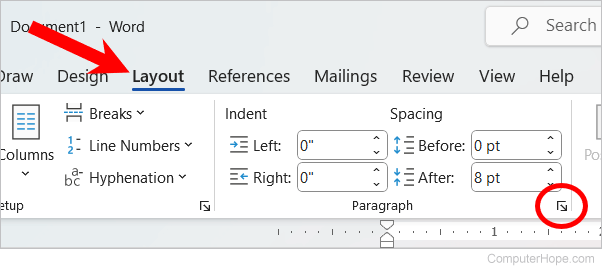
- Click the Layout tab in the Ribbon.
- In the Paragraph section of the Layout tab, click the dialog launcher for paragraph options.
- In the Paragraph window, click the Tabs button at the bottom-left corner.
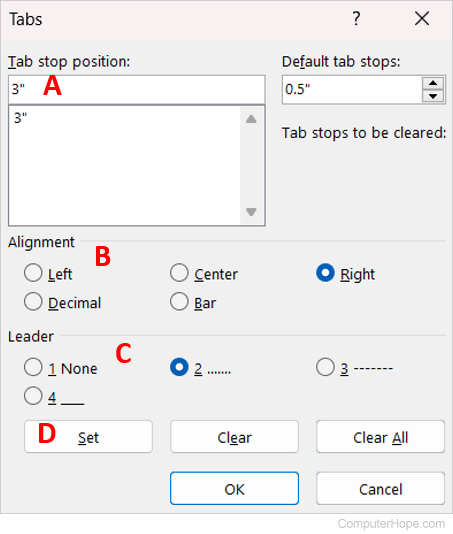
- On the Tabs window, in the Tab stop position text field (A), enter a number for the length of the tab stop. For example, if you want the cursor to move to the 3-inch position in the document's horizontal ruler when pressing Tab, enter 3 in the Tab stop position text field.
- In the Alignment section, select how you want the characters to the right of the leaders to be aligned (B).
- In the Leader section, select the type of leader (C) you want. Options are None (1), dotted (2), dashed (3), and solid underline (4).
- Click the Set button (D) to save the new leader, then click OK.
The tab stop and leader options set above are now used each time you press Tab.
How to change leaders in a Word document
To change leader options for a specific line in a document, do the following:
- Select the entire line of text with the leader you want to modify.
- Click the Layout tab in the Ribbon.
- In the Paragraph section of the Layout tab, click the dialog launcher for paragraph options.
- In the Paragraph window, click the Tabs button at the bottom-left corner.
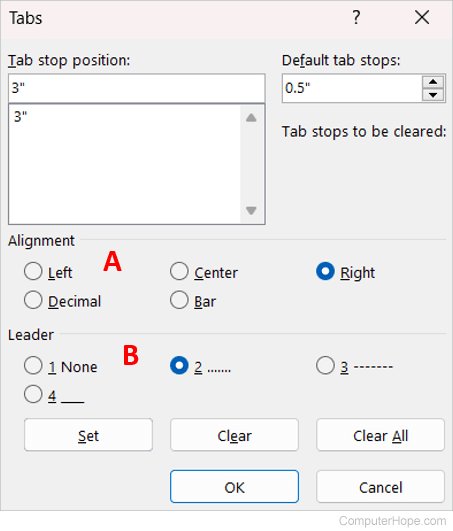
- On the Tabs window, in the Alignment section, select how you want the characters to the right of the leaders to be aligned (A).
- In the Leader section, select the type of leader (B) you want. Options are None (1), dotted (2), dashed (3), and solid underline (4).
- When you're done changing the leader options, click the OK button.
To change the tab stop position for the selected line of text, clear all existing tab stops first, then add the desired tab stop position. After adding the new tab stop, select the desired alignment and leader options, and click OK.
How to remove leaders in a Word document
To remove a leader and its text, select the line and press Delete on your keyboard.
To remove a leader, but keep the text associated with that leader, follow the steps below.
- Select the line of text, including the leader.
- Click the Layout tab in the Ribbon.
- In the Paragraph section of the Layout tab, click the dialog launcher for paragraph options.
- In the Paragraph window, click the Tabs button at the bottom-left corner.
- On the Tabs window, select the tab stop (A) under the Tab stop position text field.
- Click the Clear button (B), then click the OK button to remove the leader from the selected line of text.

If there are two or more tab stops configured in the Tabs window, clear each tab stop to remove all possible leaders from the selected line of text. Instead of clicking Clear for each tab stop, click Clear All to remove all tab stops.