
How to use Microsoft ScanDisk
ScanDisk can improve the performance of your hard drive and help maintain the Windows filesystem. Review the ScanDisk steps below for your version of Windows.
Close all open programs, web browsers, etc. before performing a disk scan to ensure that disk activity is minimal while the disk is being scanned.
If you are using an old version of Windows (Windows 95, 98, and Me), boot the computer to Safe Mode before running ScanDisk.
Windows 11
Method 1: Using the error checking tool
Follow these steps to scan your drive from the Windows File Explorer.
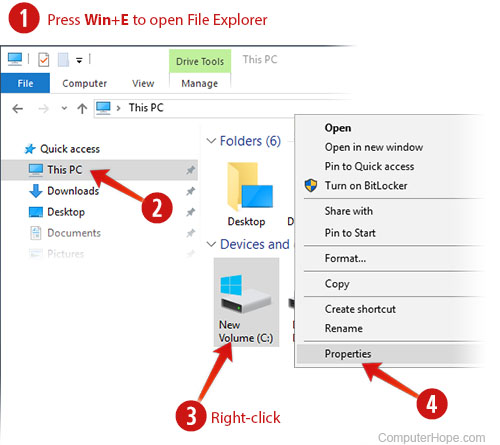
- Open a File Explorer window by pressing Windows key+E on your keyboard.
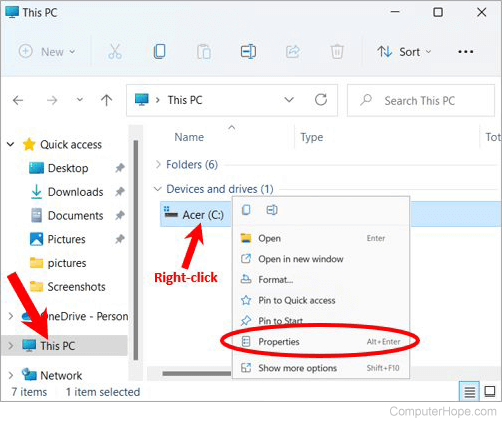
- In the File Explorer window, click This PC in the left navigation pane.
- In the Devices and drives section on the right side of the window, right-click the drive you want to scan and select Properties.
If you don't see the Properties option in the right-click menu, click Show more options to view an expanded menu, and select Properties in that menu.
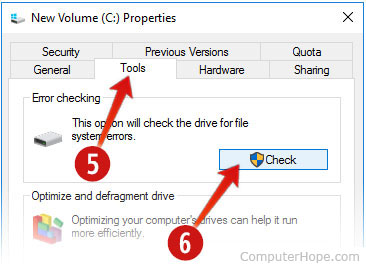
- In the Properties window, click the Tools tab.
- In the Error checking section, click the Check button.
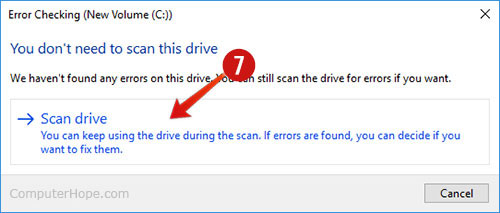
- In the Error checking window, click Scan drive.
Depending on your system, the scan can take anywhere between 15 minutes and a few hours.
Method 2: Using SFC /SCANNOW
SFC (system file checker) is a command-line tool that scans for corrupted files and resources on your system. Follow these steps to scan your drive with SFC.
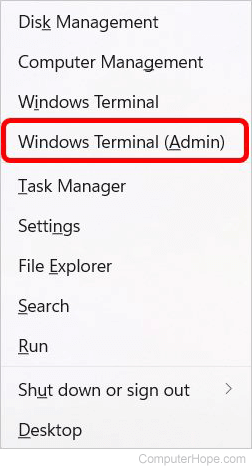
- Press Windows key+X to open the Power User Tasks Menu.
- Select Windows Terminal (Admin).
- After the User Account Control prompt, click Yes.
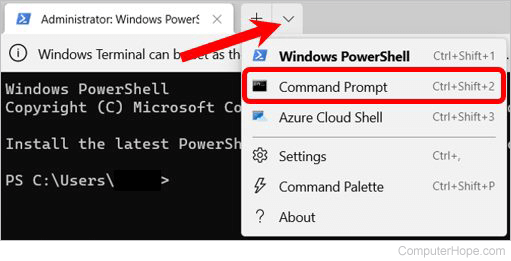
- In the Windows Terminal window, click the down arrow at the top of the window, to the right of the Administrator: Windows PowerShell tab.
- In the drop-down menu, select Command Prompt to change the Windows Terminal to a command prompt instead of PowerShell.
- At the Command Prompt, type sfc /scannow and press Enter.

Do not close the command prompt window until the scan reports that it has completed. Depending on your system, the scan can take anywhere between 15 minutes and a few hours.
If you receive the message "Windows Resource Protection could not perform the requested operation," boot your computer in Safe Mode and repeat the steps above.
Windows 10
Method 1: Using the error checking tool
Follow these steps to scan your drive from the Windows File Explorer.
- Open a File Explorer window by pressing Windows key+E on your keyboard.
- In the File Explorer window, click This PC in the left navigation pane.
- In the Devices and Drives section on the right side of the window, right-click the drive you want to scan and select Properties.
- In the Properties window, click the Tools tab.
- Under Error checking, click Check.
- In the Error checking window, click Scan drive.
Depending on your system, the scan can take anywhere between 15 minutes and a few hours.
Method 2: Using SFC /SCANNOW
SFC (System File Checker) is a command line tool that scans for corrupted files and resources on your system. Follow these steps to scan your drive with SFC.
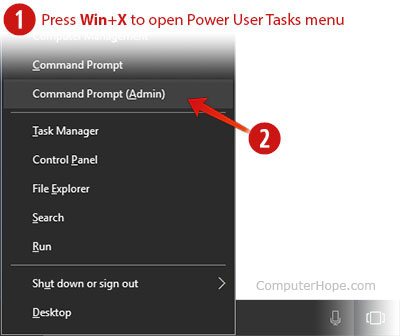
- Press Windows key+X to open the Power User Tasks Menu.
- Select Command Prompt (Admin).
- In the User Account Control prompt, click Yes.
- At the Command Prompt, type sfc /scannow and press Enter.
Do not close the command prompt window until the scan reports that it has completed. Depending on your system, the scan can take anywhere between 15 minutes and a few hours.
If you receive the message "Windows Resource Protection could not perform the requested operation," boot your computer in Safe Mode and repeat the steps above.
Windows 8
To scan your hard disk for errors, we recommend following these steps.
- Open a File Explorer window by pressing Windows key+E on your keyboard.
- In the File Explorer window, click This PC in the left navigation pane.
- Under Devices and Drives on the right side of the window, right-click the drive you want to scan and select Properties.
- In the Properties window, click the Tools tab.
- Click the Check button in the Error Checking section.
- Click Scan Drive. If Windows needs to restart the computer to perform the scan, it lets you know.
Windows 7, Vista, XP, and 2000
To run ScanDisk, follow these steps.
- Double-click My Computer.
- Highlight a local hard drive by clicking it once.
- Right-click the highlighted local drive and select Properties.
- Click the Tools tab and click Check Now to check the drive for errors.
- The computer needs to restart to run ScanDisk without getting interrupted.
Windows 95 and 98
To run ScanDisk from Windows 95 and 98, follow the steps below.
- Click the Start button.
- Click the Run option, type ScanDisk in the Run box, then press Enter.
- In the ScanDisk window, select the drive that you want to be checked.
- Choose the Standard or Thorough option. We recommend you run a Standard scan first. If you encounter issues with ScanDisk using the Standard scan, run the Thorough scan instead.
- Click start to begin ScanDisk.
Windows 95 OSR2 and Windows 98 run ScanDisk automatically if the computer is shut down improperly. They do this to check if the hard drive encountered issues when the computer was improperly shutdown.
Windows NT
Windows NT is not shipped with ScanDisk. However, various third-party companies offer utilities to verify your disk integrity.
Windows 3.x and MS-DOS
ScanDisk is available in MS-DOS versions 6.2 and later. If you are running MS-DOS 6.2 or 6.22 and would like to run ScanDisk, follow the steps below.
- If you are in Windows 3.x, click File and then Exit to get to the MS-DOS prompt.
- At an MS-DOS prompt, run:
CD \DOS
- At the C:\DOS> prompt, run:
SCANDISK
Some computer manufacturers have changed the installation of ScanDisk to C:\WINDOWS. If ScanDisk is not found in the DOS directory, try:
CD \WINDOWS
SCANDISK