
How to fix a broken laptop key or put it back on
Sometimes a key on a laptop keyboard may become loose or fall off. To fix the key and snap it back in place on the keyboard, try the following suggestions.
This page is a general reference guide and may not apply to your laptop, as your laptop may have a different keyboard key design. If you have difficulty removing, replacing, or fixing a laptop key, and the suggestions below don't work, we recommend taking your laptop to a computer repair shop for further help.
Additionally, if you're trying to remove or put a key back on a desktop keyboard, see: How to remove the keys on a keyboard.
Fixing a loose keycap
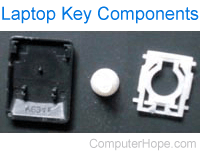
Unlike a desktop key, each key on a laptop keyboard may have three components: the keycap, key pad, and the key retainer, as shown in the picture.
If the keycap is loose but still attached to the laptop, it is often fixed by pressing down on the keycap. If the keycap re-attaches, a snap while pressing the key down is heard. If this does not fix the issue, we suggest removing the key so it can be re-attached. The re-attachment process is detailed below.
Fixing a broken keycap
If a key, keycap, key pad, button, or retainer is physically broken or missing, it must be replaced. See: Where can I find a replacement for a keyboard key?
If you're having difficulty putting a key back on the laptop keyboard, follow the steps below. If you're trying to fix the spacebar, skip to the spacebar steps.
- Start by first inserting the key retainer into the laptop. If you have a key pad, we suggest inserting it after the retainer is set in place to make things easier. Once the retainer is inserted, it should lie flat and be able to flex (shown in the image below).
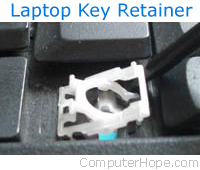
If you're unsure what direction the laptop key retainer goes, check the orientation of the metal hooks on the base of the keyboard. These metal hooks help determine the orientation of the key retainer laid into them, as the retainer should align with the hooks.
- Insert the key pad in the retainer.
- Once the two steps above are completed, position the key cap over the retainer in the proper orientation and press down lightly. The key should snap onto the retainer. If the key does not look right, try pressing down on all corners of the key to make sure all clips are snapped in place. Once snapped in, test the key and see if it works again.
Spacebar key steps
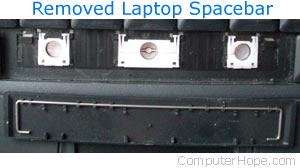
Unlike the other keys on the keyboard, the spacebar requires additional steps to get it back on properly. The image below shows the spacebar removed from a laptop. Before placing the spacebar keycap back on the laptop, a bar (shown below) must be removed by inserting your flathead screwdriver beneath it and gently pulling upward.
Once the bar is removed, place the new spacebar on the laptop. Be mindful that it is properly oriented over the retainers, and push down to snap it back in place.
Key still doesn't work after fixing or replacing
If the key still doesn't work after putting it back on or replacing the keycap, key pad, or key retainer, the circuit board for the keyboard may not be working. In the case of a problem with the circuit board, replace the entire keyboard, including the circuit board, to fix the problem.
To replace the entire keyboard, contact the laptop manufacturer to try purchasing one directly from them. If the manufacturer does not directly sell replacement keyboards to end users, take your laptop to a computer repair shop.
Do not under any circumstance use glue to repair your keys. This causes the key to malfunction.