
How to enter and exit the BIOS or CMOS setup
Every computer provides a way to enter the BIOS or CMOS setup, which lets you configure some basic settings for your computer and its hardware components.
Below lists common methods for accessing and exiting your computer's BIOS or CMOS setup and recommendations if you're having trouble.
You must have a working keyboard to enter and exit the BIOS or CMOS setup.
The details for your computer may be unique. If you're unsure, consult the owner's manual for your computer or motherboard if the computer is custom-built.
This page doesn't help if you cannot enter the BIOS or CMOS setup because it's password-protected. For help with clearing a BIOS or CMOS password, see: How to clear a desktop BIOS or CMOS password.
Access BIOS or CMOS on newer computers
Computers manufactured in the last few years allow you to enter the BIOS or CMOS setup by pressing one of the five keys listed below during the boot process.
- F1
- F2 *
- F10 **
- Delete or Del
- Esc
F1, F2, and F10 are all function keys on the top of the keyboard.
* If pressing F2 opens a diagnostics tool, your setup key is likely F10.
** F10 is also used for the boot menu. If pressing F10 opens a boot menu, your setup key is likely F2.
Setup keys are to be pressed as the computer is booting up. Most users see a message similar to the example below upon startup. Some older computers may also display a flashing block of text to indicate when to press F1 or F2.
Press F2 to enter BIOS setup.
If you're unsure what key to press, as the computer boots, try pressing and holding one or more keys on the keyboard to cause a stuck key error. Once you get this error, the option to continue or enter setup should appear.
If you are still unable to enter the BIOS using the methods listed above, check the motherboard's manual for the appropriate key to enter BIOS. Documentation for the motherboard may also be on the manufacturer's website.
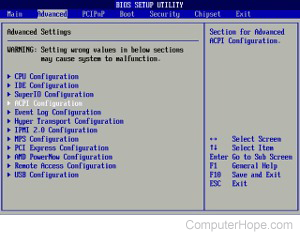
Once you have successfully entered the CMOS setup, a screen similar to the example below appears. Your CMOS setup may look different, depending on the manufacturer, but it should still share a lot of the same options and information.
How do I change and save changes in CMOS setup?
Once in CMOS setup, the method for changing the settings often depends on the BIOS manufacturer. You may use the arrow keys and the Enter key to select categories and change their values. Some manufacturers may have you press the Page up and Page down keys to change the values.
All manufacturers show which keys to use for navigation on the bottom or right side of the setup screen.
I cannot change the values for a setting I want to use
If you're trying to change the clock, speed, or other settings and don't have the option available, the motherboard doesn't support it. If you believe it should be supported, you may need a BIOS update.
If changes you made appear to revert to default settings, or the date and time setting in the BIOS keeps falling behind, you may need to replace the CMOS battery. For help with replacing the battery, see: How to replace the CMOS battery.
How do I save the changes?
If any changes are made, save those changes, which is usually done by pressing the F10 key on the keyboard. If F10 doesn't work, look at the bottom or top of the screen for the key that's used to save the settings.
Access BIOS or CMOS on older computers
Unlike today's computers, older computers (before 1995) had numerous methods of entering the BIOS setup. Below is a listing of key sequences to press as the computer boots to enter the BIOS setup.
Acer BIOS
If your Acer computer cannot boot or you want to restore the BIOS to its original settings, press and hold the F10 as you turn on the computer. While holding F10, two beeps should be heard to indicate the settings are restored.
AMI BIOS
Older AMI BIOS could be restored to bootable settings by pressing and holding Insert as the computer is booting.
BIOS or CMOS diskettes
Early 486, 386, and 286 computers required a floppy disk to enter the BIOS setup. These diskettes may be called ICU (ISA configuration utility), BBU (battery backup unit), or SCU (storage control unit) disks. Because these diskettes are unique to your computer manufacturer, you must obtain the diskettes from them. See the computer manufacturers list for contact information.
Access BIOS on early IBM computers
Some early IBM computers require you to press and hold both mouse buttons as the computer boots to enter the BIOS setup.
Additional suggestions for accessing BIOS or CMOS
Finally, if none of the suggestions above allow access to the setup, try generating a stuck key error, which gives an option to enter the BIOS or CMOS setup. To do this, press and hold any key on the keyboard and do not let go (you may hear several beeps). Keep pressing the key until the computer stops booting to enter setup. If this does not work, make sure your keyboard is working.
How to exit the BIOS or CMOS
There are several ways to exit the BIOS or CMOS setup depending on the computer's type. The most common methods include the following.
- Press the Esc key to exit without saving any changes.
- Press the F10 or F12 key to save changes and exit.
- Access the Exit or Save & Exit tab in setup and select the Exit or Save and Exit option.
If you have trouble exiting the BIOS or CMOS setup, try the following methods to fix the problem.
- Press the F9 key to load default settings and press F10 to save and exit.
- Access the Exit or Save & Exit tab in setup, select the Load Optimized Defaults option, select Yes, and press Enter. Any changes made are reverted, and the BIOS or CMOS is set back to default settings.
- Turn off the computer (use only as a last resort and with caution).
If your computer fails to start up, try resetting the BIOS or CMOS to fix the problem. For help, see: How to reset CMOS or BIOS settings.