
How to install a hard drive or SSD
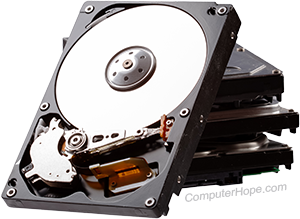
Whether you're building a computer, upgrading storage, looking for improved performance, or some combination of the three, a hard drive or SSD (solid-state drive) is essential. In recent years, solid-state drives have become the go-to storage medium due to their speed and reliability. However, some users still require the additional space afforded by an HDD (hard disk drive). To learn how to install a secondary storage drive, follow the steps in the sections below.
Read before starting
- If you have any important data on the drive you wish to keep, back it up.
- Ensure you have a working copy of Windows.
- Write down important information from the top or bottom of the hard drive, such as the model number, serial number, and specifications.
- Make sure you are familiar with ESD (electrostatic discharge) and its potential dangers.
- When you are physically installing the drive, ensure the computer is powered down and unplugged.
Mounting the drive
Open the computer and determine the appropriate drive bay for the installation. All computers have 3.5-inch bays. However, as SSDs become popular, cases are implementing drive bays that look more like "slots," so an SSD fits without requiring additional hardware. If you're installing an SSD and only have 3.5-inch bays, you can purchase mounting brackets online.
Identify the drive interface and plug in the cables
The interface varies depending on your new drive. You need to know which connection type your computer has available so you can connect the drive to power and the motherboard after you get it mounted. If you already know which interface your drive uses, you can select one of the following quick links.
SATA
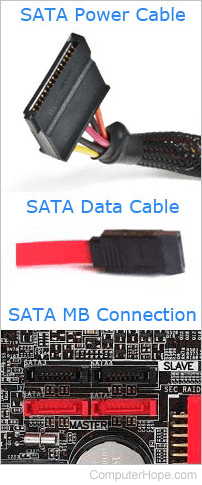
A SATA (Serial AT Attachment) hard drive or SSD requires two connections to the motherboard: a SATA cable and a power cable.
Once you've mounted the drive, plug the data and power cables into the motherboard by matching them to the appropriate ports. If you're not sure which ports to use, consult your motherboard owner's manual.
Both ends of a SATA cable look the same, having an "L" shaped connector. This design ensures that the SATA connector is correctly oriented when attached to a port. Line up the SATA cable end with the drive's SATA connection, and gently push the cable end into the storage drive.
If you're having trouble connecting the cables, use the image as a reference.
PCIe
Although it's been used with video cards for years, the PCIe (PCI Express) interface can now be used to create extremely fast SSD connections. These drives are the easiest to install of the three. You'll need to open the computer case and insert the drive into a PCI express port. Several of these ports should be on your motherboard. Examples shown in the image below.
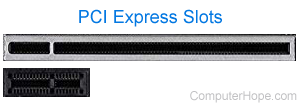
Once you've located the appropriate port, align the contacts with the slot. Make sure to touch only the edges of the storage device. Gently and firmly apply pressure straight down. When the storage device is firmly inserted, installation is complete.
IDE/EIDE
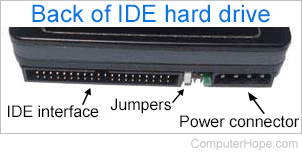
IDE (integrated drive electronics) hard drives require that their jumpers are set correctly. It's easier to complete this process before the installation. On the back of the hard drive is a small set of pins with a small sheath of plastic connecting two of the pins. This removable plastic piece is known as a jumper block, or shunt. The jumper placement configures for single, primary, secondary, or cable select operation. If you're not sure what the jumper settings are, check your hard drive owner's manual, or look for a jumper diagram affixed to the hard drive itself.
- If the new hard drive is going to be the only hard drive in the computer, set the jumper as primary.
- If the new hard drive is going to be a second hard drive on the same IDE cable as another hard drive, set the jumper as secondary.
If a hard drive uses an IDE/EIDE interface and shares the cable with another device (e.g., disc drive), the other drive should be secondary and the hard drive set as primary. Consult your manual or jumper diagram for the correct settings, and set each drive's jumpers accordingly.
Alternatively, if all devices on the IDE cable have jumpers set to "cable select," their primary/secondary configuration is determined by their position on the cable. Consult your owner's manual for detailed information about your drive's cable select capability.
Once you set the jumpers, connect the data and power cables to the motherboard by matching them to the ports with the appropriate number of pins.
The IDE/EIDE cable (gray flat ribbon cable) has a blue, red, or dotted line on one side of it that indicates pin 1. This side of the cable point to the side where the power connects to the back of the hard drive.
If the IDE/EIDE cable is not already connected to the interface card or motherboard, connect that end of the cable now. If this is the only hard drive, we recommend the drive connect to the PRIMARY 0 (PRI 0) or PRIMARY 1 (PRI 1) motherboard connector.
BIOS setup
Once the hard drive has been installed, reconnect the keyboard, monitor, and power cable to the computer. We recommend you do not connect any of the other cables yet because, if you experience issues, you may have to disconnect all the cables again.
Once connected, turn on the computer. As the computer is booting, access the BIOS setup. Verify the drive is being recognized or that each drive is set up as Auto.
Software setup
Once the hard drive has been detected in BIOS (basic input/output system), it may need to be set up with software provided by your drive manufacturer. If the hard drive is not plug and play, use a bootable disk to prepare the setup.
If you plan on using another operating system, such as Linux, disk partitioning will be performed during the setup process. You can also use a live ISO, such as GParted, to create a bootable USB (universal serial bus) thumb drive or CD-R (compact disc recordable), and boot with that disk to edit your partitions.
Troubleshooting
If other issues arise during or after the installation of the hard drive, refer to our hard drive help and support page for additional help and information.