How to install Nextcloud on Ubuntu 18.04
Nextcloud is a self-hosted cloud service. It provides synchronized storage, productivity, and groupware applications for personal or business use, that you can access in the cloud. It can be hosted on-premises (on a local network), or on a VPS (virtual private server) on the Internet.
These instructions guide you through the steps required to install Nextcloud on a VPS.
Create a VPS running Ubuntu Server 18.04 LTS
Start with a fresh installation of Ubuntu 18.04.
For example, if you are using Linode, from your Linode dashboard choose Create, then Linode. Then, under Choose a Distribution, choose Ubuntu 18.04 LTS.
Or, if you are using Digital Ocean, from your Digital Ocean dashboard choose Create, Droplets. Then, under Distributions, choose Ubuntu 18.04.3 (LTS) x64.
The minimal $5/month services on Linode and Digital Ocean offer 1 GB of RAM (random-access memory), 25 GB of SSD (solid-state drive) storage, and 1 TB of monthly network traffic. For personal use, Nextcloud performs well on these specs. If you need more disk space, you can choose a more expensive plan.
When your VPS is created, make sure you know its IP address and root password before continuing with these instructions. The IP address is listed in the dashboard for your VPS. The root password was either chosen by you during installation (Linode), or e-mailed to you (Digital Ocean).
Update DNS record of your domain
Now is a good time to update the DNS (domain name system) record of your domain to point at your VPS. Log in to your domain registrar, and create an A record for your domain with the IPv4 address of your VPS. You can optionally create an AAAA record pointing to the VPS IPv6 address.
If you're unsure how to do this, check the documentation on your registrar's website.
Using a domain name for your server is recommended, but not required. If you don't have a domain name, you can get one at a registrar such as NameCheap or GoDaddy. If you don't want a domain name, you can substitute the IPv4 address of your VPS for the domain name in these instructions.
Connect to VPS with SSH
Connect to your VPS with SSH (secure shell), logging in as the user root. For example, in Windows 10, open a command prompt and run the following command.
ssh root@address
Replace address with the domain name or IP address of your server. For example, if the IPv4 address of your VPS is 123.45.67.89:
ssh [email protected]
If you recently updated your DNS records, the information may not yet have propagated to your DNS servers. If you can't connect using your domain name, use your IP address instead.
If this is the first time you're connecting to the server, you'll be asked to verify the authenticity of the server's encryption key.
The authenticity of host 'example.com (123.45.67.89)' can't be established.
ECDSA key fingerprint is SHA256:asdfPZq159216hjklgRBhD412b3PvkEjKBf0h352mZp.
Are you sure you want to continue connecting (yes/no)?
Type yes and press Enter. You'll then be prompted for the root password of your VPS.
Warning: Permanently added '198.74.58.146' to the list of known hosts.
[email protected]'s password:
Type the root password and press Enter.
Update Ubuntu and create a user
When you log in, you'll see the command prompt for your server.
root@localhost:~#
Update the system using the apt package manager.
apt update && apt -y upgrade
Create a regular (non-root) user account. Choose a one-word name with lowercase letters. For example, if your name is Alice, you could choose the username alice. In this example, we'll name the user myuser.
adduser myuser
Answer the prompts as follows.
Enter new UNIX password:    (type a password and press Enter)
Retype new UNIX password:   (type it again and press Enter)
    Full Name []:       (press Enter)
    Room Number []:     (press Enter)
    Work Phone []:      (press Enter)
    Home Phone []:      (press Enter)
    Other []:           (press Enter)
Is the Enter correct? [Y/n]   (press Enter)
Use the usermod command to add your user to the sudo group. Usermod lets you run the sudo command, so you can run administrator commands without logging in as root.
usermod -aG sudo myuser
Set the hostname of your computer to your domain name. (Substitute example.com with your actual domain name.)
hostnamectl set-hostname example.com
Log out of the server.
exit
Secure the VPS
Log in to the server again, this time as your new user.
ssh [email protected]
You're greeted by the regular user prompt.
myuser@example:~$
Notice that instead of a #, the prompt ends in a $. This indicates you are logged in as a regular user, instead of root.
Disable root SSH login
It's dangerous to allow SSH logins by the root user, because your VPS is exposed to the Internet, and it can receive many unwanted login attempts. The following steps ensure that no one (including you) can log in to the server as root.
You should always disable root SSH logins as soon as possible after creating a VPS.
Open the file /etc/ssh/sshd_config in a text editor. In these examples, we use the nano text editor. The sshd_config file requires administrator privileges to edit, so you must prefix the nano command with sudo, and enter your password (not the root password) when prompted.
sudo nano /etc/ssh/sshd_config
In the text editor, use the arrow keys to locate the line that says PermitRootLogin yes. Change the word yes to no.
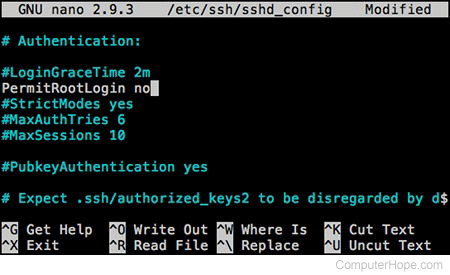
Save the file by pressing Ctrl+O, Enter. Exit the editor by pressing Ctrl+X.
Restart the SSH server to load the new settings.
sudo systemctl restart sshd
Configure VPS firewall
To help secure your server, use the utility ufw ("Uncomplicated Firewall") to restrict access to specific network ports.
First, set broad default rules. Configure the firewall to allow all outgoing traffic, and deny all incoming traffic.
sudo ufw default allow outgoing
sudo ufw default deny incoming
Then, create exceptions to allow incoming traffic for SSH (port 22), HTTP (port 80), and HTTPS (port 443) connections.
sudo ufw allow ssh
sudo ufw allow http
sudo ufw allow https
Enable the firewall, putting these rules into effect.
sudo ufw enable
Command may disrupt existing ssh connections. Proceed with operation (y|n)?
Type y and press Enter.
Firewall is active and enabled on system startup
Install web server, database, and PHP
Install the Apache web server, the MariaDB database system, and the PHP (PHP: Hypertext Preprocessor) scripting language.
sudo apt -y install apache2 mariadb-server php
Install the PHP modules required by Nextcloud.
sudo apt -y install php-curl php-gd php-mbstring php-zip php-xml php-mysql \
                    php-intl php-bz2 php-imagick
Configure MariaDB
Prepare the MariaDB server, and configure its root account.
sudo mysql_secure_installation
Enter current password for root (enter for none):  (press Enter)
Change the root password? [Y/n]                    (press Enter)
New password:                       (type a password, press Enter)
Re-enter new password:              (type it again, press Enter)
Remove anonymous users? [Y/n]                 (press Enter)
Disallow root login remotely? [Y/n]           (press Enter)
Remove test database and access to it? [Y/n]  (press Enter)
Reload privilege tables now? [Y/n]            (press Enter)
Open the MariaDB client.
sudo mysql
Run the following commands at the MariaDB prompt.
use mysql
update user set plugin='mysql_native_password' where user='root';
flush privileges;
\q
Configure Apache
Enable the Apache modules required by Nextcloud.
sudo a2enmod rewrite headers env dir mime
Set the global ServerName directive
Open the Apache global configuration file for editing.
sudo nano /etc/apache2/apache2.conf
At the top of the file, insert the following line, using your domain name instead of example.com.
ServerName example.com

Press Ctrl+O, Enter to save the file. Press Ctrl+X to exit.
Create an Apache virtual host configuration file for Nextcloud
Create a new web server configuration file for Nextcloud. The file will be blank when you open it.
sudo nano /etc/apache2/sites-available/nextcloud.conf
Put this text in the file.
<VirtualHost *:80>
  ServerName example.com
  DocumentRoot /var/www/nextcloud/
  Alias / "/var/www/nextcloud/"
  <Directory /var/www/nextcloud/>
    Require all granted
    AllowOverride All
    Options FollowSymLinks MultiViews
    <IfModule mod_dav.c>
      Dav off
    </IfModule>
  </Directory>
</VirtualHost>
Press Ctrl+O, Enter to save the file. Press Ctrl+X to close the file.
Download and install Nextcloud
Change to your home directory (abbreviated as ~) using the cd command.
cd ~
Create a "Downloads" directory with the mkdir command, then change to that directory.
mkdir Downloads
cd Downloads
Use the wget utility to download the latest version of Nextcloud, and the SHA512 hash. The hash is a small text file containing a mathematical signature that helps verify the authenticity of the Nextcloud archive.
wget https://download.nextcloud.com/server/releases/latest.tar.bz2{,.sha512}
Use the sha512sum utility to verify that the SHA512 hash of the Nextcloud archive matches the contents of the text file.
sha512sum -c latest.tar.bz2.sha512
latest.tar.bz2: OK
Use the tar utility to extract the contents of the archive.
tar xjvf latest.tar.bz2
Copy the extracted nextcloud directory to the directory /var/www/.
sudo cp -R nextcloud /var/www/
Use the chown utility to change the owning user and group of the directory /var/www/nextcloud (and all its files and subdirectories) to the special website user/group www-data.
sudo chown -R www-data:www-data /var/www/nextcloud/
Install nextcloud with the following command. In this command, replace the following values with your own.
- dbpass — the MariaDB root password you specified in Configure MariaDB, above.
- ncuser — a username for the Nextcloud administrator user. This value does not need to be the same as your VPS username. For example, you can choose admin, or alice, etc. This user has administrator privileges in the Nextcloud application.
- ncpass — a password for your Nextcloud administrator user.
sudo -u www-data php /var/www/nextcloud/occ maintenance:install \
--database "mysql" --database-name "nextcloud" --database-user "root" \
--database-pass "dbpass" --admin-user "ncuser" --admin-pass "ncpass"
After a few moments, if everything worked correctly, a confirmation message is displayed.
Nextcloud was successfully installed
As good practice, clear the command history after entering plaintext passwords on the command line.
history -c
Add your domain name to the Nextcloud trusted domains.
sudo -u www-data php /var/www/nextcloud/occ config:system:set \
trusted_domains 1 --value=example.com
System config value trusted_domains => 1 set to string example.com
Enable the Nextcloud web server configuration.
sudo a2ensite nextcloud.conf
Disable the default Apache placeholder website.
sudo a2dissite 000-default.conf
Reload the Apache configuration.
sudo systemctl reload apache2
Enable HTTPS
Your Nextcloud application is currently accessible by HTTP only. The next step is to enable HTTPS to ensure that data is fully encrypted between your Nextcloud devices and the server.
These instructions use the certbot utility to automatically acquire a free TLS (transport layer security) certificate for your domain from Let's Encrypt. Certbot also configures Apache to encrypt your Nextcloud traffic with TLS.
Enable the Apache SSL (secure sockets layer) module, and restart Apache.
sudo a2enmod ssl
sudo systemctl restart apache2
Install and run certbot.
sudo apt install -y python-certbot-apache
sudo certbot --apache
Certbot prompts you for information. Answer as follows.
- Enter your e-mail address (required).
- Type A and press Enter to agree to the Let's Encrypt terms of service.
- Type Y to share your e-mail address with the EFF (Electronic Frontier Foundation), or N to decline, and press Enter.
- Your Apache domains are listed. Type the number of the domain whose traffic you want to encrypt. If this is your only website on the server, type 1 and press Enter.
- Type 2 to redirect HTTP requests to HTTPS (strongly recommended). Press Enter.
Certbot automatically reloads your Apache configuration, and your website traffic is now encrypted over HTTPS. Certbot also configures cron to automatically renew your certificate before it expires.
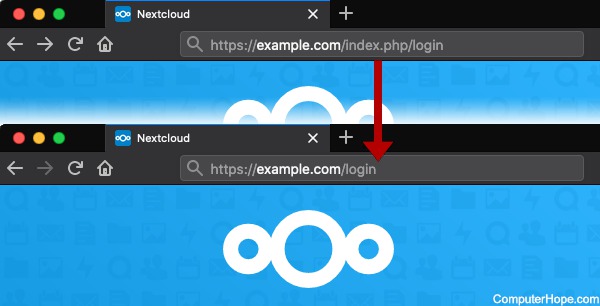
Enable "pretty" URLs
By default, your Nextcloud URLs include "index.php" as part of the web address. You can configure Nextcloud to hide this part of the URL, which makes them look nicer when sharing them, for example when creating links to share files.
Shortening the URLs is a cosmetic change only, and does not affect the functionality of Nextcloud.
To omit index.php from your Nextcloud URLS, edit the file /var/www/nextcloud/config/config.php.
sudo nano /var/www/nextcloud/config/config.php
Make the following two changes. First, locate the line containing:
'overwrite.cli.url' => 'http://localhost'
In this line, change http://localhost to https://yourdomain so it looks like this:
'overwrite.cli.url' => 'https://example.com',
Then, add a new line, containing this text:
'htaccess.RewriteBase' => '/',

Save the file and exit the editor. (In nano, press Ctrl+O, Enter, Ctrl+X.)
Finally, run this command to update your Nextcloud's .htaccess file with the new configuration.
sudo -u www-data php /var/www/nextcloud/occ maintenance:update:htaccess
The change takes effect immediately, without restarting any services. Old URLs with "index.php" still function normally, but new requests use the "prettier" URL format.