
How to connect and disconnect a computer external hard drive
Using an external hard drive is an excellent way to back up important files and transfer files from one computer to another. Today, nearly all external hard drives are lightweight and small in size, making them easy to carry with you wherever you go. Despite their size, they can store a large amount of data, including documents, spreadsheets, presentations, music, and videos.

Most external hard drives connect to a computer through a USB or eSATA connection, and many also draw power needed to run from the computer's USB port. To connect and disconnect an external hard drive, select a link below for instructions.
Connect an external hard drive
- If the external hard drive requires a power cord, connect it to the back of the hard drive. The end of the power cord that connects to the hard drive is usually a small round connector. Connect the other end of the power cord to a power outlet.
If no power cord is required, skip to the next step.
- Connect the USB cable to the hard drive if not already connected and the other end to a USB port on the computer.
- Plug the other end of the USB cable in a USB port on the computer.
- After connecting the external hard drive to the computer, it should be recognized automatically by your computer's operating system. Your computer should find and install any necessary drivers.
- In Windows, File Explorer may automatically open, displaying the contents of the external hard drive. If File Explorer does not automatically open, manually open File Explorer and locate the drive.
In macOS, Finder may automatically open, displaying the contents of the external hard drive. If Finder does not automatically open, manually open Finder and locate the drive.
Disconnect an external hard drive
To properly disconnect an external hard drive from a computer, select the operating system on your computer and follow the provided instructions.
Microsoft Windows
Using the notification area
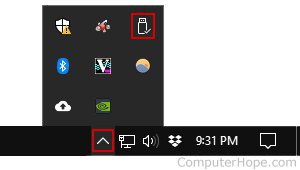
- In the Notification Area of the taskbar, click the up arrow to view the items in the systray. Then, right-click the Eject Media
 icon.
icon.
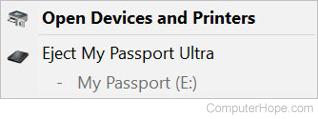
- A menu lists the removable media you can eject. Click the name of the external hard drive. In this example, the option to eject the external hard drive is named "Eject My Passport Ultra."
After clicking the eject option, wait for a message stating it is safe to remove the hardware before pulling the external hard drive out of the computer. If no message is displayed after five seconds, it is likely safe to disconnect the external hard drive.
Apple macOS
With Command key+E keyboard shortcut
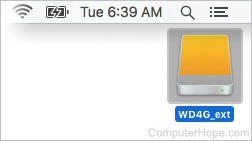
- Locate the external hard drive on the desktop. Click it once to select it.
- On the keyboard, press Command+E to eject the external hard drive.
In Finder
- Open Finder. On the left side of the Finder window, locate the external hard drive under Devices.
- Click the Eject icon (⏏) to the right of the external hard drive.

Drag to the Trash
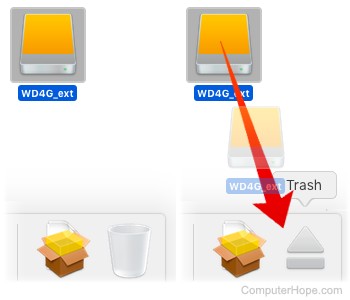
You can also eject your external hard drive if you drag-and-drop its icon from your macOS desktop to the Trash icon on the dock.
Dragging the drive icon from the desktop to your Trash does not delete any of its files.
- Select the external drive icon on your desktop.
- Drag the icon. When you start to drag, notice that the Trash icon changes to an Eject icon, as pictured below.
- Move the cursor over the Eject icon (⏏).
- Drop (release the mouse button).
When the external drive's icon disappears from your desktop, it is ejected and safe to disconnect.