
How to eject a USB flash drive from a computer

When finished using a USB flash drive or pen drive connected to your computer, don't pull it out of the USB port. Instead, eject it using the eject option provided by your OS (operating system).
The steps on this page can also be used to safely eject other devices connected to a computer via USB, including a mobile phone, tablet, or external hard drive.
When you eject a flash drive, you're telling the operating system that the drive is about to be disconnected. The operating system completes any read or write operations on the drive and unmounts it from the computer.
If you don't eject a USB flash drive before disconnecting it, data on the drive could become corrupt, because the operating system was using the drive when disconnected. For this reason, it's best to always eject your USB drive before physically disconnecting it from your USB port.
The Windows, macOS X, Linux, and ChromeOS operating systems, and MS-DOS or Windows command line, each provide a safe method to eject a flash drive.
Eject a USB drive in Windows
Using the notification area
- In the Notification Area of the taskbar, click the up arrow to view the items in the systray. Then, right-click the Eject Media
 icon.
icon.
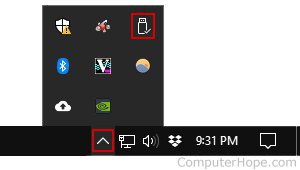
- A menu lists the removable media you can eject. Click the name of your USB flash drive. In this example, the option to eject the USB flash drive is named "Eject Cruzer Glide."
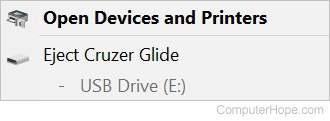
After clicking the eject option, wait for a message stating it is safe to remove the hardware before pulling the flash drive out of your computer.
Using File Explorer
- Open File Explorer by pressing Windows key+E.
- On the left, click This PC.
- On the right, right-click your USB flash drive and select Eject.
Eject a USB drive in macOS
With Command+E keyboard shortcut
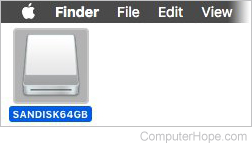
- Locate the USB flash drive on your desktop. Click it once to select it.
- On your keyboard, press Command+E to eject the flash drive.
In Finder
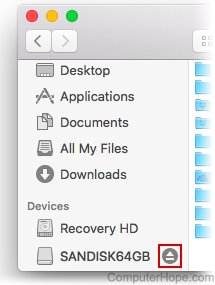
- Open the Finder utility. On the left, locate your USB flash drive under Devices.
- Click the eject icon (⏏) to the right of the flash drive.
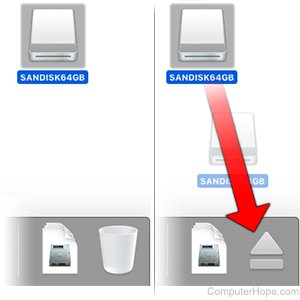
Using Trash
- Locate the USB flash drive on your desktop.
- Drag-and-drop the USB flash drive into the trash bin icon. When you start dragging a removable disk icon, such as your USB flash drive, the Trash turns to an eject (⏏) icon. When you drop the disk on the eject icon, the disk is ejected. No data is deleted using the Trash icon this way.
It is now safe to remove the USB flash drive from your computer.
Eject a USB drive in Linux
In a Linux operating system, you can eject a USB flash drive in your file manager, or in the command line shell.
File manager example: Nautilus
In this example, we eject a USB flash drive using Nautilus, the default file manager in Ubuntu. Nautilus is a lot like the Windows File Explorer. (Your file manager may be different if you're using another Linux OS.)
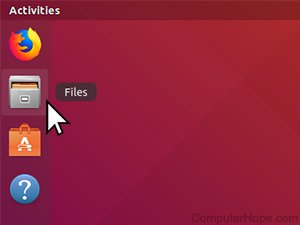
Open a new Nautilus window by clicking the shortcut on your dock. It looks like a file cabinet, labeled Files.
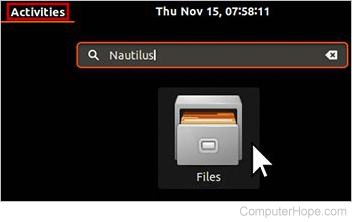
Or, click Activities (on the left side of your taskbar). In the search box, type Files or Nautilus. In the search results, click the Files icon.
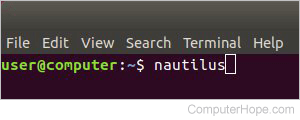
Or, open a terminal (Ctrl+Alt+T), type nautilus, and press Enter.
In the Nautilus file manager window, you see your USB flash drive listed on the left. Click the eject icon (⏏) next to the disk name.
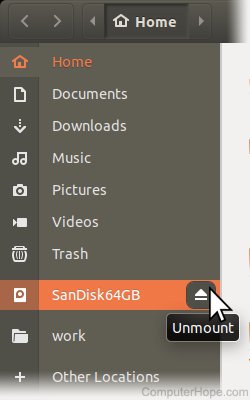
Your disk is removed from the list, and a notification informs you that it's safe to remove the USB flash drive.
Ejecting from the Linux shell
In every Linux operating system, the administrator can eject a mounted USB flash drive with the eject command, specifying the device name of the USB flash drive.
For example, if your USB flash drive is mounted as the device name /dev/sdc, and you're a sudoer (administrator rights), eject it with the following command.
sudo eject /dev/sdc
Here, the sudo command means "run the following command as administrator." When you press Enter, you are prompted for your password.
When the command runs, all pending I/O operations for the specified device are forced to complete immediately, as if you'd run the sync command. Then, the device is unmounted, as if you ran umount.
If the eject is successful, the command displays no output and the USB flash drive can be safely disconnect.
Determining your flash drive's device name
If you're unsure of the device name for your USB flash drive, list it with parted.
The device name of your USB flash drive is /dev/sdx, where x is a lowercase letter a–z.
List your mounted devices by running parted -l as root or with sudo:
sudo parted -l
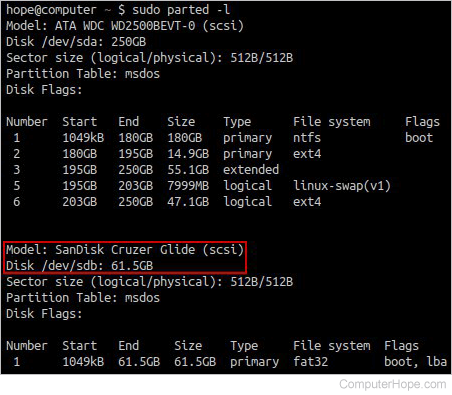
In this example, disk /dev/sdb is our USB flash drive, so the eject command would be:
sudo eject /dev/sdb
Eject a USB drive in ChromeOS
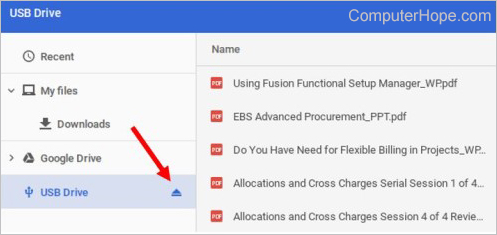
- Open the Files app on the ChromeOS device.
- In the left navigation pane, find the USB drive.
- Click the eject icon to the right of the USB drive. When the USB drive disappears from the Files app, it is safe to remove the USB drive from the ChromeOS device.
Eject a USB drive at DOS command prompt
- Access the DOS command prompt or Windows command line.
- At the prompt, type diskpart and press Enter.
- At the DiskPart prompt, type list volume and press Enter.
- Type select volume [volume #], replacing [volume #] with the volume number for the USB drive from the list of volumes displayed. For example, if the USB drive is volume 5, type select volume 5 and press Enter.
- To eject or release the USB drive, type remove all dismount and press Enter. The drive is unmounted and can be safely disconnected from the computer.
- Type exit and press Enter to end the DiskPart session.
After dismounting a USB drive with DiskPart, that drive is no longer visible or accessible in Windows or MS-DOS. The drive needs to be mounted again in DiskPart to see the drive and its contents. Follow the steps above, and in step 5, type assign mount="[drive letter]" instead of the dismount command. For example, type assign mount="E:" to set the USB drive as drive letter E: in File Explorer and MS-DOS.