
How to turn off or disable a laptop keyboard

Laptops are handy in that they come with all the necessary components for basic computer operation: a pointing device (touchpad), screen, and a keyboard. Some users, however, prefer to use external peripherals for various reasons. Consequently, they may want or need to disable the laptop keyboard.
There are different methods used to disable or turn off the keyboard in various operating systems, and specific limitations. The following sections show you the details of these processes for Windows, macOS, and ChromeOS.
These steps also work for desktop computers.
How to temporarily disable the keyboard in Windows
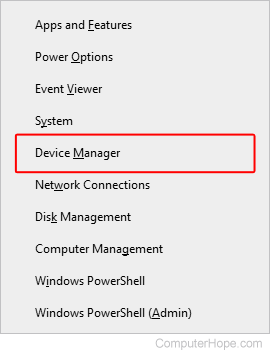
- Press the Windows key and X at the same time.
- Select Device Manager from the pop-up menu.
- In the list of hardware components, click the down arrow
 next to Keyboards to expand the section.

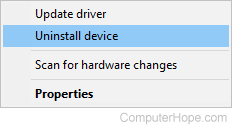
- Right-click the appropriate keyboard(s) and select Disable device or Uninstall device.
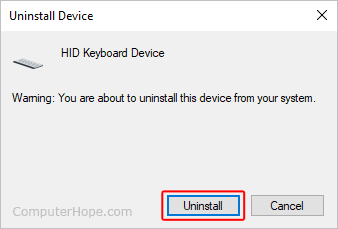
- If you're prompted to do so, confirm the uninstallation by clicking Uninstall.
Windows automatically reinstalls your keyboard(s) on startup. Using the method described above only disables the keyboard until you restart your computer.
How to disable the keyboard in macOS
With macOS, you cannot disable the MacBook keyboard without third-party software. We recommend downloading Karabiner Elements to do the job. Once you've downloaded and installed this program, follow the steps below.
Karabiner Elements only disables your Mac's laptop keyboard when a different one is connected. In other words, you must connect an external keyboard to disable the internal one.
- Connect an external keyboard to your MacBook.
- Open the Karabiner Elements program.
- Select Preferences.
- Click the Devices tab, then Advanced.
- Under the Disable the built-in keyboard while one of the following selected devices is connected section, check the box next to your external keyboard.
How to disable the on-screen keyboard on a Chromebook
If you're on a Chromebook, only the on-screen keyboard may be disabled, not the physical one. To do so, follow the steps below.
- Using the keyboard or a mouse, click the bottom-right corner of the Chromebook screen, where the time and battery icons are located.
- In the window that pops up, click the gear icon , usually located near the top-right or bottom-left corner, to access the Chromebook settings.
- In the Settings window, in the left navigation menu, click the arrow next to Advanced to expand that section, and then click the Accessibility option.
- Under Accessibility, click the toggle switch next to the Always show accessibility options in the system menu, so it's in the on
 position.
 - In the Chromebook system menu, click Accessibility and select Manage Accessibility Features.
- In the Keyboard section, click the toggle switch in the Enable on-screen keyboard section, so it's in the off
 position.