
How to adjust power, standby, hibernate, and sleep settings

Below are the steps computer users can follow to adjust the power, standby, hibernate, and sleep settings in all versions of Windows, macOS, and through the CMOS setup. Select the link below for your computer's operating system to learn how to adjust these settings.
Windows Vista, 7, 8, 10, and 11
Adjusting the sleep settings
Laptop users can also right-click the battery icon in the notification area and select Power and sleep settings to access the power settings.
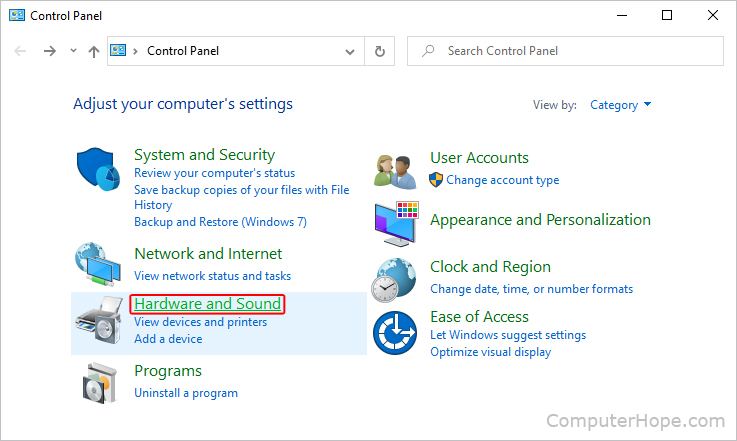
- Press the Windows key, type Control Panel, and press Enter.
- If you use the Category view, click the Hardware and Sound entry. If you use the Small icons or Large icons view, skip to the next step.
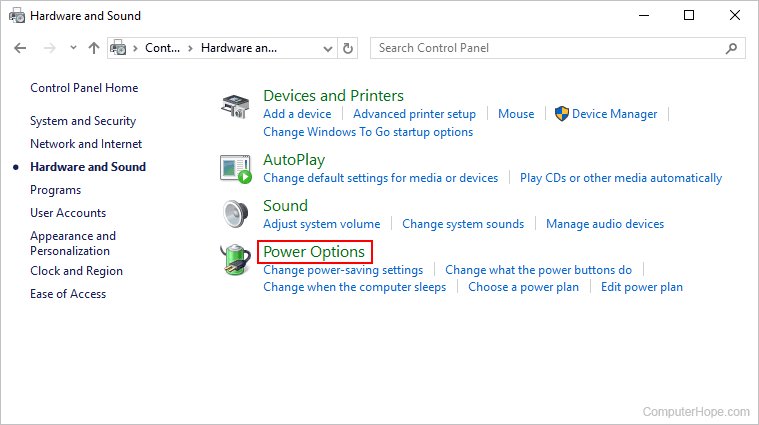
- Click Power options or Change power-savings settings.
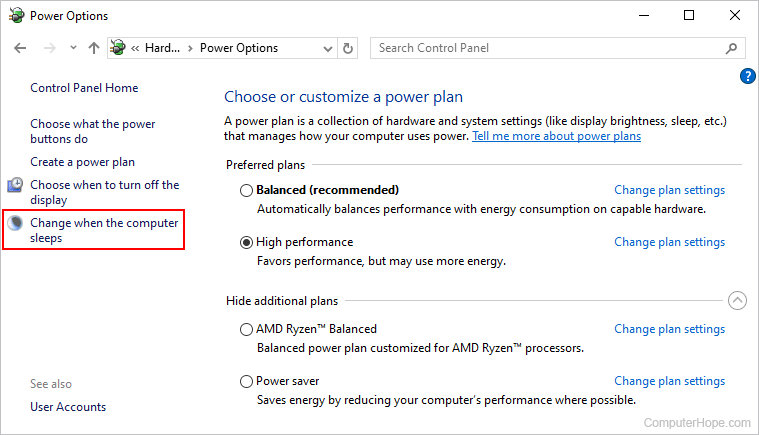
- Click the Change plan settings link next to the plan you want to modify.
- In the Power Options window, click Change when the computer sleeps in the left navigation pane.
- In the Edit Plan Settings window, adjust the display and sleep settings as desired. To prevent your computer from going to Standby mode or turning off the screen, select Never in each drop-down menu.
Laptop users can change their power settings for when the laptop uses battery and when it's plugged in, as shown below.
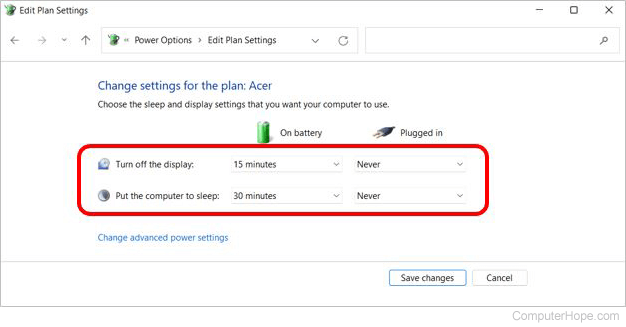
Because desktop users do not have a battery, only two settings are shown, as seen below.
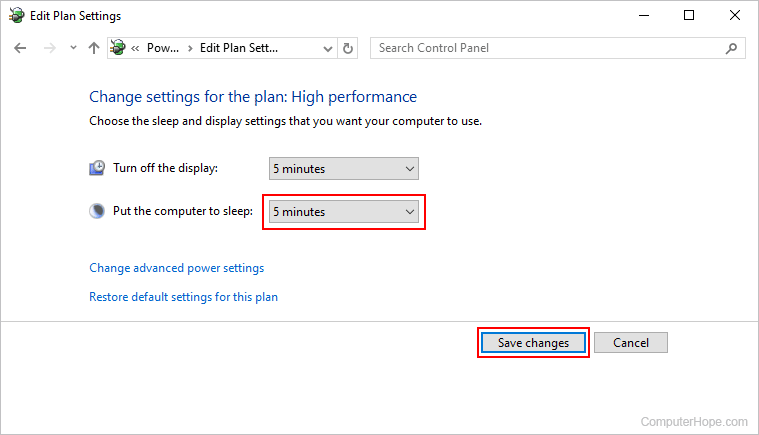
Use the upper box to change when your display (monitor) sleeps too.
- After making the desired changes, click the Save changes button and close the window.
To select additional hibernation settings, click the Change advanced power settings link below the two drop-down boxes in the Edit Plan Settings window.

Adjusting the hibernate settings
Newer Windows computers with InstantGo no longer have a hibernate option.
- Press the Windows key, type Control Panel, and press Enter.
- Click or double-click the Power Options icon.
- In the Power Options window, click the Change plan settings link for the power option currently selected.
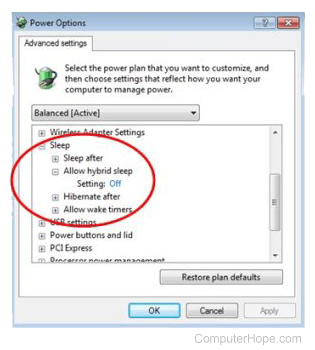
- In the Edit Plan Settings window, click the Change advanced power settings link.
- In the Power Options window, expand the Sleep section, then the Allow hybrid sleep option, adjust the setting, and click OK.
Windows 95, 98, Me, 2000, XP
Adjusting the standby settings
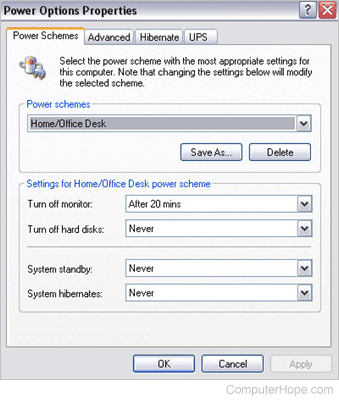
- Open the Control Panel.
- Double-click the Power, Power Management, or Power Options icon, depending on your version of Windows.
- On the Power Schemes tab, click the down arrow by System Standby and select Never. If you're running an earlier version of Windows, disable the option to turn off the hard drive and monitor by clicking the down arrow and selecting Never. Additionally, change the time before the screen is turned off or the computer goes to Standby mode by selecting a different time limit.
Adjusting the hibernate settings
Windows XP and Windows 2000 users
- Open the Control Panel.
- Double-click the Power icon.
- In the Power Options Properties window, click the Hibernate tab and check the Enable hibernation check box.
Windows 98 and earlier
Users with laptops running Microsoft Windows 3.x, Windows 95, Windows 98, or Windows NT utilize Phdisk or HDPREP to set their computer to hibernation mode.
macOS
How you adjust power, standby, and sleep settings in macOS depends on which variant you're running. To proceed, select the appropriate entry from the list below and follow the steps. If you're unsure which version is on your device, see: How to determine the version of macOS on a computer.
macOS Ventura and Sonoma
To adjust power, standby, and sleep settings in macOS versions 13 and 14, follow these steps.
- At the top-left corner of the desktop screen, click the Apple icon.
- Select System Settings from the Apple menu.

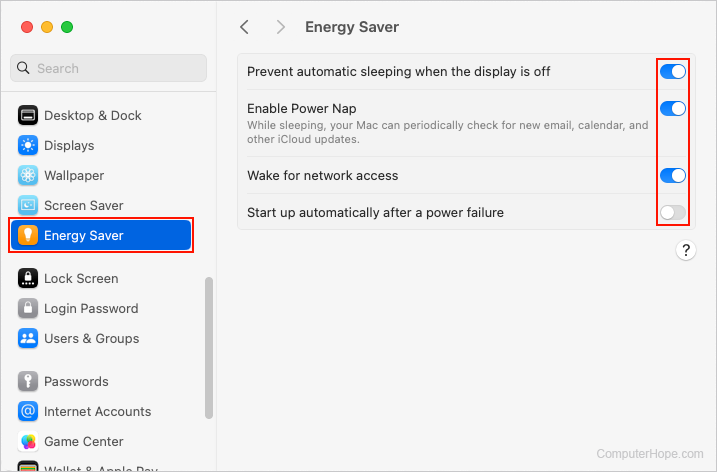
- In the sidebar, scroll down and click the Energy Saver selector.
- In the section to the right, use the toggle switches to adjust the power settings.
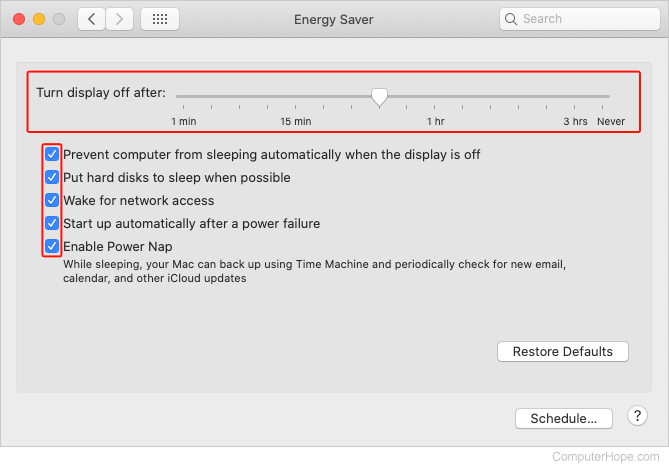
macOS High Sierra, Mojave, Catalina, Big Sur, and Monterey
Here is how to adjust power, standby, and sleep settings in macOS versions 10 through 12.
- In the Dock, click the System Preferences
 icon.
icon.

- In the System Preferences menu, near the bottom, click Energy Saver.

- In the next window, select how long until the monitor goes to sleep, and check or uncheck the five additional power settings as desired.
Through CMOS setup
Computers running Linux or other operating systems allow you to adjust or disable the power settings through CMOS setup. In CMOS (complementary metal-oxide semiconductor) setup, look for a power category for options to enable and disable power management.